Monday, February 28, 2011

Carrot Cake Pancakes w/ Cream Cheese Topping


I'll have to admit, I was a little nervous to try these pancakes because the pancakes I made previous to these were a savory veggie pancake and my kids would NOT touch them! I thought I would be doomed and banned from making pancakes after that. I actually made these pancakes the very next morning after that fiasco and I was trying to make the batter up quickly before my girls saw that I threw in the shredded carrots. I had this plan to tell them they were yummy sprinkles but my 2 year old came in and called me on it, she knew exactly what they were. Much to my surprise though, she wasn't put off by them and asked for a bite. In the end, both girls ate up their pancake and we all liked them.

Although these are carrot CAKE pancakes, don't let the name fool you. They are actually pretty healthy with whole wheat flour and flax meal, as well as little added oil and sugar. The cream cheese topping is quite a treat, but, again, not too sweet. If you like carrot cake, you'll enjoy this healthy version as a pancake.


Carrot Cake Pancakes w/ Cream Cheese Topping
1 cup all purpose flour
1/2 cup whole wheat flour
1/4 cup ground flax seeds
2 tsp. baking powder
1 1/2 tsp. cinnamon
1/4 tsp. nutmeg
dash ginger
2 Tbsp. brown sugar
1 cup milk
1 Tbsp. canola oil
1 egg
2 cups finely grated carrot

Clean, peel and grate carrots. Mix flour, flax, baking powder, nutmeg, ginger and brown sugar in a large bowl. In a separate bowl, combine egg, milk and oil. Add liquid mixture to the dry ingredients and mix until just incorporated. Fold in carrots. Let batter sit while griddle heats up.

Using a 1/4 measuring cup, scoop batter onto preheated griddle. Cook over medium heat, flipping when the pancake bubbles and the edges become slightly dry. Continue cooking until batter is gone. Serve warm with cinnamon cream cheese topping.

Cinnamon Cream Cheese Topping
4 oz. cream cheese, softened
2 Tbsp. powdered sugar
2-3 Tbsp. milk
1 tsp. cinnamon

Beat cream cheese until smooth, then add powdered sugar, milk and cinnamon. Beat again, until well incorporated.

SOURCE: Adapted from Baking Serendipity

Here are a few more of my favorite pancakes:
Oatmeal Raspberry Pancakes w/ Berry Coulis


Banana Pancakes w/ Peanut Butter and Maple Syrup


Gingerbread Pancakes

Sunday, February 27, 2011

S'mores Pancakes and National Pancake Day

 Did you know that Tuesday, March 1st is National Pancake Day? That may not mean much to you, but to a pancake lover like me, that thrills me! Any excuse to make pancakes and I'll take it. I love celebrating food holidays. It gives me something to look forward to and also something fun to do with my kids.

Over the next couple of days I'll be sharing some new pancake recipes that I've made as well as sharing links to ones I've made previously. My first installment are these scrumptius S'mores Pancakes. Enjoy!

About right now, I'm longing for summer. And summer reminds me of camping and camping reminds me of s'mores. Every time I go camping and there's a campfire, I just have to have a s'more. Even if I'm stuffed from delicious Dutch Oven cooking, I still have to have a s'more. It's like a ritual. I've branched out here and there and made dump cakes in a Dutch Oven, but I just long for that s'more. There's something about that perfectly cooked marshmallow, sandwiched in between melty chocolate and graham cracker. Mmm, hits the spot every time.

Well, as you know I also love pancakes. These pancakes combine two of my favorite things. What better food to eat than that? These pancakes really were amazing! Although they are a little sweeter, studded with chocolate chips and drizzled with marshmallow syrup, than I usually make for breakfast, it was a special occasion so I felt like I could indulge a little bit.

If you are a pancake lover like me, or even a s'more lover, you will love this new take on pancakes.

S'mores Pancakes

For the pancakes:

1 cup whole wheat flour
1 cup graham cracker crumbs (about 1 sleeve of crackers, crushed)
1/4 cup brown sugar
2 teaspoon baking powder
1 teaspoon baking soda
1/2 teaspoon salt
2 cups milk (I used almond)
2 eggs
2 tablespoon oil
½ cup mini chocolate chips

For the marshmallow syrup:

1 cup Marshmallow Fluff
2-4 Tbsp.  hot water

Whisk together the flour, graham cracker crumbs, brown sugar, baking powder, baking soda and salt in a mixing bowl. In a separate bowl combine the milk, eggs, and oil and mix well. Add the wet ingredients to the dry ingredients and mix until just combined. Stir in the chocolate chips. Let batter sit while griddle heats up.

Spray griddle as needed. Pour batter by 1/4 cup on to the griddle and cook until bubbles start popping. Flip and cook another minute or two longer. Remove to a plate and continue with remaining batter.

For the Marshmallow syrup
: Mix the marshmallow fluff and hot water in a bowl. Whisk well to combine, until it becomes smooth in texture.

Serve pancakes warm, with marshmallow syrup and more chocolate chips, if desired. If you have a kitchen torch, even better...toast those babies up!!  If not, no biggie.  You could try it under the broiler or just eat as it, still delish!


SOURCE:
Inspired by The Mixing Bowl Diary

Here are some more of my favorite pancake recipes:

Oatmeal Cookie Pancakes


Whole Wheat Apple Cinnamon Pancakes


Lemon Poppyseed Pancakes


Pumpkin Pancakes with Pumpkin Maple Syrup


Linked to...
Potluck Sunday
@ Mommy's Kitchen
Seasonal Sunday
@ Real Sustenance
Recipe Swap Thursday
@ Prairie Story
It's A Keeper Thursday
@ It's A Keeper
Sweet Tooth Friday
@ Alli-N-Son
Sweets For A Saturday
@ Sweet As Sugar Cookies

Thursday, February 24, 2011

Decadent Brownie Pie


This decadent dessert was actually part of our Valentine's Day celebrations, which we had about 5 days late because I was sick. When I was thinking what kind of dessert I wanted to make, I remembered back a couple of years ago when my husband bought me this flourless chocolate cake for my birthday. It cost a whopping $40 but it was every bit worth it. It was so delicious. I wanted to try something similar this year but couldn't find a recipe for a flourless chocolate cake I was happy with. I decided to look through all my desserts that I have bookmarked and came across this recipe for a brownie pie. Hello! I totally love brownies, and ganache, well that stuff just leaves me speechless. The recipe was so simple, I was worried it would deliver that intense, dense chocolaty goodness I was hoping for. Thankfully I was wrong.

This brownie pie practically melts in your mouth. If you want to eat it straight up, with out any toppings, I would suggest letting it sit out at room temperature first; and then, maybe even nuke it for 4-5 seconds. If you want to top it, I would HIGHLY suggest something raspberry, be it preserves, sauce, fresh or frozen. The dark chocolate is a perfect match with the raspberry. Other toppings you could try are caramel, ice cream, mints, peanut butter chips, you get my drift.

Decadent Brownie Pie

For the brownie layer:
2/3 cup butter, melted
1 1/4 cups sugar
1/2 cup light corn syrup
2 eggs
1 1/4 cups all-purpose flour
1/2 cup cocoa
1/2 teaspoon salt
3 tablespoons milk

For the ganache:
1 cup heavy whipping cream
12 ounces semisweet chocolate, chopped

In a large bowl, add melted butter, sugar and corn syrup. Whisk to combine. Add eggs, one at a time, beating well after each addition. Combine the flour, cocoa and salt in a separate bowl; gradually add to the butter mixture alternately with milk, beating well after each addition. Spread batter into a greased 10-inch springform pan. Bake at 325° for 35-40 minutes or until a toothpick inserted 1 inch from side of pan comes out clean. Cool on a wire rack.

For the ganache: In a small saucepan, bring cream to a boil. Remove from the heat and pour in chocolate; let sit for 3-4 minutes, then stir until smooth. Set aside about 10 minutes until slightly cool. Pour ganache over brownie layer and refrigerate until ganache is completely set.

Take out of the fridge about 30 minutes before serving and let it sit at room temperature. Garnish as desired.

SOURCE:Let's Dish

Linked to...
Recipe Swap Thursday @ Prairie Story
It's A Keeper Thursday @ It's A Keeper
Sweets For A Saturday @ Sweet As Sugar Cookies
Potluck Sunday @ Mommy's Kitchen

Sunday, February 20, 2011

Lemon Ricotta Pancakes


Let me just tell you that these pancakes were a dream!! They were gone all too quickly, if you ask me. I make a lot of pancakes, so I don't mind the few mintues it takes to whip them up a couple of times a week. If that is a stretch for you though, you may want to reserve these for a special occasion, because they require a little more effort and time than your average pancake. But, don't give up because they are totally worth it.

Lemon and ricotta are perfect in these pancakes. The ricotta makes them super tender and moist and the lemon flavor is present but not too much. It makes a perfect pair with some raspberry preserves, in fact it was pretty much heaven. My girls snarfed down THREE pancakes each, and that is unheard of. I have never seen them eat that many pancakes in one sitting.

Make these today for breakfast, lunch or dinner. If you don't have some ricotta on hand, just strain some yogurt really well over some cheesecloth (about 15-20 minutes) and it works perfectly.

Lemon Ricotta Pancakes
1 cup ricotta cheese
1 cup milk (I used almond, but whatever is fine)
3 large eggs, separated
Zest and juice of 1 lemon
1 1/2 cups cake flour*
1 tbsp. baking powder
1/4 tsp. salt
1/4 cup sugar

Raspberry preserves, warmed

*You can substitute 3/4 cup plus 2 tablespons all-purpose flour plus 2 tablespoons of cornstarch per 1 cup of cake flour.

Combine the ricotta, milk, egg yolks, lemon zest and lemon juice in a large mixing bowl. Whisk to combine. Add in the cake flour, baking powder and salt and mix just until incorporated. In another clean, dry mixing bowl, beat the egg whites on medium-low speed until foamy. Increase the mixer speed to medium-high and continue to beat, adding the sugar gradually, until medium-soft peaks form.

Fold one third of the egg white mixture into the ricotta mixture with a spatula until completely incorporated. Add in the remaining egg whites and fold in gently until the mixture is smooth and light.

Heat a griddle or skillet over medium heat. Grease as needed. Ladle a 1/4 cup of batter onto the cooking surface for each pancake. Allow to cook until bubbles begin to form on the top surface. Use a large spatula to carefully flip the pancake and cook the other side until light golden and cooked through. Repeat with the remaining batter. Serve warm with raspberry preserves.

SOURCE:Annie's Eats

Friday, February 18, 2011

Mango Madness Green Smoothie


I've been trying out some new combinations in my green smoothies lately. I want to create a handful of really good smoothie recipes I can make any time that I know are delicious, instead of leaving it to chance every time, wondering if this fruit is going to taste good with that, etc. I don't want EVERY green smoothie I drink to be an experiment.

I was really surprised how tasty and refreshing this smoothie was. I think it has something to do with two unsuspecting characters, fresh ginger and lime. They go great with mango. I guess it's kind of tropical if you think about it, especially if you use coconut milk. I love the taste of ginger but it is also a natural remedy for many things, like nausea and morning sickness. I recently found that it is also good for respiratory conditions because it helps loosen and thin mucus that forms when you get sick.

So, whether you're sick or not, you'll love the tropical blast you get from this refreshing smoothie.

Mango Madness Smoothie
1/2 cup coconut milk*
1 cup water/ice
2 big handfuls of spinach
2 cups mango, sliced (frozen or fresh)
1 Tbsp. lime juice
1 tsp. freshly grated ginger (I added 1 Tbsp. when I was sick)

Pour milk and water into the blender and add spinach. Whiz for 10-20 seconds to blend the spinach fine. Add the rest of the ingredients and whiz for about 30-60 seconds, until smooth. Pour into drinking glass and enjoy!

Makes about 3 cups.


*I used coconut milk from a carton, like you find next to the regular milk. You could probably use lite coconut milk from a can, almond or rice milk or even yogurt. If you are sick I would avoid using diary milk as it tends to create more mucus.

Thursday, February 17, 2011

FEATURED!!

Guess what, I'm being featured!!! Well, actually my Bananas Foster bread is being featured today over at It's A Keeper.


If you have a minute head on over to It's A Keeper and check out the It's A Keeper Thursday blog hop party to see all the lovely crafts and food everyone is linking up.
It's a Keeper.

Tuesday, February 15, 2011

Sweet Italian Sausage and Spaghetti Bolognese


Years ago I began making my spaghetti sauce with ground beef because, like most daughters, that's what my mother did and my cooking roots came from her. It wasn't until I got married that I explored other things in making my spaghetti sauce. For example, I threw in mushrooms and zucchini lots of times and per my husband's request started using Italian sausage. I found out that I really loved sausage in my spaghetti sauce and that I much preferred it over ground beef. One thing that I didn't like about sausage though, was that if you're not careful about what kind you buy, you can get some pretty gristly stuff that's not too appetizing. Finally, I got to the point where I didn't even want to buy pre-packaged sausage and started searching for a recipe that I could easily make at home with the knowledge of every single ingredient that went into it.

In my search, I found this breakfast sausage blend that we really love and enjoy but I didn't think the flavor combination was quite right for a big bowl of Italian-style spaghetti. Then I came across this Italian blend and as soon as I saw the list of ingredients, I knew I was going to love it! And love it we did. My girls, however, didn't like the big fennel seeds in it so next time, I might try grinding them a little bit before I add them. This is a very flavorful sausage, so whatever you pair it with, I would make sure it is very lightly seasoned.

Sweet Italian Sausage
5 lbs ground meat (chicken, beef or pork or a combination)
40 grams kosher salt
35 grams sugar
20 grams toasted fennel seeds
6 grams cracked black pepper
4 grams ground nutmeg
1 cup minced fresh parsley
1 head garlic, peeled and chopped
1 cup dry sherry (I used sherry cooking wine)

Mix all the spices together then add it to your meat. Using the paddle attachment to a stand mixer (or a stout wooden spoon, or your VERY clean hands), mix the sausage well. Add the sherry to the meat mixture. With a stand mixer set on level 1, let this go for 90 seconds. It might take a little longer with the spoon or hands. You want the mixture to get a little sticky and begin to bind to itself – it is a lot like what happens when you knead bread.

Now you have sausage. I like to portion mine out in to 1 lb. sections and freeze it. You could make 1 lb. blocks, links, patties, meatballs or whatever shape you want!

For the Bolognese sauce:
olive oil
1 small onion, finely diced
1 quart crushed tomatoes (you could also use tomato sauce)
1 lb. Sweet Italian Sausage

Drizzle olive oil into a large saucepan and add onion and sausage. Fry on medium-high heat until sausage is no longer pink. Add crushed tomatoes and bring to a boil. Reduce heat and simmer for 20-25 minutes. Serve hot over cooked spaghetti and shave fresh parmesan over the top.

SOURCE:Sausage recipe Adapted from Simply Recipes

Sunday, February 13, 2011

Butternut Squash Gratin


I got a surprising thumbs up from my husband for this dish! While I really enjoy butternut squash, I have a hard time making it any way that my family would like it. I almost never make gratins because of all the dairy but I thought I would try coconut milk in place of the typical cream. Although the coconut milk imparted a slight sweetness to the dish, it paired really well with the butternut squash and the saltiness of the Gruyère balanced out the flavors. I really liked using Gruyère because it melts really nicely and since it's an aged cheese doesn't have any lactose.

Butternut Squash Gratin
1 small (about 1.5 pounds) butternut squash, peeled, seeded and cut into 1/3-inch-thick slices
1 shallot, finely chopped
1 cup shredded Gruyère cheese (about 3.5 ounces)
1 cup canned coconut milk (or heavy cream)
1/2 teaspoon fine sea salt
1/2 teaspoon freshly ground black pepper
1/4 cup whole wheat bread crumbs

To make the bread crumbs, toast well one slice of whole wheat bread, then either cut into very small pieces or crumble between your fingers into a small bowl.

Preheat oven to 375°F. Butter a 2 quart casserole dish and arrange half of the squash slices in the bottom. Sprinkle with shallots and half of the cheese. Cover with remaining squash and sprinkle with remaining cheese. In a small bowl, whisk together coconut milk (or cream), salt and pepper; pour mixture over squash. Sprinkle with bread crumbs and bake until browned on top and bubbling, about 45 minutes. Cool 15 minutes before serving.

Serves 5-6

SOURCE: Whole Foods Market

Linked to...
Seasonal Sunday @ Real Sustenance
Recipe Swap Thursday @ Prairie Story

Saturday, February 12, 2011

SLK Facebook Fans

Apparently there has been a problem with facebook that everyone cannot see the feed from the Sweet Luvin' In The Kichen page. Here is a link that explains it. Hope it is helpful to you all.

Facebook Settings

Wednesday, February 9, 2011

Bananas Foster Bread

If I were to tell you I've been under the weather a little bit, to try to explain my lack of posting the past week, that would be a great understatement! To be honest, I haven't felt this terrible in a very long time! I know in the long run, a week or two of being sick isn't too long, but while I'm here deep in the trenches of it all, it seems like never ending darkness. I've been trying to keep it low key around here so I can recover quicker but I'm a doer and a busy body and there's only so much time I can sit and do nothing.

That said, I told myself I would get this post up today. Period. I actually tried writing it the other day but my brain was too foggy and I couldn't think straight.


Now, let's get on with this bread. If you like banana bread, I think you're going to be blown away with this one. I totally love banana bread and used to make it often. Now that I use bananas in my smoothies I hardly ever have brown bananas on my counter to "take care of." However, a little while back I bookmarked some new and interesting banana bread recipes that I wanted to try, and I actually bought brown bananas at the store just to make bread. Twice. Last week I made banana bread three times, all different recipes, and this was my favorite.

I jokingly called this bread boozy banana bread because of the rum (extract in my case) that it calls for. But I love the rum flavor and think it goes great with the roasted banana flavor. With the sweet glaze you may not want to eat it for breakfast, but definitely save room for dessert!

Bananas Foster Bread
1 1/2 cups mashed ripe banana
1 cup packed brown sugar, divided
6 Tbsp. butter, divided
1-2 Tbsp. rum extract (If you wish, the original recipe called for 3 Tbsp. dark rum or cognac. In that case, omit the milk.)
1/3 cup plain yogurt
1/4 cup milk (cow's milk, almond, coconut)
1 large egg
1 1/2 cups whole wheat flour
3/4 tsp. baking soda
1/2 tsp. salt
1/2 tsp. cinnamon
1/8 tsp. allspice
Cooking Spray
1/3 cup powdered sugar
1 tsp. rum extract (cognac or rum)

Preheat oven to 350 degrees F.

Combine banana, 1/2 cup brown sugar, 5 tablespoons butter and rum extract in a nonstick skillet. Cook over medium heat until mixture begins to bubble. Remove from heat; cool slightly. Place banana mixture in a large bowl. Add yogurt, milk, remaining 1/2 cup brown sugar and egg. Beat with a mixer, or whisk, until well incorporated.

Combine flour and next 4 ingredients in a small bowl. Add flour mixture to banana mixture; beat just until blended. Pour batter into a 9x5-inch loaf pan coated with cooking spray. Bake at 350 degrees F for 50-60 minutes or until a wooden toothpick inserted comes out clean. Remove from oven and cool 10 minutes in the pan. Remove bread from pan and cool on a wire rack.

For the glaze, melt remaining tablespoon of butter and combine it with the powdered sugar and 1 tsp. of rum extract. Add milk, if necessary to thin out. Drizzle over warm bread.

SOURCE:Adapted from Cooking Light

Linked to...
Recipe Swap Thursday @ Prairie Story
It's A Keeper Thursday @ It's A Keeper
Sweets For A Saturday @ Sweet As Sugar Cookies

Thursday, February 3, 2011

February 2011 Menu

Happy February everyone, it's the month of LOVE! Well, first things first. As you may have noticed to the right, I have created a Sweet Luvin' In The Kitchen Facebook page. If you're not a fan yet, make sure you are one when you leave and spread the love to others. I'll have to admit, it took me longer than I would have liked to create and it still may need to do some tweaking. So, if you know of any tricks or have suggestions to help a girl out, PLEASE, send them my way.

Now, on to the menu for this month. I've been dragging my feet the past couple of days to get it done because I have had sick kids! If any of you have kids you know how rough it can be, especially trying to get a good night's sleep. Well, I finally sat down this afternoon and wrote it out while my girls were watching a movie. The menu is going to be a little shorter this month because I'm a few days late and it's a shorter month. Also, as I've mentioned previously on a few posts, I get a CSA produce basket about every other week and I like to leave room on my menu to allow me to fit in what produce I get.

My husband and I don't have any Valentine's Day dinner plans yet so I don't have anything special on the menu, but I'm sure when the time comes it will involve either steak or shrimp if he has anything to do with it. I am, however going to make a few treats with my girls and for our preschool co-op group.

Breakfast
Peppery Bacon Cheddar Scones
Carrot Cake Pancakes
Cinnamon Roll Pancakes
Breakfast Cookies

Dinner
Thai Meatballs w/ Ginger Sauce, Coconut Rice and steamed Brussels Sprouts
Chinese Chicken Salad
Butternut Squash Gnocchi and roasted asparagus

Ham Fried Rice & veggies
Fettuccine with Cashew Cream & peas, Orange Edamame Salad
Beans & cornbread

Tortilla Soup
Cold Sesame Noodles
Chipotle Beef Taquitos, Spanish Rice, salad
Pasta with Kale Pesto, Butternut Squash Gratin with Gruyere

Spicy Thai Shrimp Soup
Spaghetti Bolognese, garlic bread sticks & Salad
Grandma's Chili w/ fresh pico de gallo and guacamole
Pistachio Chicken w/ Coconut Rice

Other things I'll be making
Roasted Garlic Hummus and Whole Wheat Pita Chips
Chewy Pretzel Bites
Homemade Italian Sausage
Peanut Butter & Jelly Bars
Peanut Butter Pretzel Truffles
Flourless Chocolate Cake

Wednesday, February 2, 2011

Raspberry Almond Cookie Bars


Before we bought our place we live in now, we rented this little farm house where we were completely spoiled. We had free reign over a nicely established raspberry patch in the back. It was huge. During raspberry picking season it would take me about an hour and a half to pick the whole patch, and that was picking about every 2-3 days. I was in heaven because I am a huge lover of raspberries.

I also love to make treats, especially on Sundays and, with my girls when possible. On Sundays we don't do much else other than go to church and maybe an occasional family dinner, so I like to do something special with my girls. My oldest said she would make cookies with me the other Sunday and when I asked her what kind she wanted to make, she said raspberry. I was at a little of a loss because I wasn't exactly sure how I was going to make them. I've seen raspberry flavored icings on cookies, raspberry chips and even raspberry jam, but I wanted that pure, unadulterated raspberry flavor that comes from using real berries.

Well, I altered a simple bar cookie recipe and this is what I came up with. They were amazing! I was kicking myself for only making a very small batch because they didn't last more than 4 or 5 hours. My husband said he liked them as much as I like brownies. Now that's saying something.

Raspberry Almond Cookie Bars
1/2 cup flour
1/2 cup oats
1 teaspoon baking powder
1/4 teaspoon salt
1/2 cup almonds (slivered, sliced or roughly chopped)
1/2 cup (1 stick) unsalted butter
1 cup packed brown sugar
1 egg
1 teaspoon almond extract
1/2 cup fresh raspberries (if using frozen, thaw and let drain)

Preheat oven to 350 degrees. Spray an 8-inch square baking pan with cooking spray, line with parchment paper. then spray again.

Combine flour, oats, baking powder, salt and almonds in a medium bowl. Cream together butter and sugar until light and fluffy; 2-3 minutes. Add egg and almond extract and mix to incorporate. Mix in the flour mixture until just incorporated.

Spread about 2/3 of the dough into the prepared baking pan. The dough is pretty sticky, you could use a spatula to help you spread it out or even just drop it by the spoonful very close together. When it cooks, it will all come together anyway.

Gently lay raspberries evenly over the first cookie layer, then drop the rest of the dough by spoon fulls over the raspberry layer.

Bake for 25-30 minutes. Let cool for about 10 minutes in pan, then gently pull them out with the parchemnt paper and let them completely cool on a rack.

Linked to...
Recipe Swap Thursday @ Prairie Story
Sweets For A Saturday @ Sweet As Sugar Cookies
It's A Keeper Thursday @ It's A Keeper

Monday, January 31, 2011

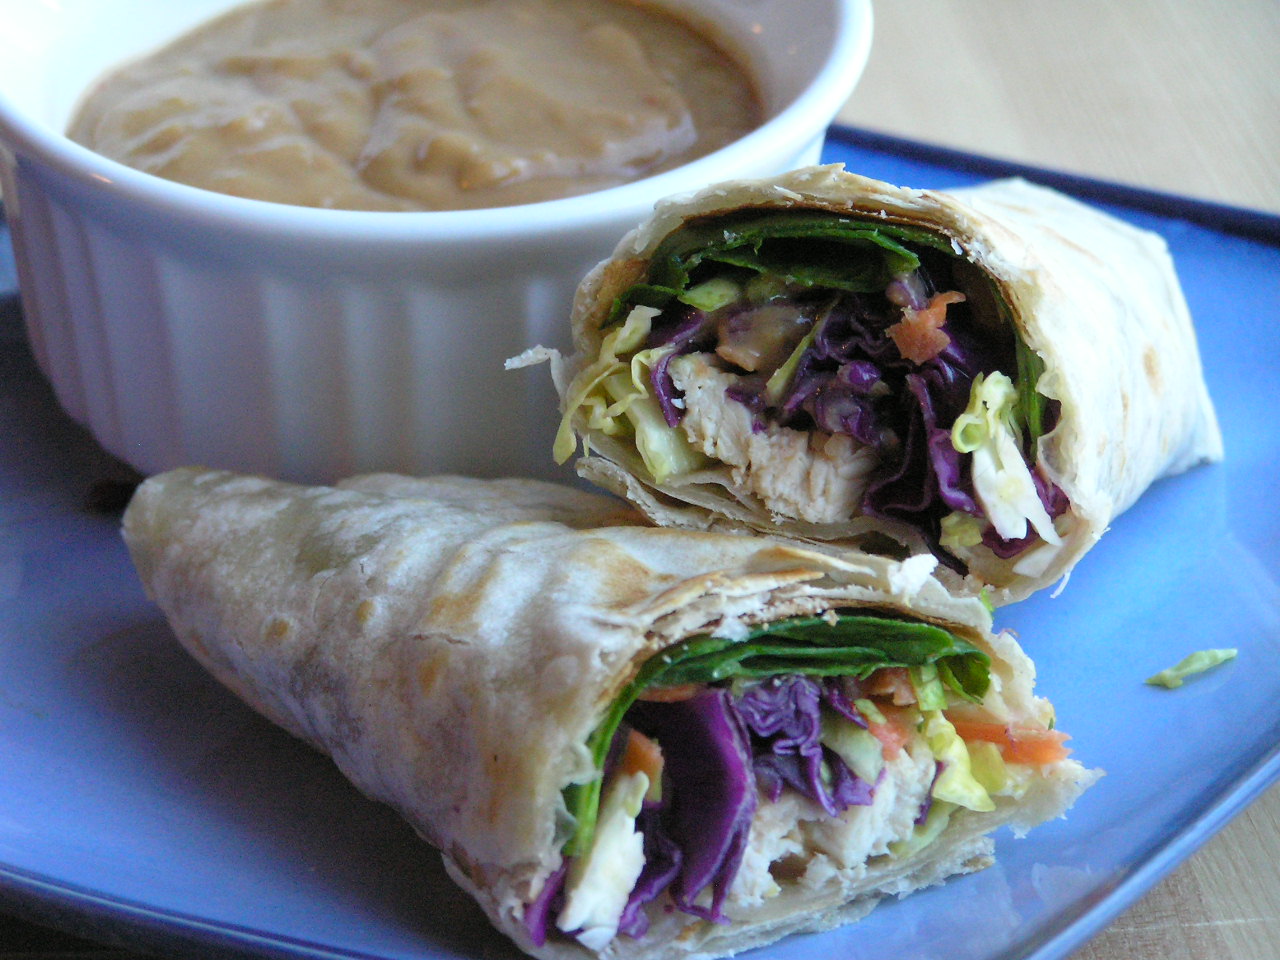
Asian Wraps with Creamy Peanut Sauce


This is another delicious recipe I snagged from the Smart Cooking the Costco Way Cookbook. It's easily the tastiest dinner dish I've made in a long time. We've eaten it twice recently, so that should say something, especially considering the long list of things I always have waiting to try.

I like Asian slaws to begin with, but I think the thing that really made this meal was the creamy peanuty dipping sauce. I absolutely loved it and I secretly stuck my finger in the bowl a time or two just to lick it off! You just can't have this meal without it. Another thing I liked about this meal was that I could easily make it meatless with very little effort. The second time I made them, I ate mine with avocado slices in place of the chicken and it was every bit as delicious. This just might be your next favorite too, so go on and give it a try.

For the filling:
1 lb. grilled chicken, cut into strips (or sliced avocado for a meatless wrap)
2 cups shredded green cabbage (green, Nappa, Brussels sprouts, etc.)
2 cups packed baby spinach
1/2 cup grated carrot
3 medium radishes, thinly sliced
2 Tbsp. rice vinegar
1 Tbsp. soy sauce
1 Tbsp. canola oil
6 10-inch flour tortillas

For the sauce:
2 Tbsp. canola oil
1/2 small onion, finely chopped
2 garlic cloves, minced
1 Tbsp. fresh ginger, peeled and minced
3/4 cup smooth peanut butter
1 cup unsweetened coconut milk
2 Tbsp. soy sauce
2-3 tsp. hot chili sauce


Mix cabbage, spinach, carrots and radishes in a medium bowl. In a small bowl, stir together rice vinegar, soy sauce and oil. Pour over the cabbage mixture and let stand for 5 minutes.

To prepare the peanut sauce, heat oil in a small saucepan over medium heat. Add onion and cook until tender; about 3-4 minutes. Add garlic and ginger and cook another minute. Set aside. In another bowl, combine peanut butter, coconut milk, soy sauce and hot chili sauce. Add the onion mixture and stir to combine. Thin with water, if necessary.

To assemble the wrap, lay the tortillas on a flat surface. Divide the cabbage mixture evenly over the wraps. Top with chicken. Drizzle peanut sauce over the chicken, then fold in the edges, wrap and serve.

**For a meatless version, swap the chicken out for strips of avocado.

SOURCE: Adapted form Smart Cooking The Costco Way

Linked to...
Recipe Swap Thursday @ Prairie Story
Seasonal Sunday @ Real Sustenance

Thursday, January 27, 2011

Coconut Brownies with Creamy Coconut Frosting


I really like brownies, in fact, I used to joke all the time that they were my favorite food group. Years ago, when brownies were one of the few desserts I used to make, I would experiment a lot. I'd throw in chocolate chips, add chocolate frosting, add some orange extract, you get the picture.

I have always liked coconut too, but it wasn't until last year that I started eating it with any frequency. I found this fabulous Thai Coconut Rice and Bean Curry, which both use coconut milk. I also throw shredded coconut in all of my homemade granola that I make usually once or twice a month. Amazingly enough, I've learned recently how good coconut is for you. You can read more about it here if you want.

Coconut and chocolate are an amazing combination, which I absolutely love. I did a little experimenting with this recipe and I really liked the outcome. I did use a box mix, please don't judge, I've had a hard time finding one from scratch that I love enough to give up the box. I used coconut milk to replace most of the oil in the batter and used coconut oil (which is solid at room temp) in place of butter in the frosting. The end result was a moist brownie, although not as dense, with a frosting that was different and delicious and I'd say out-of-this-world, but that's me, and I like coconut.


Coconut Brownies with Creamy Coconut Frosting
For the brownies:
1 box brownie mix
1/2 cup coconut milk
1/4 cup oil
2 eggs

For the frosting:
1/2 cup coconut oil (room temp, not melted)
3-4 cups powdered sugar
1 tsp. vanilla
2-3 Tbsp. coconut milk
1/4 cup shredded coconut
toasted coconut for garnish

Preheat oven to 350 degrees F. Mix all brownie ingredients together and pour batter into a greased 8 or 9-inch baking pan (I used a brownie pan). Bake 30-35 minutes, or until just barely done. (Sometimes I slightly under bake my brownies because I like them really chewy and soft.) Cool completely.

To make frosting, cream coconut oil (you can substitute butter) until creamy. Add powdered sugar and vanilla and 2 Tbsp. of coconut milk. Add more milk/sugar to desired consistency. Add shredded coconut last. Spread on cooled brownies.

To toast shredded coconut, put them in a frying pan on medium heat and toss them gently until they start to brown. Sprinkle over frosted brownies.


Linked to...
Recipe Swap Thursday @ Prairie Story
Sweets For A Saturday @ Sweet As Sugar Cookies
Feed Me, Tweet Me, Follow Me Home @ 21st Century Housewife's Kitchen
Potluck Sunday @ Mommy's Kitchen

Tuesday, January 25, 2011

Portabello and Black Bean Enchiladas with Roasted Poblano Sauce


I am increasingly enjoying many more meatless dishes and, to my surprise, I'm finding it pretty easy to find meatless main dishes that are really flavorful. When I saw these I couldn't wait to make them. Black beans are almost always my bean of choice and I love the flavor of roasted red peppers. Pair that with some mushrooms and this makes a tasty and "meaty" filling for these enchiladas. My husband wasn't so thrilled about the dish when I told him there wasn't any "meat" meat in it, so I put it off for about a week or so. However, he was pleasantly surprised when he actually tasted them and gave me the thumbs up.

I love the smokey, spicy flavor of roasted poblanos. It made really nice sauce to accompany the enchiladas. One tip though, the less time it's roasted, the more heat it will retain, so if you don't like too much heat, cook it a little longer, or use less of it. You could always add more tomatoes or tomato sauce too to tone it down.

These enchiladas do require a little more effort and time spent in the kitchen. Natalie, from Perry's Plate, suggests that you can make both the sauce and filling ahead of time so you won't spend too much time in the kitchen right before dinner. Or make them on the weekend when you have a little extra time, like I did.


Portabello and Black Bean Enchiladas
with Roasted Poblano Sauce

for the sauce:
1 poblano pepper
2 tsp. extra virgin olive oil
1 medium yellow onion, chopped
1/2 tsp. salt
1/2 tsp. ground cumin
1/2 tsp. chili powder
1/4 tsp. paprika
1/8 tsp. ground chipotle pepper (optional)
2 cups (1 can) tomatoes, crushed or chopped, undrained
1/4 cup water
1/2 cup fresh cilantro, chopped + extra for garnish

for the filling:
2 roasted red peppers, diced (jarred or fresh)
*12 oz. portobellos (about 4-5 large), stemmed, gills scraped out, and diced
1/2 red onion, diced
extra virgin olive oil
salt and freshly ground black pepper
1 can black beans, drained and rinsed

12 corn or whole wheat flour tortillas
4 oz. queso fresco (or sub feta)
cheddar cheese
fresh tomatoes or pico de gallo, for serving

Preheat oven to 425 F.

Roast the poblano pepper (and red peppers if using fresh) directly over the flame of a gas burner, turning frequently with tongs, until evenly charred. (Alternatively, char under the broiler, turning once or twice, for 5 to 7 minutes total.) Transfer to a deep bowl, cover with plastic wrap, and set aside to steam for 10 minutes.

Meanwhile, heat 2 tsp. olive oil in a medium saucepan over medium heat. Add the onion, garlic, salt, cumin, chili powder, paprika and ground chipotle (optional) and cook, stirring, until the vegetables have softened, about 5 minutes. Remove from the heat.

Peel the pepper, discard the stem and seeds, and chop. Add to the saucepan along with the tomatoes, water, and chopped cilantro. Return to medium heat and cook, uncovered, at a steady simmer, until the liquid has reduced slightly, about 10 minutes. Puree using an immersion or stick blender (or very carefully transfer to a blender or food processor) until smooth.

While the sauce simmers, place the mushrooms and red onion in a single layer on a rimmed baking sheet. Drizzle with olive oil and sprinkle with salt and pepper. Roast, stirring halfway through, until the vegetables are tender and browned in spots, about 15 minutes total. Alternately you can saute them in a large frying pan with olive oil, until tender. Do not salt and pepper until mushrooms are finished cooking. Transfer to a large bowl and stir in beans and roasted red peppers (if you are using jarred peppers make sure to remove the excess moisture).

Reduce oven temperature to 375 F.

To assemble the enchiladas: Spread 1/2 cup of the sauce in the bottom of a 9x13 baking dish. Place a skillet over medium heat. Coat both sides of a tortilla with cooking spray. Heat in skillet for 5 to 10 seconds per side, adjusting the heat if the pan gets too hot. (You can also warm the tortillas in the microwave, wrapped in a tea towel, but make sure you spray them with a little water first so they are pliable without breaking.) Spread about 1/3 cup of the filling and 1 Tbsp. of the sauce down the middle of the tortilla and roll it up to enclose the filling. Place seam-side down in the baking dish. Repeat with the remaining tortillas, filling and sauce. Spread the remaining sauce over the enchiladas. Top with crumbled queso fresco and cheddar cheese.

Bake, in preheated oven, uncovered (I covered mine the first half), until hot, about 15-20 minutes. Serve with fresh tomato or pico de gallo and garnish with cilantro.

Serves 4-6.

*Portabellos can be pretty expensive, but you can substitute crimini mushrooms here, especially since they get chopped up. Criminis are mini portabellos and a little more cost-effective to buy.

SOURCE: Perry's Plate


Linked to...
Recipe Swap Thursday @ Prairie Story
Potluck Sunday @ Mommy's Kitchen
Seasonal Sunday @ Real Sustenance

Sunday, January 23, 2011

Risotto with Roasted Chicken and Caramelized Onion


I love risotto. For me, it's an easy, usually one pot, dish to throw together that has some really nice flavor combinations going on. For others though, it may seem a little labor intensive, with all the stirring and adding liquid and stirring again every few minutes. When I first started making this butternut squash risotto a few years ago, I would pull up a chair right next to the stove and have a book handy to read in between all the stirring. Trying to make dinner with kids running around screaming and pulling on my leg the whole time, well now that's a different story.

I had not made risotto in quite a long time and when I saw this recipe, I really, really started craving it. Roasted chicken and caramelized onions, it all sounded like a wonderful flavorful combination to me. Another wonderful thing about this recipe is there's a little less hands-on time. Most of the stirring is in the beginning and the end, so during the major cooking time in the middle you are free to do other things.

I like that risotto typically calls for a few splashes of white wine/cooking wine, I think it develops the flavor really nicely. This recipe called for a little more than I've usually seen but I went with it and I think it turned out great. Feel free to substitute additional chicken broth in place of the wine if you don't use it.

Herbed Risotto with Roasted Chicken and Caramelized Onion
Olive oil
1 yellow onion, thinly sliced
Pinch of sugar
4 cups low-sodium chicken broth
2 cups water
1-2 cups roasted chicken, shredded (I used this leftover chicken)
2 cloves garlic, minced or pressed
2 cups Arborio (short grain) rice
1 cup white wine/cooking wine
1 cup grated Parmesan cheese
2 Tbsp. butter
2 tbsp. minced fresh parsley (about 1 Tbsp. dry)
2 tbsp. minced fresh chives (about 1 Tbsp. dry)
Ground black pepper
Salt

Add a small drizzle of olive oil to a large skillet over medium heat. Add the sliced onion and sugar, stirring to coat. Allow the onion to cook, stirring occasionally, until deep golden brown and caramelized, about 10-15 minutes. Remove the onions to a plate and set aside.

In a medium saucepan over medium heat, combine the chicken broth and water and bring to a simmer. Keep warm.

Drizzle a couple of tablespoons of olive oil into a Dutch oven set over medium heat. Add the garlic and cook just until fragrant, about 30 seconds. Add the rice to the pan, stirring to coat. Cook, stirring frequently, until the grains are translucent around the edges, about 3 minutes.

Add the wine and cook, stirring constantly, until fully absorbed, about 2-3 minutes. Stir 5 cups of hot broth mixture into the rice. Reduce the heat to medium-low, cover and simmer until almost all liquid has been absorbed and the rice is just al dente, 16-19 minutes, stirring twice during cooking.

Add 3/4 cup of the hot broth mixture to the risotto and stir gently and constantly until the risotto becomes creamy, about 3 minutes. Remove the pot from the heat and stir in the Parmesan.

Stir the shredded chicken and caramelized onions into the risotto with the butter, parsley and chives. Season with salt and pepper to taste. Serve immediately.

Source:Adapted from Annie's Eats

Linked to...
Potluck Sunday @ Mommy's Kitchen

Thursday, January 20, 2011

Garlic-Rosemary Roasted Chicken


The last two times I have roasted a chicken, I could not get a good picture to save my life! Darn chickens, they are so unphotogenic. Well, despite that mishap, this was a really tasty bird. Garlic and rosemary are two of my favorite flavors when it comes to cooking and poultry. This is really simple and relatively quick to throw together, barring you don't get squeamish from touching raw chicken because you do have to get fresh with it when you stuff the herbs under the skin (just don't rip the skin like I did). However, you should give it a go anyway for your next Sunday dinner.

Garlic-Rosemary Roasted Chicken
1 (5 to 6-pound) roasting chicken
1 Tbsp. chopped fresh rosemary
8 garlic cloves, crushed
2 medium red onions, quartered
2 whole garlic heads
2 tsp. olive oil

Preheat oven to 450°.

Remove and discard giblets and neck from chicken. Rinse chicken under cold water; pat dry. Trim excess fat.

Starting at neck cavity, loosen skin from breast and drumsticks by inserting fingers and gently pushing fingers between the skin and meat. Place rosemary and crushed garlic beneath skin of breast and drumsticks. Lift wing tips up and over back; tuck under chicken. Place chicken, breast side up, on a broiler pan.

Cut a thin slice from end of each onion. Remove white papery skins from garlic heads (do not peel or separate cloves). Cut tops off garlic heads, leaving root end intact.

Insert meat thermometer into meaty part of thigh, making sure not to touch bone. Bake at 450° for 30 minutes. Brush onions and garlic heads with olive oil. Arrange onions and garlic heads around chicken. Reduce oven temperature to 350°; bake an additional 1 hour and 15 minutes or until meat thermometer registers 180°. Cover chicken loosely with foil; let stand 10 minutes. Discard skin from chicken.

NOTE: Squeeze roasted heads of garlic to extract pulp; serve as a spread on French bread, if desired.

SOURCE:Cooking Light

Monday, January 17, 2011

Banana Bars


These banana bars totally take me back to my college days. Along with chocolate chip cookies and brownies, these were my standard goodies. When I made these the other day, a whole 9x13 pan for our small family, they did not even last 24 hours. Ok, I did give a few away to our neighbor, but still!

Bananas and chocolate are a great combination and for me the darker the chocolate, the browner the banana the better! You don't want to miss these delicious treats.

Banana Bars
2 cups flour
2 tsp. baking powder
1/2 tsp. salt
1/2 cup butter, softened
2/3 cup sugar
2/3 cup brown sugar, packed
1 tsp. vanilla extract
1 cup (about 2) mashed ripe banana
1 egg
1 pkg. (2 cups) semi-sweet chocolate chips

Preheat oven to 350 degrees F.

Combine flour, baking powder and salt in medium bowl. Beat butter, sugars and vanilla in a large mixer bowl until creamy. Beat in bananas and egg. Gradually beat in flour mixture. Stir in chocolate chips. Spread into greased 9x13 baking pan or 15x10 jelly roll pan.

Bake for 20-30 minutes or until toothpick inserted in center comes out clean. Cool completely in pan on wire rack. Cut into bars.


SOURCE:Toll House Best-Loved Cookies Cookbook

Linked to...
Recipe Swap Thursday @ Prairie Story
Sweets for a Saturday @ Sweet As Sugar Cookies
Full Plate Thursday @ Miz Helen's Country Cottage
Potluck Sunday @ Mommy's Kitchen
Seasonal Sunday @ Real Sustenance
It's A Keeper Thursday @ It's A Keeper

Saturday, January 15, 2011

Apple Cinnamon Baked Oatmeal


Last year sometime my sister introduced me to baked oatmeal. I had never really heard of it but when I tried it I loved it. We're hot cereal eaters in this house, especially my girls, and they love it when I make oatmeal. So, it was no surprise that they loved this baked oatmeal when I first made it.

Sometimes I forget about the really delicious recipes that I have made because I have so many others that I'm waiting to try out. When I saw this recipe though, I knew it would be a keeper because it reminded me immediately of when I had made it before. After my daughter's first bite, she declared it yummy. The apple and cinnamon is really a perfect combination here and is nicely balanced. I like that it's not overly sweet and that I could still sprinkle a little brown sugar over each individual bowl. My younger daughter wasn't too fond of the bigger chunks of apple, so I think next time I will shred the apple.

Apple Cinnamon Baked Oatmeal
2 cups old fashioned oats
1/4 cup light brown sugar
1 1/2 teaspoons cinnamon
1 tsp. baking powder
1/4 tsp. salt
1/2 cup milk (I used almond milk)
1/2 cup applesauce
1 egg
1 tsp.vanilla
1 large Granny Smith apple, peeled, cored, and diced

Optional Toppings:
Brown Sugar
Raisins
Dried Cranberries
Chopped almonds

Preheat oven to 350 degrees F. Coat an 8 by 8 baking dish with cooking spray and set aside.

In a large bowl, combine oats, brown sugar, cinnamon, baking powder, and salt.

In a medium bowl, whisk together milk, applesauce, egg and vanilla. Pour wet ingredients over dry ingredients and stir until combined. Gently stir in diced apples. Pour oatmeal mixture into prepared pan.

Bake for 20-25 minutes or until oatmeal is golden brown and set. Remove from oven and serve warm with milk and toppings, if desired.

Serves 4-6

Source: Adapted from Two Peas and Their Pod

Linked to...
Potluck Sunday @ Mommy's Kitchen
Seasonal Sunday @ Real Sustenance

Wednesday, January 12, 2011

Stuffed Portobellos with Mashed Potatoes


If any of you have a Costco membership, this may look familiar. I guess recently they handed out a Costco cookbook and this was one of the recipes in it. I don't have a membership but my parents do and I happened to be at their house right after they got the cookbook. After thumbing through it and finding so many yummy recipes to try, my mom let me take it home. I'm so glad she did because I've already made several recipes in it and I love it.

I wanted to try this recipe because I love mushrooms, especially portabellos, and we also had a big bag of potatoes from our produce co-op basket that we needed to use up. Well, when I say big bag, I guess it's relative because I think it was only a 5lb. bag. But, we don't eat potatoes very often so, for me, that's big.

Anyway, I thought these stuffed mushrooms were wonderful. The potato mixture was great on it's own, and I really loved the flavor the feta cheese brought to it. And, who can complain about bacon? Really. The combination of the potatoes and mushrooms was great, one I'd be willing to use my potatoes for any time. I served this as a main dish but it could also be served as a side.

Stuffed Portobellos with Mashed Potatoes
6 fresh portobello mushrooms
4 garlic cloves, chopped
4 Tbsp. butter, divided
1 Tbsp. olive oil
2 cups mashed potatoes
pinch of black pepper
pinch of salt
1/2 tsp. dried thyme
1/2 cup chopped fresh chives (I used about 1 Tbsp. dried)
1/2 cup feta cheese
1/4 + 2 Tbsp. grated parmesan cheese
8 slices bacon, crisp, cooked & crumbled
2 cups dry bread crumbs
1/4 cup chopped fresh parsley

Preheat oven to 400 F. Remove stems from mushrooms and set caps aside. Finely chop stems.

In a skillet, saute mushroom stems and garlic in 1 tablespoon of butter over medium-high heat until tender.

Rub mushroom caps with oil and set in a greased baking pan.

In a bowl, combine mashed potatoes, pepper, salt, thyme, chives, feta cheese, 2 tablespoons of parmesan cheese, bacon and sauteed mushroom stems. Mix until well blended. Stuff firmly into the mushroom caps.

In a separate bowl, combine the remaining melted butter, bread crumbs, Parmesan and parsley. Sprinkle over the mushroom caps.

Bake, uncovered, for 25 minutes, or until heated through. Serve warm.

Makes 3-6 servings.

SOURCE:Adapted from the Costco cookbook

Linked to...
This Week's Cravings @ Mom's Crazy Cooking

Sunday, January 9, 2011

Maple Cornbread


When I think of cornbread, I think of a nice salty pot of beans with a little bacon or ham. We usually eat the two together and it's yummy. Simple, but yummy. When I was making up the January menu I told my husband that we're going to be eating a lot of rice and beans for a while. After indulging in sweets and heavy foods, our bellies (and our wallets) needed to get back to simple. I say that to my husband as a joke, but he always smiles because he loves rice and beans and so do my girls.

This is a simple and tasty cornbread. After doing a little reading on the subject, I found out this is more of a Yankee cornbread because it's sweetened. I guess southerners don't like sweetened cornbread, but I'll take it any day. This is perfect right out of the oven with a little honey butter or crumble it over a scoop of freshly made beans. YUM!

Maple Cornbread
1 cup flour
1 cup yellow cornmeal
1 Tbsp. baking powder
1/2 tsp. salt
1 cup buttermilk
1/4 cup maple syrup
1/4 cup melted butter, cooled
2 large eggs

Preheat your oven to 425°F. Lightly grease or oil an 8 x 8-inch square or 9-inch round baking pan.

In a medium-sized mixing bowl, whisk together the flour, cornmeal, baking powder and salt until thoroughly combined. In a small bowl, or in a large measuring cup, whisk together the milk, maple syrup, melted butter and eggs. Add the liquid mixture to the dry ingredients and stir just until moistened.

Pour the batter into the prepared pan, and bake the cornbread for about 20 to 25 minutes, until it's lightly browned and a cake tester inserted into the center comes out clean.


SOURCE: adapted from King Arthur Flour

Wednesday, January 5, 2011

Apple Sausage Cheddar Quiche


We had some guests Christmas morning and I wanted to make something a little special. We make pancakes all the time so I wanted to stray from our norm, and my husband suggested a breakfast casserole. I went straight to my Southern Living cookbook. It didn't take long for me to make up my mind about what to make, this quiche jumped right out at me. I knew it would be perfect. I also thought it would balance out the cinnamon rolls we were also having.

This is slightly different than your typical quiche and it's not quite as heavy and rich. I used my own chicken sausage and think using the homemade sausage really makes a difference here. It adds to the great flavor without all the grease, salt, MSG and who knows what else in other sausages.

Apple Sausage Cheddar Quiche
1 9-inch pie crust (store bought or homemade)
1/2-1 lb. chicken sausage
1 1/2 cups (6-oz)shredded Cheddar cheese
1 cup peeled, chopped cooking apple (I used Granny Smith)
1/4 cup chopped onion
1/4 cup chopped green pepper
1/2 tsp. dried basil
1/8 tsp. garlic powder
4 large eggs, beaten
1 cup milk
Paprika

With your pie crust fitted in a pie plate, prick bottoms and sides of pie crust with a fork. Bake at 400 degrees F for 8 minutes.

Brown sausage in a large skilled, stirring until it crumbles. Drain and cool.

Combine sausage, cheese and next 5 ingredients; spoon into prepared crust. Beat eggs and milk until blended and pour over sausage mixture. Sprinkle lightly with paprika.

Bake at 325 for 50-60 minutes OR until set. Don't take it out too early.

SOURCE: Adapted from The Ultimate Southern Living Cookbook

Linked to...
Potluck Sunday @ Mommy's Kitchen

Monday, January 3, 2011

January Menu

I totally caved this whole holiday season. I pretty much just threw in the towel with exercising after my 5k in October. And as for indulging in holiday sweets, I didn't even TRY to restrain myself. Ok, maybe there was that one time...oh, who am I kidding? It's like a complete food fest from Thanksgiving to New Years, and it doesn't help that both my daughters' birthdays are in December and early January. I guess it's good that it's only one time of year and we can get it all done and over with and move on. As much as I love fudge and caramel and egg nog, I think I've had enough. I'm sure I'll be craving it come next holiday season though.

Well, my waist is not getting any smaller, so onto some lighter fare this month with lots of veggies, salads and soups. You know the drill, what's highlighted is linked back to previous recipes, the others I will post as I go. Got any suggestions for me, just leave them in the comments.

HAPPY NEW YEAR! HERE'S TO GOOD EATING-BON APPETIT!

Breakfast
Banana Pancakes w/Peanut Butter and Maple Syrup
Lemon Poppy Seed Pancakes
Peppery Bacon Cheddar Scones
Peanut Butter Granola
Banana Chocolate Chip Granola

Dinner
Chicken Parm Meatball Subs & Tuscan Panzanella
Roast Acorn Squash w/ Maple Cornbread Stuffing, Spinach & White Bean Salad with Maple-Mustard Dressing
Bean Curry w/ Thai Coconut Rice
Garlic Rosemary Roast Chicken w/ peas and Caesar Potato Salad

Chinese Chicken Salad
Broccoli & Cheddar Rolls w/ Oven Fries & Salad
Portabello & Black Bean Enchiladas w/ Roasted Poblano Sauce & Corn
Posole
Ham Beans & Homemade Bread

Pasta w/ Kale Pesto & Salad
Chipotle Bean Tostadas & corn
Butternut Squash Gnocchi w/ Roasted Veggies
Grandma's Chili & Mexican Cornbread
Italian Wedding Soup w/ Romano-Black Pepper Biscotti

Fettuccine w/ Cashew Cream & Peas
Black Bean Burgers & Mango Chicken Salad
Cauliflower Soup
Chicken Wraps w/ Creamy Asian Peanut Sauce & Asian Slaw w/ Ginger Lime Dressing
Spicy Thai Shrimp Soup

Goodies
Strawberry Cupcakes
Cake Batter Ice Cream

Saturday, January 1, 2011

2010 Faves, Part 3

Happy New Year! I hope you all had a happy and safe holiday.

Ok, here's the last of my favorites from 2010.

Berry Cheesecake Ice Cream-This ice cream is amazing and wonderful and delicious. I love the layers of flavor and texture here; tastes just like real cheesecake.


Pumpkin Pancakes with Pumpkin Maple Syrup-I know this is the third pancake recipe in the "faves" but my life is not complete without pancakes and I love pumpkin. Need I say more?


Peanut Butter White Chocolate Popcorn-A simple, easy treat that tastes divine! This is great in goodie bags or for a game night.

Peanut Butter Chocolate Chip Cookies-My absolute favorite cookie recipe and my go-to recipe whenever I get a hankering.


Pesto Panini-I absolutely love the flavor of fresh basil, so naturally basil pesto is a big hit in my book. This sandwich is really easy to throw together and has lots of great flavor.


Ham and Swiss Sliders-I can't believe how tasty these little sandwiches are. They are perfect for entertaining a crowd or just your belly.


What recipes have you tried from the Sweet Luvin' blog? What are some you hope to try?

I hope you've enjoyed a little reminiscing of the past year's cooking adventures. I'm excited to see what 2011 brings to the Sweet Luvin' blog.

Friday, December 31, 2010

2010 Faves, Part 2

So, on to more favorites from this year.

Chocolate Rootbeer Bundt Cake-This is seriously one of the best chocolate cakes I have ever had, root beer and all! And the frosting is pretty finger-licking too.


Pizza Rolls-If you have kids, these are absolute genius. Even if you don't, they're still genius. Whenever I make these I just can't stop eating them.


Mango Chicken Salad-I started making a lot of salads this year and this was one of my first favorites. The dressing is especially wonderful.


Asian Slaw-I think I made this salad more than anything else this whole year. Period. I could still eat it for days. After I discovered this Ginger Lime dressing, I've paired the two and have eaten it that way ever since. I've also used the dressing on fish and it was great too.


Brown Sugar Bourbon Pork Tenderloin-I love how easy this is to prepare, it practically makes itself. It has incredible flavor and is right up there with my absolute favorite Sweet and Spicy Shredded Pork.


Chocolate Coconut Ice Cream-I discovered the fun of homemade ice cream this summer and found this gem from my friend Carolyn. This was, by far, my most favorite ice cream and even most favorite dessert of the year. Yes, it's that good.


Greek Panzanella-Like I said, we ate a lot of salads this year and this is another winner. Give me Greek any day and I'll eat it, especially if there's feta involved.


Chocolate Zucchini Bread-This is super easy and super yummy and a great way we used up some excess zucchini over the summer.


Ok, so I've decided to add a few more. Catch the last installment of my favorites from this year tomorrow. Have a happy new year!

Thursday, December 30, 2010

2010 Faves, Part 1

Wow, I can't believe how much my little blog has come along in just one short year. This has been so fun for me. The time surely has flown by. I've cooked, baked, and photographed a lot, I've even had my fair share of failures in the kitchen as well. Nonetheless, I'm sure I have a long way to go in terms of my learning but I know I'll have fun doing it.

I've gone through all the posts from the past year and have picked the ones that are my favorites, ones I'd like to highlight again so I can share them with you all. I hope you enjoy them as much as we have.

White Chicken Chili-This is still one of my favorite soups, I love the flavor combinations going on here. It is so tasty and very hearty.


Feta and Sun-Dried Turkey Sliders-I love Greek inspired food, especially when there's feta cheese involved. The moment I saw these, I knew I would love them and I absolutely did, they were wonderful.


Four Cheese Ravioli- I was absolutely in heaven when I first made these. They are simple and easy to make and they practically melt in your mouth.


Strawberry Cream Cheese Stuffed French Toast-If you've been following my blog for any length of time, you'll know I'm a die-hard breakfast fan. I absolutely love this french toast. It certainly does not disappoint.


Lemon Poppy seed Pancakes-Just about anything lemon strikes my fancy, but when it comes in pancake form, even better. These pancakes are light and fluffy and have just a little more than a subtle taste of lemon.


Honey Curry Chicken with Thai Coconut Rice-This is one of the simplest and quickest meals to throw together. After I made it the first time, I couldn't get enough of it, especially the rice. This is a hands down favorite at our house.


Perfect Pizza Crust-Pizza is much loved in our house and I always have the ingredients on hand to make it. This dough is perfect for any topping you might like.


Peanut Butter Cup Trifle-If you've made this stuff, you know it goes quick! I have to say that this is one of my all-time favorite desserts, it's also one of the most indulgent desserts I've made too; very rich but oh so delicious. Peanut butter and chocolate, what can get better than that?


Apple Cinnamon Pancakes-Another favorite pancake recipe. We ate these a lot this year, especially in the fall after we went apple picking. I just love the combination of apples and cinnamon. For a special treat, we served them with some apple cider syrup-wow!


Pecan-Crusted Chicken Tenders with Honey Mustard Dipping Sauce-I couldn't believe when I first made these how my family gobbled them up! I have never been one to buy pre-packaged chicken nuggets, I much prefer to make my own. These chicken tenders take very little effort and only have a few simple ingredients.

Stay tuned tomorrow for the rest of the list.
Related Posts Plugin for WordPress, Blogger...