Monday, March 26, 2012

Brown Butter Risotto with Lobster


We don't often buy lobster, in fact we may only have it once or twice a year. But, my husband loves lobster and I thought this would be the perfect addition to some risotto for a special date night at home. Using lobster tail, which I bought on sale, allowed us to feel a little indulgent without breaking the bank.

This turned out to be a beautiful dish and tasted amazing! It was also easier than you might think to put together. Instead of using chicken or fish stock to cook the rice, I decided to use the water I boiled the lobster in, with a dash of Old Bay to spice it up. Pair that with delicious brown butter, and I couldn't have been happier with the results.

Brown Butter Risotto with Lobster
1 pound (about 2 medium) frozen lobster tails, thawed
4 1/2 cups lobster stock
dash Old Bay seasoning (or more to taste)
4 tablespoon butter
1/2 cup finely chopped onion
1 1/2 cups Arborio rice
1/2 cup white cooking wine
1/2 cup grated Parmesan
salt and freshly ground black pepper
chives, for garnish, if desired


Bring a stockpot of salted water to a boil over medium-high heat. Add the lobster tails and boil for 8 to 10 minutes until the shells curl and the lobster meat turns white. Remove tails, reserving 4 1/2 cups of the stock, drain and transfer to a cutting board; cool for 15 minutes. Using kitchen shears or a sharp knife, cut through the top shell lengthwise. Remove the meat and cut into 1/2-inch pieces. Set aside.

In a medium saucepan, keep the stock hot over low heat. Add Old Bay and stir to incorporate.

In a large saucepan, melt 3 tablespoons of butter over medium heat. Cook until the butter begins to foam and then turns brown, about 1 to 1 1/2 minutes. Add the onion and cook, about 3 minutes. Add the rice and stir to coat with the butter. Add the white wine and simmer until the liquid has almost evaporated, about 3 minutes. Add 1/2 cup of stock and stir until almost completely absorbed, about 2 minutes.

Continue adding the stock, 1/2 cup at a time, stirring constantly and allowing each addition of stock to absorb before adding the next. Cook until the rice is tender but still firm to the bite, about 20 minutes. Remove from the heat. Stir in the Parmesan cheese and the remaining butter. Season with salt and pepper, to taste.

Transfer the risotto to a large serving bowl. Arrange the lobster meat on top of the risotto and garnish with the remaining chives, if desired.


SOURCE: Giada De Laurentiis

Friday, March 23, 2012

Spicy Thai Coconut Shrimp Soup


I had to hurry and sneak this soup in while the weather is still in limbo. It's been unseasonably warm this winter and now that spring is on the verge, we've got snow in the forecast. Silly weather.

Anyway, whether the weather cooperates or not, you'll be happy you tried this soup. It is amazingly delicious! My husband and I couldn't stop eating it. It's also super fast to throw together. Make the soup while the rice is cooking and it will all be ready at the same time.

This soup gets it's kick from serrano peppers and it's slight sweetness from the coconut milk. The flavors balance out with the addition of fresh lime, ginger and basil leaves. Don't have shrimp around? Go ahead and switch it out for a couple of cut up chicken breasts.

Spicy Thai Coconut Shrimp Soup
2 Tbsp. olive oil
2 serrano peppers, seeds removed and finely diced
6 cloves garlic, minced
1 Tbsp. ginger, peeled and minced (or grate it on a microplane, if you have one, no peeling necessary)
5 cups low sodium chicken broth
2 cans (13.5-oz) coconut milk, light or regular
3 Tbsp. fish sauce
2 tsp. black pepper
1 tsp. salt
8 whole basil leaves, chopped into ribbons
zest and juice of 1 lime
1/2 lb. large shrimp, raw, peeled and deveined, tails Off (can Substitute 1 Cup, Chopped Raw Chicken)
Hot cooked Thai Coconut Rice (omit toasted coconut and cilantro)

Heat the olive oil in a large pot over medium-high heat. Add the chili and cook until soft, about 3 minutes. Add the garlic and the ginger. Stir frequently until you can smell the garlic, about 30 seconds. Add the chicken broth and coconut milk and allow to simmer for 10 minutes.

Add the remaining ingredients and cook until the shrimp is cooked through, about 5 minutes. Taste and adjust seasoning to your personal preference.

Serve with a large spoonful of hot cooked coconut rice.


SOURCE: Adapted from Domestic Fits

Wednesday, March 21, 2012

Tropical Smoothie


It is not very often that I try a new combination in my green smoothies that I immediately like and continue to make. So, I was really surprised when I made this the other day and absolutely loved it! I made it like three days in a row (until my cilantro and mangoes were gone). I was a little hesitant about the cilantro but was so glad I tried it. It is so refreshing in this smoothie.

If you don't have a high powered blender, you may have to blend this for a longer time to make sure there aren't pieces of orange floating around. Your other option would be to just juice the orange and use that.

Tropical Smoothie
1 mango, peeled and seed removed
1 cup fresh pineapple
1 whole orange, peeled
2 cups baby spinach
small handful of cilantro
1 cup water (add more to your liking)
handful of ice

Place everything in a blender and blend until liquid and smooth. Add more water as desired.

Monday, March 19, 2012

Chicken Enchiladas


I am so glad I finally got to post these. I didn't think I would ever find (or make) an enchilada that looked or tasted so good. You see me and enchiladas, we don't get along-uhh we didn't until now. Years ago, when I first got married, I searched and searched for a good enchilada recipe and tried a few different ones out. They never ended up any good. I usually didn't like the sauce and they always fell apart on me! After much searching, I came upon these Chicken Enchiladas that had a green sauce and used flour tortillas. I actually really liked them and made them quite a bit for a while. However, there was still something in the back of my head that wanted to find that perfect traditional enchilada recipe.

Well folks, I think I have found it! When I saw this recipe on Annie's Eats a while ago, I bookmarked it because I knew it would be good. Her recipes are always spot on! When I got around to trying it the first time I was blown away by how good they were, especially the sauce. They tasted even better than a traditional enchilada and looked pretty good too. My only complaint the first few times I made these was that the tortillas always broke when I tried to roll them up. Very frustrating; no fault of Annie's though, I just needed to learn how to do it.

I was almost ready to bag the whole roll-it-up way and make it lasagna-style like my other enchiladas when I happened to randomly pick up some freshly made tortillas from a Mexican bakery. Score!

Let me tell you! It made such a difference using the fresh tortillas. They were much more pliable with rolling and filling them up and they didn't break all over the place.

Now, I'm sure I won't be able to get fresh tortillas ALL the time, so I may have to learn a trick or two when using regular store-bough tortillas so they won't break. Or I might just stack instead of roll. Either way this is a keeper! You will want to try these.

Chicken Enchiladas
for the sauce:
1 medium onion, chopped fine
2 jalapenos, seeded and chopped fine
1 tsp. canola oil
3 cloves garlic, minced
3 Tbsp. chili powder
2 tsp. cumin
1 Tbsp. sugar
1 (15 oz.) can tomato sauce
1 cup water
1 tomato, seeded and chopped
Salt and pepper

3-4 cups cooked and shredded chicken
1 cup shredded sharp white cheddar cheese, divided (Feel free to substitute mozzarella cheese here, farmers cheese or a soft Mexican cheese such as cojita.)
1 cup shredded monterey jack cheese, divided
1/2 cup minced fresh cilantro
12 (6-inch) soft corn tortillas
Cooking spray


Combine the onion, jalapeno and oil in a large saucepan over medium heat. Cook, stirring often, until the onions and peppers have softened, 8-10 minutes. Stir in the garlic, chili powder, cumin and sugar, and cook just until fragrant, less than 30 seconds. Mix in the tomato sauce, water, and chopped tomato. Bring the sauce to a simmer, lower the heat and cook until slightly thickened, about 5 minutes.

Strain the sauce through a large mesh strainer into a medium bowl, pressing down on the onions and tomatoes to extract as much liquid as possible. Transfer the reserved solids to a large bowl and set aside. Season the sauce with additional salt and pepper to taste. Add shredded chicken to onion mixture, as well as 1/4 cup of the enchilada sauce, 1/2 cup of each of the shredded cheese and the cilantro. Stir to combine.

Preheat the oven to 425˚ F. Oil a 9 x 13″ baking dish with cooking spray. Stack half of the tortillas on a plate, cover with plastic wrap, and microwave for 40-60 seconds, until warm and pliable. Spoon 1/3 cup of the chicken mixture evenly down the center of a tortilla. Roll up the tortilla around the filling tightly, and place in the prepared baking dish, seam-side down. Repeat with the remaining filling and tortillas.

Lightly spray the tops of the enchiladas with cooking spray. Place in the oven, uncovered, for 7 minutes or until the tortillas start to brown slightly.

Reduce the oven temperature to 400˚ F. Remove the enchiladas from the oven and pour the sauce oven the top. Sprinkle with the remaining shredded cheese. Cover the dish with foil and bake for 20 minutes.

Remove the foil and bake for 5 more minutes, until the cheese is browned. Remove from the oven and let stand 10 minutes before serving.

SOURCE:Lightly adapted from Annie's Eats, originally from America's Test Kitchen

Saturday, March 17, 2012

Cinnamon Baked French Toast


I know I'm a breakfast person, but I almost never make french toast. I don't know why. I like it. I eat it. I just don't really think about it much.

We had some day old french bread and cream in the fridge that I didn't have plans for and needed a home. My brain went right to french toast. And not just regular french toast. Baked french toast. I wanted yummy deliciousness but didn't want to have to stand around dippin' and flippin' all morning. I figured Ree-Pioneer Woman-would have something worth writing home about. And she did. I went right for it.

This stuff does not disappoint man! I cheated on the whole soaking over night part, 'cause, you know I only had patience to wait like 10 minutes before putting it in the oven. It still turned out heavenly. If you have the foresight to put this together the night before, more power to you. All you would have to do in the morning would be toss it in the oven. This would be great for company, or a lazy weekend.

Beware of those ooey-gooey little pieces though, they are dangerous! You'll want to snitch one because it's poking out making the row uneven. Then you'll keep snitching and snitching and before you know it, you've eaten a whole other row. By yourself. Don't say I didn't warn you!

Cinnamon Baked French Toast
For the toast:
1 loaf day old french bread
8 eggs
2 cups heavy cream
3/4 cups Sugar
2 Tbsp. vanilla extract

For the topping:
1/2 cup flour
1/2 cup firmly packed brown sugar
1 tsp. cinnamon
1/4 tsp. salt
1 stick cold butter, cut into pieces

Spray a 9 x 13-inch baking pan with cooking spray. Tear bread into chunks (or cut into bite-sized cubes) and evenly distribute in the pan.

Mix together eggs, cream, sugar, and vanilla. Pour evenly over bread. Cover tightly and store in the fridge several hours or overnight. (Or if you're like me, you can just wait 10 minutes or so, while the oven heats up.)

In a separate bowl, mix flour, brown sugar, cinnamon, and salt. Add nutmeg if desired. Add butter pieces and cut into the dry mixture until mixture resembles fine pebbles. Store in and airtight bag or container the fridge if you're not baking the french toast right away.

When you're ready to bake the french toast, preheat oven to 350 degrees. Remove pan from fridge and sprinkle crumb mixture over the top. Bake for 45 minutes for a softer, more bread pudding texture. Bake 1 hour or more for a firmer, less liquid texture.

Scoop out individual portions. Top with butter and drizzle with maple syrup.


SOURCE: Pioneer Woman

Thursday, March 15, 2012

Dulce de Leche Banana Trifle


I have a love-hate relationship with trifles. First of all, I love them because they are totally a fool-proof dessert, you can't mess them up if you tried and they have lots of layers of deliciousness. Buuuuuuuuuuuuuut, I hate, hate, hate trying to photograph them! I am by no means a great, or even good, photographer, so I have no skills in trying to take a nice picture of these tricky things.

Lately trifle has been my go-to dessert when I need something for a crowd and there is NEVER ANY LEFT! I guess that's a good thing, or I'd be scooping that stuff right out of the bowl and into my mouth. This trifle is no different. I stumbled upon it a while ago but finally found the right occasion to make it a few weeks ago. I was teaching an Italian-themed cooking class at my home for some girls in my church and this just fit.

Seriously, I couldn't believe my mouth when I had the first bite of this stuff-SO delicious! And rich. Don't think you can get away with eating just one bite of it either. And you may just have to add a few more miles on the treadmill for it as well.

I've actually made this a couple of times and I have to admit the first time I made it I accidentally bought sweetened condensed milk instead of dulce de leche. I used it anyway because really, it's the same stuff, just not cooked down as long, and even though it has a different flavor it was still really delicious. So, you know, just use which ever one you want.

Dulce de Leche Banana Trifle
1 box white cake mix
8 ounces mascarpone cheese,
2 cups heavy cream
1/2 tsp. pure vanilla
1/4 cup granulated sugar
1 can dulce de leche
3 ripe bananas
1 package toffee bits

Make cake mix according to package instructions in a 9x13 baking pan. Cool completely and cut into 1-inch cubes.

In a mixer, fitted with a whisk attachment, whisk the mascarpone cheese. Slowly add the heavy cream and whisk on high making sure the cream is incorporated into the cheese. Scrape down the sides of the bowl periodically. Whisk until the mixture is thick and forms soft peaks. Add the vanilla and sugar, mix.

In a trifle bowl, layer 1/3 of cake cubes, 1/3 of the dulce de leche, 1/3 of the bananas, 1/3 of the mascarpone cream, and 1/3 of the toffee bits. Repeat two more times. Cover and chill, at least 1 hour, or until ready to serve.


SOURCE: Adapted from Stonewall Kitchen

Monday, March 12, 2012

Basil Chicken in Coconut Curry Sauce


Goodness we have been eating some fabulous food around here lately. I'm not sure if it's the food that's a little extra special or if it's just we haven't had real food in so long anything and everything sounds soooo delicious!

I was looking at my long line-up of posts waiting to debut and deciding which was the next most delicious thing I could post. It was a hard decision (ok, it really only took me about 3 seconds to decide), but this coconut curry totally won.

This seriously is one of the most tasty meals I have had in a while. (Do I say that a lot, because it sounds a little deja vous.) Even better, it's so easy and quick to prepare...AND my kids gobbled it up! You really can't get better than that.

I love coconut curries. This one has a milder taste, but you could certainly intensify the flavor a bit by adding more curry paste and jalapenos, or better yet, try the smaller Thai chilies if you really want a kick. All the flavors go together so perfectly and completely balance each other out. I like to serve this curry with Jasmine rice, but feel free to use whichever rice you prefer.

Basil Chicken in Coconut Curry Sauce
1-2 tsp. red curry paste
1/2 tsp. cracked black pepper
1 tsp. salt
1/4 tsp. chili powder
4 skinless, boneless chicken breast halves, cut into 1-inch pieces
1 Tbsp. olive oil
1/2 large red onion, cut into thin wedges (1 cup)
2 fresh jalapeno chile peppers, seeded and finely chopped
5 cloves garlic, minced
1 13 1/2 - 14 ounce can unsweetened coconut milk
3 Tbsp. snipped fresh basil
1 tsp. grated fresh ginger
3 cups hot cooked Jasmine rice

In a medium bowl combine curry paste, black pepper, 1/2 teaspoon of the salt, and the chili powder. Add chicken pieces and toss to coat. Cover and let marinate for 1 to 2 hours.

In a large frying pan or wok, heat oil over medium-high heat. Add onion, jalapeno peppers, and garlic to wok; cook and stir about 8 minutes or until crisp-tender. Remove onion mixture from wok. Add chicken to the wok. Cook and stir for 4 to 6 minutes or until no longer pink. Return onions, jalapenos and garlic mixture to wok.

Pour the can of coconut milk into the wok and sprinkle the remaining 1/2 teaspoon of salt. Stir and allow to simmer a few minutes, until heated through. Stir in basil and ginger. Cook another minute or two. Serve over hot rice.

SOURCE: Adapted from Better Homes and Gardens

Monday, March 5, 2012

Orange Cranberry Granola


I'm always looking for new and tasty combinations for my granola. I don't know why I never thought to add orange to my granola, it's so light and refreshing and pairs wonderfully with cranberries.

Granola is one of my breakfast staples. We eat it a lot. I love making my own because it's much cheaper than buying it at the store, I can control the amount of sugar and I know exactly what goes into it. Plus, sometimes, I like to give it an extra healthy boost by adding some ground flax, sesame seeds or wheat germ. I love that my girls enjoy eating granola too. It gives me great satisfaction that they enjoy eating something healthy.

Whether you eat this for breakfast or for an afternoon snack, this deliciously crunchy, slightly sweet granola is sure to be a winner for any member of your family!


Orange Cranberry Granola
4 cups rolled oats
1 cup shredded sweetened coconut
1 cup almonds (whole, chopped, slivered or sliced)
1/4 cup coconut oil
1/4 cup Honey
3 Tbsp. brown sugar
1/2 Tbsp. vanilla extract
pinch salt
1 Tbsp. orange zest
1 1/2 tsp. ground cinnamon
1 1/2 cups dried cranberries
1/2 cup white chocolate chips, chopped (optional)

Preheat oven to 325 degrees F.

In a large bowl, combine the rolled oats, coconut and almonds. In a small microwave safe bowl, add the coconut oil, honey and brown sugar. Heat in microwave about 20-30 seconds until coconut oil is melted. Stir to combine, then add the vanilla extract, salt, orange zest and cinnamon. Stir again until completely combined then pour over the oat mixture. Stir with a long wooden spoon until oat mixture is evenly coated. Spread onto a baking sheet and bake for 20-30 minutes, and stirring about every 5 minutes. Remove from oven and allow to cool on the baking sheet. Stir in cranberries and white chocolate. Store in an airtight container.

Tuesday, February 28, 2012

Coconut Macaroon Pancakes


Happy national pancake day! It is no secret that we are big fans of pancakes around here, so this is a fabulous holiday for us to celebrate. Coconut is another love of mine, so, naturally, when I saw these pancakes I knew they would hold a dear place in my heart. If you don't like coconut, this may not be the pancake recipe for you, but stick around and check out the pancake link over there on the side. There's lots of other tasty ones to choose from.

Ok, back to the coconut macaroon pancakes. Ohh, were they lovely. For the most part, my favorite way to eat a pancake is HOT off the griddle. Any leftover pancakes (which are not many, so I just leave them on the counter) get eaten by my children, and sometimes me, a few hours later as a snack. Rarely do pancakes make it to the fridge for consumption the next day. But these did only because I was the only one eating them. Yes, I sometimes make pancakes JUST for myself. I know, I'm weird.

The first time I snitched a bite of these, COLD from the fridge they were a different kind of delicious. OH, so good. Then my mind went straight to CHOCOLATE! What is a macaroon without chocolate right? I drizzled some hot fudge over them and just like that they became a dessert pancake. Completely perfect.

So, what I'm trying to say is you can eat these hot with a little drizzle of syrup, just out of your hand at room temperature, or cold for dessert drizzled with chocolate. You cannot go wrong any way you eat them.

Coconut Macaroon Pancakes
1 14-ounce can of coconut milk
3 eggs
1/4 cup brown sugar
1 /4 cups flour
3 cups sweetened shredded coconut
1/4 tsp. salt
2 tsp. baking powder

In a large bowl combine the coconut milk, eggs and sugar. Whisk until incorporated. In a separate bowl, mix together flour, coconut, salt and baking powder. Add the dry ingredients to the wet and stir to combine.

Heat a non-stick (or well-seasoned) skillet, or griddle to medium-hot. Brush with a bit of coconut oil (or butter), if necessary. Drop batter, using a 1/4 cup measuring cup, onto the griddle and cook until edges begin to look dry (about 2 minutes). Flip pancakes and cook another 2 minutes or so, until bottom is deep golden in color.

Makes about 10-12 pancakes.

SOURCE: Perry's Plate

Friday, February 24, 2012

Brown Butter Chocolate Chip Cookies


It seems like there is a continuous search for the perfect chocolate chip cookie. I've gone through different recipes over the years and I've seen many, many different recipes come and go through the blogging world. In the end, I think it's a little bit of personal preference and a really good recipe that fits your bill.

With that, I have to say that this recipe, for me, almost reaches perfection! First of all, I love brown butter anything. Second, these cookies are nice and chewy with just the slightest bit of crunch. If there's one thing I don't like about chocolate chip cookies it's when they are too crunchy. But then again, that's just me.

Give these babies a try--trust me you will ADORE them as I do. When I first stumbled upon the recipe, I made them two days in a row! You just cannot go wrong here.

Brown Butter Chocolate Chip Cookies
1/2 cup butter
1/2 cup granulated sugar
1/2 cup packed brown sugar
1 egg
1 teaspoon vanilla extract
1 1/3 cups all purpose flour
1/4 tsp. baking powder
1/8 tsp. baking soda
1/2 tsp. salt
2 oz. semi-sweet chocolate chips (about 1/3 cup)

Preheat oven to 350 degrees.

Place butter into small pot over medium heat. After butter has melted, start swirling pot gently until it starts to brown and become fragrant. Once the butter is a golden amber color, take off the heat and allow to cool.

In a bowl, whisk together flour, baking powder, baking soda and salt. Set aside.

In a mixing bowl, fitted with a paddle attachment, beat together cooled butter, both sugars, egg and vanilla.

Gradually add flour mixture and beat until just moistened. Gently mix in chocolate chips with a rubber spatula or a few pulses of your mixer.

Using a small scoop, scoop dough onto baking sheet. Slightly flatten with the palm of your hand. Bake in preheated oven for about 7-10 minutes. Allow to cool on baking sheet. Remove cookies to a cooling rack.

Yield: about 18 cookies

SOURCE:Slightly adapted from Lauren's Latest

Saturday, February 18, 2012

Mini Lasagna Cups


Lasagna is comfort food at it's best! My mom made great lasagna growing up. I loved the thick layers of noodles, creamy cheese filling and the tasty meat sauce. I always had a hard time waiting for the pan of lasagna to cool down enough to dish up so that it wouldn't spread all over my plate!

Well, the only thing better than homemade lasagna is homemade MINI lasagnas! Food always tastes and looks better when in mini form, don't you agree? How cute are these? I had so much fun making them. This is some absolutely delicious lasagna and in perfect portions too.

Making mini lasagnas takes about the same amount of time as it does to make traditional lasagna. Although you don't have to precook noodles, you do have to scoop filling into each cup. But a small scoop, like ones you use for cookie dough, makes quick work of it and you'll be done before you know it.

This is a fun way to change up your typical lasagna. It's also great for large gatherings or small munchkin mouths.

Mini Lasagna Cups
1 lb. Italian sausage
1 1/2 - 2 cups marinara sauce
1 1/2 cups ricotta cheese
1 1/2 cups mozzarella cheese, divided
1 tsp. dried basil
1 tsp. dried oregano
salt and pepper
24 square wonton wrappers
1/4 cup chiffonade of fresh basil

Heat skillet over medium-high heat. Crumble sausage into pan and saute until cooked through. Drain fat from pan and add marinara sauce. Bring to a boil, then reduce heat and simmer for about 10 minutes.

Preheat oven to 375 degrees F.

In a medium bowl, combine ricotta cheese, dried oregano and dried basil, a pinch of salt and pepper, and just over 1 cup of the mozzarella cheese. Set aside.

Coat a 12-cup muffin pan with cooking spray. Line each cup with 1 wonton wrapper, pressing firmly in the bottom of the cup and up the sides. Using half of the cheese mixture, divide it evenly into each of the muffin cups. Do the same with the meat sauce. Gently press another wonton wrapper, in the opposite direction of the first wrapper. Repeat layers with remaining cheese mixture and meat sauce. Top with remaining mozzarella cheese.

Bake for 10-15 minutes or until cheese is melted and wonton wrappers are golden. Remove from oven and sprinkle fresh basil over the top of each one. Allow to cool in pan 5-10 minutes before serving.


SOURCE:Adapted from Kevin & Amanda and Sensible Shoppers

Thursday, February 9, 2012

Wheat-Oat Pancake Mix


My daughter asks for pancakes just about every other day, and since we just LOVE pancakes around here, this mix was a no-brainer. Especially since it's a whole grain mix. Now, I've made my fair share of pancakes over the years, so I can pretty much do it with my eyes closed in about 30 seconds flat! BUT, having a mix all ready to go, takes it down to about 15 seconds. Who can beat that? Now, I'm sure a bowl of cold cereal probably could, but how can you pass up a nice hot breakfast? Not I.

Even if you're not a morning person, throw together this mix ahead of time and you can still have a yummy, healthy hot breakfast in no time!

Wheat-Oat Pancake Mix
3 1/2 cups oats (rolled or quick is fine)
4 cups whole wheat flour
1 cup all-purpose flour
3 Tbsp sugar
3 Tbsp baking powder
1 Tbsp. salt
1 Tbsp. baking soda
3/4 cup oil*

To make the mix: Grind the oats in a food processor until they're chopped fine, but not a powder. Combine the oats, flours, sugar, baking powder, salt, and baking soda in a large bowl, preferably an electric mixer. Mix on low speed, and drizzle the oil into the bowl slowly while the mixer is running. When all the oil has been added, stop the mixer and squeeze a clump of the mix in your hand; if it holds together, it's just right. If it won't hold together, stir in 1 tablespoon of oil at a time, until it does. Store indefinitely in an airtight container in the freezer. *(I have also left the oil out of the mix and just added 2 tablespoons for each cup of mix at the time I make the batter up. Either way works well.)

To make the pancakes: Whisk together 1 cup mix, 1 cup buttermilk (or other milk) and 1 large egg. Don't worry if the batter seems thin at first; it'll thicken as it stands. Let the batter stand while the griddle heats up.

Heat your griddle or pan till a drop of water sputters when you drop it on the surface (on my griddle it's about medium-high or 250 degrees F). Lightly grease, if necessary, and pour pancake batter by the 1/4-cupful onto the griddle. A muffin scoop works well here. Cook the pancakes till they're golden brown on the bottom, flip them over, and cook till golden brown on the other side.

We love to change up the batter every once in a while and add different mix-ins for variety. Here are some of our favorites:
1 large, ripe banana, smashed
1 cup pumpkin puree and 1 tsp. pumpkin pie spice (and chocolate chips sometimes too)
1 cup applesauce (or shredded apple), with cinnamon and nutmeg

Each batch makes about 8-10 pancakes or about 12-14 when you mix in fruit.


SOURCE: King Arthur Flour

Monday, February 6, 2012

Pretzel Rolls


Ok, a while back a friend and reader asked if I had a recipe for pretzel rolls. Well, not only did I NOT have a recipe but I had never heard of them! That totally intrigued me and sent me on a search for a great recipe. I bookmarked a couple recipes but wasn't able to get to them for quite a while.

Recently my two oldest girls have developed a small love affair with hamburgers and when putting them on our weekly menu a little while ago, I remembered the pretzel rolls my friend had asked me about and thought they would go perfect with homemade hamburgers. (Although I still totally love these buns I usually make.)

I have to admit, although the recipe is easy, the rolls totally flopped the first time I made them. I was SO disappointed that I made them again the very next day! I think my problem was that I made the dough too moist like the dough I make for our sandwich bread; this requires a much stiffer dough than I am used to.

Anyway, the second time I made them they were both delicious and beautiful. They just looked adorable! I loved how the cracks on the top made them look just like real pretzels.

So, try these the next time burgers are on your menu and change it up a bit from the norm! You'll love them too.

Pretzel Rolls
4 1/2 cups all-purpose flour
2 1/4 tsp. instant yeast
2 tsp. sugar
2 tsp. salt
4 Tbsp. unsalted butter, melted
1 1/2 cups warm water
1/4 cup baking soda
large saucepan of water
1 egg, lightly beaten
pretzel salt

In the bowl of a stand mixer fitted with a dough hook, combine the flour, yeast, sugar, salt and butter. Pulse just to combine. Add the water and mix 3-5 minutes; until thoroughly combined. Place dough in a greased bowl and cover with a light towel and let rise in a warm place until doubled in size. Punch down and turn out onto a lightly floured surface.

Line two sheet pans with parchment paper. Cut the dough into 18 pieces (2 ounces each-I use my kitchen scale but you can just eyeball it). For larger rolls, like for hamburger buns, I suggest you make the dough into about 3 1/2-4 ounce balls.) To shape, take a piece of dough and start forming a round, smooth ball by pulling the sides to the center and pinching to seal.

Place, pinched side down, on a counter and lightly cupping your hand around the dough ball, rotate your hand in small circles lightly rolling the ball around the palm of your hand. Place on baking sheet pinched seam side down at least 1” between each roll. Cover with a towel and let rise in a warm place for until doubled in size again.

Preheat oven to 425°F and place oven racks on the lowest and middle positions.

In a large saucepan, bring 2 quarts of water to a LOW boil. Add the baking soda (it will bubble a bit) and LOWER heat to a simmer. Put the rolls into the poaching liquid, 2-3 at a time and seam side down. Poach for 30 seconds then carefully turn the roll over and poach other side for 30 seconds. Remove with a slotted spoon to the same prepared sheet pans, seam side down. Repeat with the remaining rolls.

With a pastry brush, glaze each roll with the lightly beaten egg making sure to coat all sides completely. Top each roll with a sprinkle of pretzel salt.

Bake the rolls in a preheated oven for 15-20 minutes.

Source: Slightly adapted from The Misadventures of Myrtle Grace

Thursday, February 2, 2012

Greek Pasta Salad


Ok, it's probably time I threw in something healthy again, you know with it being the new year and all. I don't know about you but my attempts to keep away from sweets are just not working!!! Maybe it's the whole having a baby thing and those extra 300 calories a day I need in order to feed baby. We do eat rather healthy at mealtimes, it's just those times in between that get me. A girl needs her chocolate you know!!

Anyway, I digress. On to this salad. I love salads. I love Greek food. Pasta is good. This is a great combo! My sister brought a similar pasta salad to one of our family dinners over the holidays and I had been thinking about it ever since. I knew it would be something that the whole family would eat and enjoy; not always an easy task with a toddler and preschooler to please. When I came upon this recipe and looked at the dressing ingredients, I realized it was pretty much the same dressing I use on my Greek Panzanella, which I love, so I knew the flavor would be spot on.

We ate this as is, meatless, for our whole dinner, although it would be fabulous with some roast chicken shredded on top (YUM!). I love that this only took about 10 minutes to prepare (almost a necessity these days). I made the dressing, then while the pasta cooked, I chopped veggies.

Greek Pasta Salad
For the salad:
1 pound gemelli or other short pasta
1 cucumber, peeled and diced (about half-inch pieces)
1 pint cherry or grape tomatoes, halved
1/4 large red onion, thinly sliced (or more if you like)
1 can black olives, drained (halved, if desired)
3 cups firmly packed baby spinach
feta cheese, crumbled

For the Greek Dressing:
2 cloves garlic, finely minced
1 tsp. dried oregano
1 tsp.Dijon mustard
1/4 cup red wine vinegar
1/2 tsp. salt
1/2 tsp. pepper
1/4 cup olive oil


To make the dressing, in a small bowl, whisk together garlic, oregano, mustard, vinegar, salt, pepper and olive oil until well combined. Set aside. (This can be made ahead of time)

Bring a large pot of salted water to a boil. Add pasta and cook until al dente, about 8 minutes, or as label directs. Drain, rinse under cold water and transfer to a bowl. Add remaining salad ingredients, all but the feta. Toss with dressing and crumble feta over the whole salad or each individual salad.


SOURCE: myrecipes.com

Monday, January 30, 2012

Trail Mix


I've been eating this stuff as long as I can remember. Although I haven't made it much the past few years, my mom would make this every once in a while growing up. The other day I was looking for a treat to make for our family night and I remembered this! It's so quick and easy to throw together and you probably have most of the ingredients on hand.

Not only is this a perfect snack for a family fun night, but it also makes a great little gift for a teacher or friend.

Trail Mix
5 cups Cheerios
5 cups Corn Chex
4 cups pretzel sticks
2 cups peanuts
1 1/2 cups butter
1 1/2 cups sugar
1 1/2 cups light Karo syrup

Mix first 4 ingredients in a large bowl. In a medium saucepan, bring to a boil butter sugar and Karo syrup. Boil for for 2 minutes. Remove from heat and stir down bubbles. Pour over dry mix and stir to combine. Pour onto a cookie sheet after mixed to cool. Store in an airtight container.

Wednesday, January 25, 2012

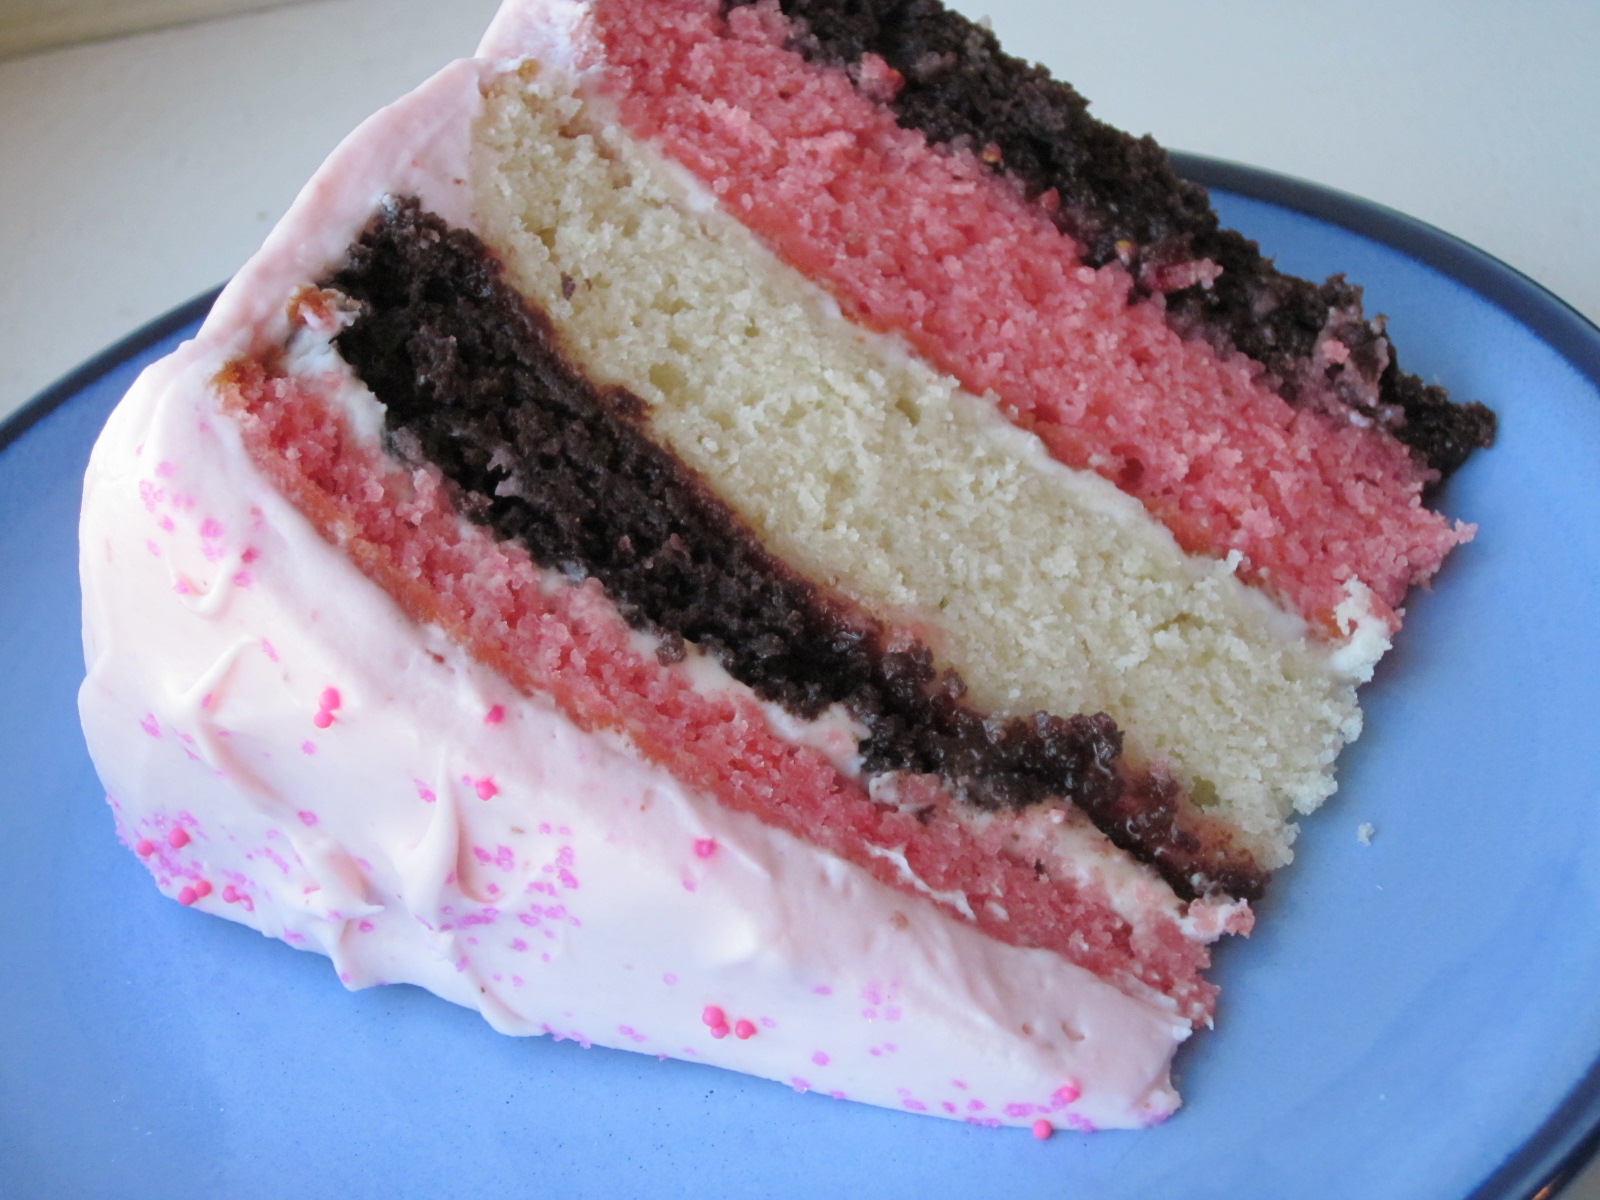
Neapolitan Layer Cake


Ok, I thought it was high time I got this cake posted. I made it for my three-year-old's birthday the beginning of December and I've been wanting to post it ever since. I wanted my daughter to help choose her cake so we sat down together and looked and some pictures of yummy cakes. She chose this one because it was PINK!!! Go figure, she's such a girl.

Actually, this cake was really delicious, despite being chosen mainly for it's color. I loved each and every layer. The original frosting, however, I wasn't crazy about, so I tweaked it and came up with what you see here.

This cake comes together pretty easily, although it may look hard. Two things I would suggest in making this cake is to leave yourself plenty of time and chill, chill, chill!!! I made the cake layers the day before I planned on putting it together so they could chill in the fridge overnight. A chilled cake is also much easier to cut and very helpful when applying your crumb coat.


Neapolitan Layer Cake

For the chocolate cake:
3/4 cup plus 2 Tbsp. all-purpose flour
6 Tbsp. dark cocoa powder
1 tsp. baking soda
1/2 tsp. baking powder
1/2 tsp. salt
1 cup sugar
1/4 cup vegetable or canola oil
1 large egg
1 cup buttermilk
1 1/2 tsp. vanilla extract

For the white cake:
2 large egg whites
1 3/4 cup all-purpose flour
1 1/2 tsp. baking powder
1/2 tsp. salt
1 cup sugar
8 Tbsp. unsalted butter, at room temperature
3/4 cup very cold water
1/2 tsp. vanilla extract
1/4 tsp. almond extract

For the strawberry cake:
1 1/4 cups plus 2 Tbsp. all-purpose flour
1 1/4 tsp. baking powder
1/4 tsp. salt
1 cup sugar
1.5 oz. strawberry gelatin
8 Tbsp. unsalted butter, at room temperature
2 large eggs
1/2 cup milk
1 1/2 tsp. vanilla extract
1/4 cup sweetened strawberry puree*

For the filling:
Vanilla buttercream or good quality strawberry jam (I actually had plenty of strawberry frosting leftover, I could have used a thin layer as the filling.)

For the strawberry buttercream frosting:
1 1/2 cups fresh strawberries (8 oz.), rinsed, hulled and coarsely chopped*
4 large egg whites
1 1/4 cups sugar
3 sticks (1 1/2 cups) unsalted butter, at room temperature
3 cups powdered sugar

*To make the strawberry puree, process partially thawed frozen strawberries with a bit of sugar in a blender or food processor until smooth. If using sweetened frozen strawberries, no additional sugar is necessary.

Directions:
Preheat the oven to 350˚ F. To make the chocolate cake, butter and flour the edges of a 9-inch round pan, shaking out the excess flour. Line the bottom with a round of parchment. In a small bowl, combine the flour, cocoa powder, baking soda, baking powder and salt; whisk to blend and set aside. In the bowl of an electric mixer, combine the sugar, vegetable oil and egg. Beat on medium speed until smooth, about 1-2 minutes. With the mixer on low speed, blend in half of the dry ingredients, beating just until incorporated. Blend in the buttermilk and vanilla just until smooth. Beat in the remaining dry ingredients, mixing just until incorporated.

Pour the batter into the prepared pan and bake, rotating halfway through, until a toothpick inserted in the center comes out clean, about 35 minutes. Transfer to a wire rack and let cool in the pan for 20 minutes. Run a knife around the edges, then turn the cake out onto the rack and let cool completely. Wrap in plastic wrap and chill at least an hour, up to overnight.

Preheat the oven to 350˚ F. To make the white cake, butter and flour the edges of a 9-inch round pan, shaking out the excess flour. Line the bottom with a round of parchment. In a small bowl, combine the flour, baking powder and salt; whisk to blend and set aside. In the bowl of an electric mixer fitted with the whisk attachment, whip the egg whites on medium speed until foamy. Increase speed to medium high and continue to beat until stiff peaks form.

Transfer the egg whites to another bowl and set aside. In the bowl of the electric mixer now fitted with the paddle attachment, combine the sugar and butter, and beat on medium-high speed until light and fluffy, 2-3 minutes. With the mixer on low speed, beat in half of the dry ingredients just until incorporated. Blend in the water, vanilla and almond extracts. Beat in the remaining dry ingredients just until incorporated. With a silicone spatula, stir in about a quarter of the egg whites to lighten the batter. Gently fold in the remaining egg whites, until the batter is smooth and no streaks remain.

Pour the batter into the prepared pan and bake, rotating halfway through, until a toothpick inserted in the center comes out clean, about 35 minutes. Transfer to a wire rack and let cool in the pan for 20 minutes. Run a knife around the edges, then turn the cake out onto the rack and let cool completely. Wrap in plastic wrap and chill at least an hour, up to overnight.

Preheat the oven to 350˚ F. To make the strawberry cake, butter and flour the edges of a 9-inch round pan, shaking out the excess flour. Line the bottom with a round of parchment. In a small bowl, combine the flour, baking powder and salt; whisk to blend and set aside. Combine the sugar, strawberry gelatin and butter in the bowl of an electric mixer. Beat on medium-high speed until light and fluffy, about 2-3 minutes. Beat the eggs into the sugar mixture one at a time, mixing well after each addition. With the mixer on low speed, add half of the dry ingredients to the batter and mix just until incorporated. Blend in the milk and vanilla extract. Add in the remaining dry ingredients, mixing just until incorporated. Blend in the strawberry puree.

Pour the batter into the prepared pan and bake, rotating halfway through, until a toothpick inserted in the center comes out clean, about 35 minutes. Transfer to a wire rack and let cool in the pan for 20 minutes. Run a knife around the edges, then turn the cake out onto the rack and let cool completely. Wrap in plastic wrap and chill at least an hour, up to overnight.

To make the frosting, place the strawberries in a food processor or blender. Puree until completely smooth. Combine the egg whites and sugar in a heatproof bowl set over a pot of simmering water. Heat, whisking frequently, until the mixture reaches 160° F and the sugar has dissolved.

Transfer the mixture to the bowl of a stand mixer** fitted with the whisk attachment. Beat on medium-high speed until stiff peaks form and the mixture has cooled to room temperature, about 8 minutes. (The bowl should be cool to the touch.)

Reduce the speed to medium and add the butter, 2 tablespoons at a time, adding more once each addition has been incorporated. If the frosting looks soupy or curdled, continue to beat on medium-high speed until thick and smooth again, about 3-5 minutes more (or longer – don’t worry, it will come together!) Blend in the strawberry puree until smooth and completely incorporated, scraping down the sides of the bowl as needed. Finally, add in the powdered sugar and beat until incorporated.

To assemble the cake, slice each of the (chilled) cake layers horizontally into two thin halves. Place one of the chocolate layers on a cake board or cake platter. Top with a very thin layer of the vanilla buttercream or strawberry jam (I alternated buttercream and jam on each of the layers). Place a layer of the strawberry cake on top. Again, cover with a thin layer of vanilla buttercream or strawberry jam. Top with a layer of the white cake. Cover with a thin layer of the vanilla buttercream or strawberry jam. Repeat the process with the remaining layers of chocolate and strawberry cake. (For a taller cake, you can use the remaining layer of white cake. Otherwise, you can wrap tightly and save for later use or discard.)

Crumb coat the top and sides of the cake with the strawberry buttercream and let it chill for 30-60 minutes in the fridge. Remove cake from fridge and evenly frost the top and sides of the cake with the remaining strawberry buttercream; leaving some for detailing, if desired.

Transfer remaining buttercream to a pastry bag fitted with a decorative tip for detailing as desired. (I skipped this step as my detailing skills leave much to be desired, although I had enough buttercream to do so.)


SOURCE: Lightly adapted from Annie's Eats

Monday, January 23, 2012

Tropical Granola


Today I've got a little mid-winter pick-me-up to share with you. Now's about the time of year that winter starts getting old. The dreary, cloudy days. The enormous piles of snow everywhere. The days that get dark by 5pm. Although this winter has been pretty mild actually (it's snowed like twice here in Utah), I still find myself longing for the warm spring days when I can take my kids out again on walks and to the park to play with their friends.

Making food that's light and refreshing always makes me feel better, just like this granola. Granola is so versatile, I love it! Occasionally I'll make the same granola more than once, if it's super good, like this cherry almond granola or this pepita granola (perfect for fall!!). However, there's just so many flavor combinations to try out, I make it different often.

Since dried fruit is available year round, you can make this granola any time! I have found dried fruit at my grocery store both in the produce section and on the aisle next to the canned fruit and raisins. Normally, I try to purchase my dried fruit at grocers that have a bulk section. That way I can get the amount that I need and it's usually more fresh.

Tropical Granola
3 cups oats
2 cups crisp rice cereal
1 cup cashews (preferable unsalted)
1 1/2 cups coconut flakes
1 1/2 tsp. cinnamon
1/4 - 1/2 tsp. ground ginger
1/2 tsp. ground nutmeg
1/4 - 1/2 cup honey
1/2 cup unsweetened applesauce
1/4 cup coconut oil, melted
2 cups dried pineapple, mango and papaya, small-diced
2 Tbsp. crystallized ginger, finely diced

In a large bowl, mix together oats, cereal, nuts and coconut flakes. In a microwave safe bowl, melt the coconut oil and honey; stir in the applesauce and spices until well-combined. Pour over the oat mixture and stir until completely coated. Spread granola out over 2 large, rimmed cookie sheets and bake at 325 degrees F about 15-20 minutes, stirring every 5 minutes.

When done cooking, remove granola from oven and let cool. Add dried fruit and ginger. Store in either an airtight container or a heavy-duty zip-top bag in the fridge or freezer to maximize freshness.

Monday, January 16, 2012

Thai Chicken Pizza


I absolutely could not wait to share this pizza with you. It was so incredibly delicious and quite unique too. If you love Thai food, this is right up your alley. The pizza has pretty typical toppings found in many Thai dishes: carrots, red pepper and cilantro. And the sauce....oh the sauce!!! Let's just say I could swim in it and slurp it up all day. It's the most amazing thing ever. I found myself using the leftovers for pasta, dipping veggies, and as a salad dressing.

I threw this together rather quickly on some Indian Naan bread. It makes a fabulous lunch or a speedy weeknight dinner.

Thai Chicken Pizza
4 Indian Naan bread
1 cup cooked chicken, shredded or chopped
1 red pepper, julienne
2 green onions, chopped
1-2 medium carrots, cut into matchsticks
1/2 bunch cilantro, chopped
1 1/2 cups mozzarella cheese, shredded
Thai Peanut Sauce (recipe below)
sweet chili sauce

Preheat oven to 400 degrees F.

Make the Thai peanut sauce and set aside. Gather the veggies and chop them up accordingly. In a small bowl, toss the chicken with a little sweet chili sauce.

On each piece of Naan, spread about 2 tablespoons of the peanut sauce. Layer with chicken, peppers, onions, carrots and cilantro. Top with a small handful of cheese. Bake about 7-10 minutes.


Thai Peanut Sauce
1/2 C peanut butter
1 lime, juiced
2 1/2 tsp. sesame oil
1 Tbsp. rice wine vinegar
2 Tbsp. soy sauce
2 Tbsp. honey
2 cloves garlic, minced
1 Tbsp. minced ginger
1/2 cup olive oil
1/4 tsp. salt
2-3 Tbsp. sweet chili sauce
2-4 Tbsp. water

SOURCE:Pizza adapted from Budget Bytes and sauce adapted from Our Best Bites

Linked to...
These Chicks Cooked @ This Chick Cooks

Monday, January 9, 2012

Hot Fudge Sauce


What better way to start off a Monday morning than with chocolate right? I have been making things from scratch for my family for quite a while, and I am still trying hard to do as much as I can, and more, from scratch so I know exactly what goes in to our food.

Making condiments, like sauces, syrups, salad dressings and spice mixes, is not any harder than making a home cooked meal. In fact, in my experience so far, it is fairly easy, takes a minimal amount of time and usually the ingredients are not hard to find. You may even have them on hand in your pantry. I can't remember the last time I bought salad dressing or a seasoning packet for my meat.

This chocolate sauce is one of those things that I will never buy again and always make at home. I think the taste is FAR better than anything you can get in the store anyway. I have made it several times recently and let me tell you, it doesn't last long at our house. I've even snuck into the fridge a time or two and eaten it right off a spoon!!!

Hot Fudge Sauce
1 cup semi-sweet chocolate chips
1/2 cup (1 stick) butter
1 12-oz can evaporated milk
2 cups powdered sugar
1 tsp. vanilla

In a medium saucepan, melt chocolate chips and butter over low heat. Gradually add evaporated milk and powdered sugar. Blend well and bring to a boil. Boil for 8 minutes, stirring constantly. Serve warm. Store leftovers in an airtight container in the fridge.

Saturday, December 31, 2011

2011 Favorites

Looking back through all my posts from this year, I was surprised how many there were, considering how sick I was with my pregnancy and how delusional I was (and still am) from lack of sleep now that she's here.

It was fun to look back and reminisce on all the yummy food that was made and reminded me of some dishes I NEED to make again. So, I've made a line up of my favorite savory dishes and my favorite sweet treats. Here they are, in no particular order.


Sweet Pepper, Tomato and Feta Pizza-I fell in love with this pizza too and made it many, many times over the summer.

Crispy Coconut Chicken Fingers-Well, you know I love coconut anything, but I wasn't the only one that loved these in our house; my kids gobbled them up as well.

Lemon and Oregano Roast Chicken-Love, love, loved this chicken! After grilling, roasting chicken is my next favorite way of preparing it. Plus, when you roast a whole chicken, you have it all cooked for several meals ahead of time.

Chicken Milano-We so totally fell in love with this dish. It is the perfect combination of flavors.

Asian Wonton Salad- I'm a firm believer that when it comes to eating salads, variety is the key. This was so fun and different, I loved eating it.

Asian Wraps with Creamy Peanut Sauce-Maybe it's my love of peanut butter that I loved this dish so much because man that dipping sauce is something else! This is SUPER delicious!

Chicken Parmesan-This was easily one of the two best meals I made this year (Chicken Milano being the other one). It was absolutely perfect.

Sesame Noodles-Made this many times, even the kids eat it!

Lemon Garlic Shrimp with Orzo-Incredibly simple dish but packed with flavor.

Berry Chicken Salad with Berry Poppy Seed Vinaigrette-Another tasty and colorful salad.


Coconut Brownies with Creamy Coconut Frosting-Rich, creamy and delicious and totally unique!

Bananas Foster Bread-I love banana bread in general; this is my boozy bread version.

Cake Batter Pancakes-We totally love pancakes around here. I think I made these for every birthday this year. So fun!


Tres Leches Cake
-I don't make a whole lot of cake, except for birthdays and such, but this is absolutely to die for. I'll have to make it again for our 5 de mayo party.

Raspberry Almond Cookie Bars-Sometimes you just want something sweet and delicious and NOT chocolate..cue these rich cookie bars-YUM.

Sugar Cookies with Cherry Buttercream-I've made and eaten a lot of sugar cookies in my day and I can honestly say that this cookie and frosting recipe are so perfect. The subtleness of the cherry in the frosting is absolutely amazing.

S'mores Ice Cream-Love s'mores; love ice cream. Great combo!

White Chocolate Macadamia Nut Cookies- I can't believe I ever waited so long to try these. One of my most favorite cookies ever.

Chocolate Coconut Fudge-Million dollar fudge right here folks...not joking!

Egg Nog Syrup-This is the perfect condiment for the holidays. You can use it on pancakes, ice cream, warm gingerbread or cake, the sky is the limit!

Thursday, December 29, 2011

Egg Nog Gingerbread Trifle


I'm so glad I finally get to post this delicious trifle! I saw it last year and made my version of it, but it was gone before I could get a photo or hardly even a taste. I took it to a Christmas party this year and the same thing happened, so I was determined to make it again. I decided to make it a third time for our family dinner on Christmas day and I finally got a nice big helping, and leftovers to eat for breakfast the next day!!!

This is a beautiful and festive trifle with layers of yummy gingerbread, tart raspberries and delicious custard made with egg nog, topping it off with some whipping cream, fresh raspberries and ginger snap crumbs. This will definitely wow the socks off any guests you have over this holiday, or even your family

Egg Nog Gingerbreaed Trifle

For the gingerbread:
1 1/2 teaspoons baking soda
2 1/2 cups flour
1 tsp. ground cinnamon
1 tsp. ground ginger
1/2 tsp. salt
1/2 cup butter, slightly softened
1/2 cup sugar
3/4 cup dark molasses
2 large eggs, at room temperature
3/4 cup buttermilk

For the egg nog custard:
9 large egg yolks
3/4 cup sugar
1/4 cup flour
3 cups good egg nog

For the filling and garnish:
3 (12-ounce) packages frozen unsweetened raspberries, thawed and drained
1 cup chilled heavy cream
3 Tbsp. sugar
2 tsp. confectioners' sugar
1/2 pint fresh raspberries
ginger snap cookies, crumbled (optional)


To make the gingerbread: Heat the oven to 350°. Generously grease and flour a 9-inch round cake pan. In a small bowl, whisk together the flour, baking soda, ginger, cinnamon, and salt.

In a large bowl with an electric mixer set on medium-high speed, beat the butter until it's soft and creamy, about 1 minute. Use a spatula to scrape down the sides of the bowl, then add the sugar and molasses and beat again until the mixture is well blended and fluffy, about 2 minutes more. Add the eggs one at a time, beating 30 seconds after each addition. Slowly pour in the buttermilk and beat well. Reduce the mixer's speed to low and slowly add half the flour mixture to the bowl and beat until blended. Repeat with the other half.

Pour the batter into the cake pan and bake until a wooden toothpick inserted into the center of the cake comes out clean, about 45 minutes. Let the cake cool completely on a wire rack, then cover it tightly with plastic wrap until ready to use. It can be stored in the pan at room temperature for up to two days.

To make the custard: Divide the egg yolks and whites. Set the egg whites aside for another use (they may be frozen). In a large bowl with an electric mixer set on medium-high speed, beat the yolks and sugar until the mixture is pale yellow and thick, about 2 to 3 minutes. Reduce the speed to low and beat in the flour.

In a medium saucepan, bring the egg nog to a boil. Temper the eggs by very slowly (I do about a cup at a time) pouring half the egg nog into the egg mixture and beat until blended then pour the mixture into the remaining egg nog in the pan. Over medium heat, bring the ingredients to a boil while whisking constantly. Allow the custard to boil for 1 minute as you continue to whisk. Remove the pan from the heat.

Let the custard cool slightly, then cover its surface with a piece of plastic wrap to prevent a skin from forming. Let the custard cool completely, then refrigerate it until ready to use (up to three days).

To assemble the trifle: In a medium bowl, toss the thawed raspberries and sugar. Remove the gingerbread from the pan and use a serrated knife to slice it into four equal wedges.

Take one of the gingerbread wedges and crumble it over the bottom of a trifle bowl or a 2 1/2-quart bowl. Spoon and spread about 3/4 - 1 cup of the raspberry mixture over the cake, then top the fruit with 1 cup of custard. Repeat the layering two more times with the remaining ingredients. (You can actually do three more layers, you will have an extra wedge of cake to do that. However, you will have to do a little less custard and raspberries on each layer, and I found that three layers filled my trifle bowl pretty much to the top. I just saved the fourth wedge of gingerbread.) Cover the bowl with plastic wrap and refrigerate it for at least 3 hours to let the flavors meld (the dessert can be stored overnight).

Before serving, make the whipped cream. In a medium bowl with an electric mixer on medium-high speed, whip the cream with the confectioners' sugar until soft peaks form, about 3 minutes. Use a spatula to spread the whipped cream on top of the trifle, and garnish it with the fresh raspberries and crumbled ginger snap cookies, if desired.


SOURCE: Adapted from Family Fun Magazine

Tuesday, December 27, 2011

Chocolate Coconut Fudge


Healthy fudge....what! I've mentioned before how much I love coconut and what great health benefits it has. It also has great flavor to boot and when paired with chocolate, it's like a match made in heaven.

I created this fudge using coconut oil instead of butter and coconut milk instead of any kind of dairy milk or cream. I also used dark chocolate and about a fourth of the sugar used in regular fudge recipes. Don't you worry though, it's still plenty rich and sweet and incredibly creamy and smooth! My husband and I both agreed that this was the best fudge either of us had ever eaten (and believe me, I've had my fair share)....a million dollar recipe.....hmm, maybe!

Chocolate Coconut Fudge
16 oz. dark chocolate, chopped (or dark chips)
1/2 cup flaked coconut
3/4 cup canned coconut milk, full-fat
3 1/3 cups mini marshmallows
5 Tbsp. coconut oil
1 1/4 cups sugar
1 tsp. salt

Grease a 9-inch square baking pan with coconut oil, or lightly spray with cooking spray. Line with parchment paper, if desired, leaving about 2 inches of overhang on each side for easy removal.

In a medium saucepan over medium-high heat, combine coconut milk, marshmallows, oil, sugar and salt. Stir until everything is melted and completely smooth. Remove from heat and add chopped chocolate. Stir again until completely melted and smooth. Add flaked coconut and stir to combine. Pour into prepared baking pan and spread evenly. Allow to cool.

Fudge will be soft at room temperature. To aid in cutting, place fudge in the fridge until slightly firm. Cut into 1-inch squares and store either at room temperature or in the fridge. You can also wrap it up in wax paper and put it into a freezer safe zip-top bag and store it in the freezer. Serve at room temperature.


Linked to...
These Chicks Cooked @ This Chick Cooked

Tuesday, December 20, 2011

Egg Nog Syrup


I'll just get to the point here. If you like egg nog, this syrup is going to knock your socks off!!! I couldn't wait to try it when I stumbled upon it a while ago and, believe me, I was NOT dissappointed. Not only is this a delicious and seasonal pancake topping, but you can also use it on ice cream or even a slice of warm gingerbread (yum!).

If you really like egg nog, you can serve this syrup with the egg nog pancakes I posted yesterday, even more delicious! But, good old buttermilk pancakes are great too.

Egg Nog Syrup
1 stick butter
3/4 cup good eggnog
1 cup granulated sugar
1/2 tsp rum extract
1 tsp. baking soda
pinch of fresh grated nutmeg

In a large saucepan, bring to a boil the butter, eggnog, and sugar, stirring continuously. Remove from heat and whisk in rum extract and baking soda (it will foam when you put in the baking soda, so make sure you are using a large saucepan).

Allow to cool and either serve warm right away or refrigerate in an airtight container.


SOURCE: Adapted from Dine & Dish


Linked to...
These Chicks Cooked @ This Chick Cooks

Egg Nog Pancakes


One thing I love about the holidays is that I get to indulge in yummy treats I don't usually get to, egg nog being one of them. Other than homemade fudge and caramel, a good egg nog hits right up there with one of my favorites and a must-have during the season. I love it so much, I've been known to drink it right out of the carton, forgetting about sharing it with anyone else or even using a proper cup. Thankfully I'm not the only egg nog-lover in my family; my dad and siblings are as well. In fact, last year my older brother went so far as to make his morning cream of wheat with egg nog-not sure about that one.

Well, another love of mine is anything breakfast, especially pancakes. So, when I bought an abundance of egg nog a couple of weeks ago, naturally my mind turned to egg nog pancakes, egg not syrup, egg nog breakfast cake....you get the picture. So, I created this recipe based on my basic pancakes recipe and it is absolutely delicious!

These pancakes are a little sweeter than your typical pancake because of the egg nog. I enjoyed eating them with just some melted butter and a dusting of powdered sugar. HOWEVER, I also made some crazy good egg nog syrup (which I will share tomorrow) and put it on top of the egg nog pancakes and it was complete bliss-to DIE for!!! So, you choose how you want to serve them; and the sooner the better.

Egg Nog Pancakes
3/4 cup good egg nog, room temperature
1/2 cup milk, room terperature
1 egg
1 tbsp. brown sugar
2 Tbsp. butter, melted
1/4 tsp. rum extract (optional)
1 cup flour
1 tsp. baking powder
1/2 tsp. baking soda
1/4 tsp. salt
pinch of freshly grated nutmeg

In a mixing bowl, whisk together the egg nog, milk, egg, sugar, butter and rum extract, until well-incorporated. Then, stir in the rest of the ingredients until combined, taking care not to over-mix.

Let batter sit while griddle heats up. Ladle batter by the 1/4 cup onto griddle and cook until edges start to dry and bubbles start forming on top; about 2-3 minutes. Flip pancakes and cook another 2-3 minutes on the other side. Serve warm.

Makes about 8-10 pancakes


Linked to...
These Chicks Cooked @ This Chick Cooks

Friday, December 16, 2011

Autumn Panzanella


I think now is a good time to stick a salad in here; mix it up with all those sweets and something healthy to stick under your belt before the onslaught of holiday goodies begins rolling in (if it hasn't already).

Panzanellas are one of my favorite kinds of salads, especially with the right kind of bread, toasted to perfection. I'm glad I stumbled upon this salad because sometimes it's easy to forget to eat your greens (and sometimes veggies too!) during the cold fall and winter months. Well, now there's no excuse. This fall-inspired panzanella gives you a mixture of delicious fall produce, good-for-you greens along with toasty bread and pumpkin seeds and a pop of both color and sweet-tart flavor from the dried cranberries.

Autumn Panzanella
olive oil
1 small butternut squash, peeled and cubed
2 sweet potatoes, peeled and cubed
2 apples, chopped
1/4 teaspoon salt
1/4 teaspoon pepper
1/4 teaspoon chili powder
1/4 teaspoon cinnamon
1/4 teaspoon garlic powder
3-4 cups fresh greens
1/3 cup dried cranberries
1/4-1/2 cup green pumpkin seeds (or sunflower seeds would work too)
4-5 thick slices multi-grain bread, cut into chunks


Preheat oven to 350 degrees F. Mix salt, pepper, chili powder, cinnamon, and garlic powder in a small bowl.

In a large bowl, mix sweet potato and squash chunks, then generously drizzle olive oil on top and toss to coat. Add about 3/4 of the spice mixture, and toss again to coat. Lay on a baking sheet and bake for 20 minutes, stirring about half way through.

After 20 minutes, toss apple chunks with remaining spice mixture. Add apple to the baking sheet and bake for another 10-20 minutes, or until everything is tender, tossing once or twice. Remove from oven and cool.

Toss pieces of bread in some olive oil and sprinkle with a little salt and pepper, then spread on a separate baking sheet . Bake for 10-12 minutes, or until golden and crispy.

Heat a small skillet over medium-high heat. Add (green) pumpkin seeds and toast until lightly golden. Remove from heat and allow to cool in a separate dish.

In a large bowl, combine greens with roasted veggies and apple, toasted bread, seeds and cranberries. Toss with some of the vinaigrette and serve immediately. (You can serve the dressing separately if you don't plan on eating it all right away.)

Vinaigrette:
1 clove garlic, minced
1/2 tsp. Dijon mustard
1/4 cup apple cider vinegar
1/4 cup olive oil
salt
pepper

SOURCE: Adapted from How Sweet It Is

Monday, December 12, 2011

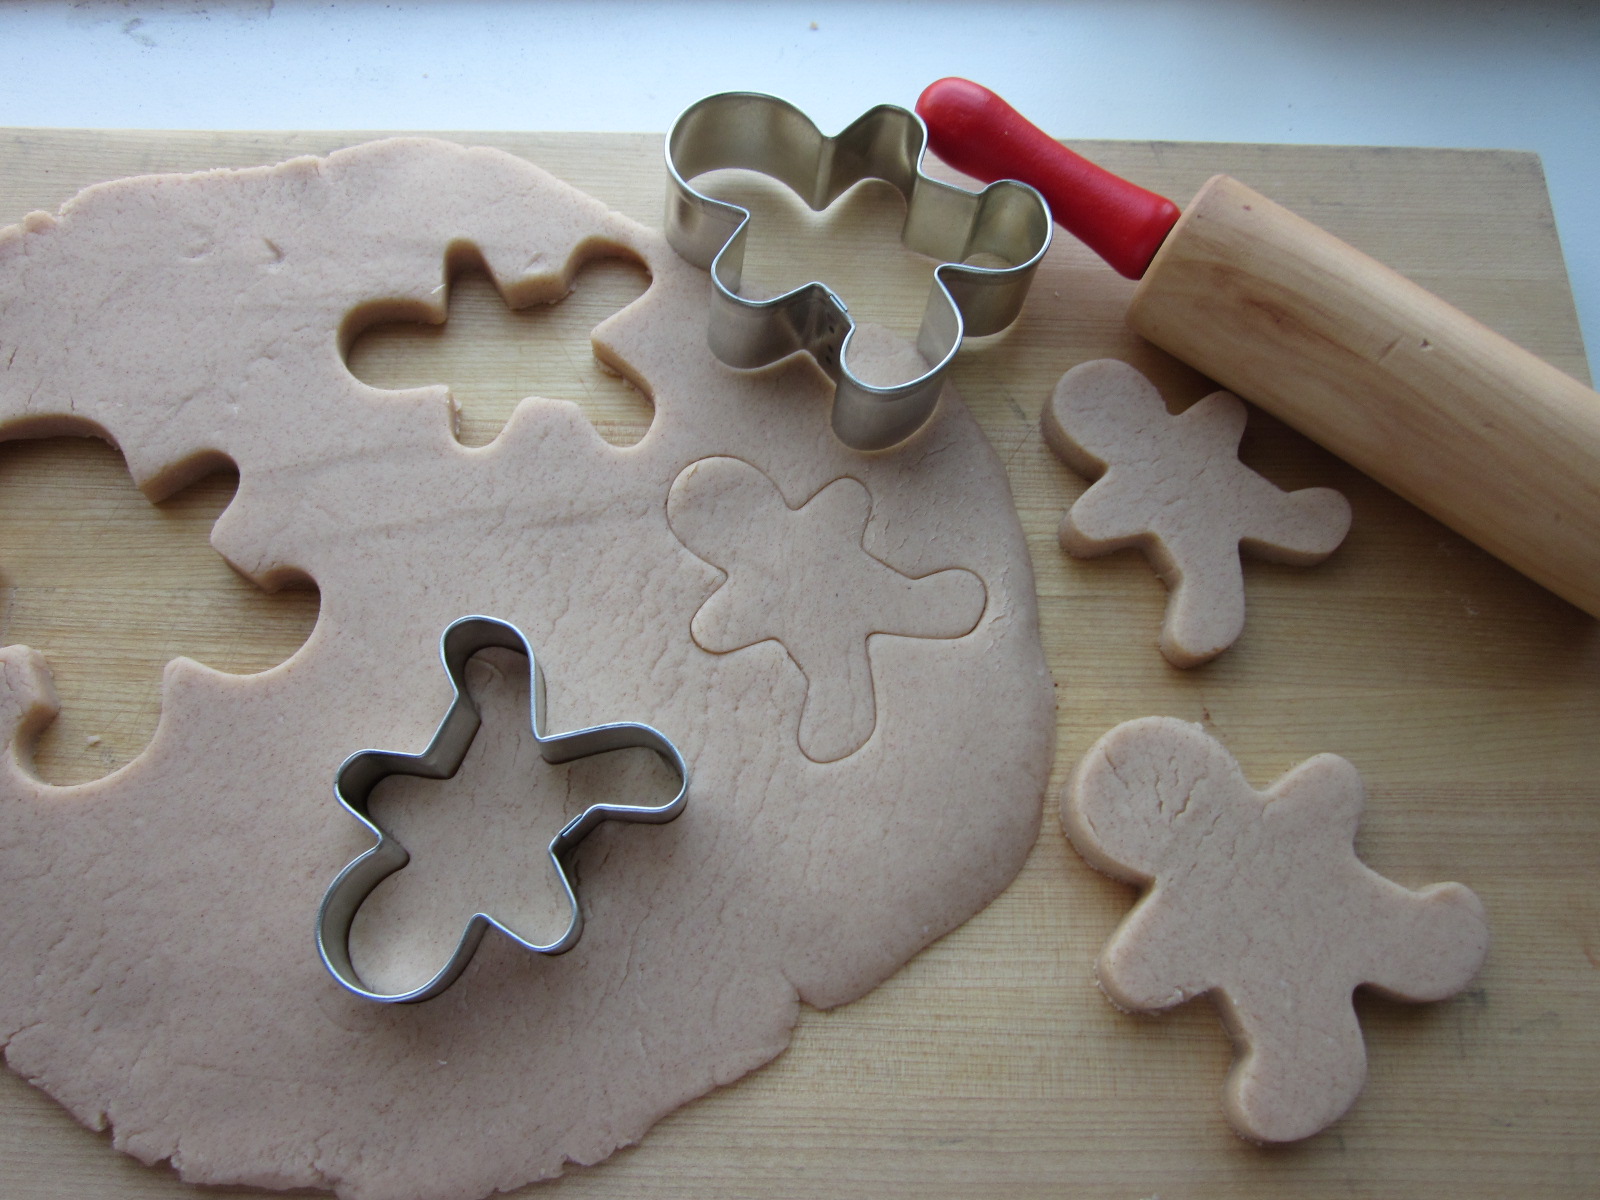
Gingerbread Play Dough


Here's another great holiday gift-giving idea; especially for the little ones. While looking for seasonal activities for my girls to do to keep them busy during the day, I remembered my friend gave me the recipe for this gingerbread play dough years ago. Playing with play dough is fun anyway, but it's even better when it makes everything smell like warm cinnamon and ginger.

Kids of all ages (and even the occasional adult) enjoy playing with play dough. Gift wrap some up and tie it with a small gingerbread cookie cutter for your kids to give as friend gifts, or just keep some on hand for those long quiet afternoon hours when the little ones get bored. This will keep them busy; and smelling great too!

Gingerbread Play Dough
3 cups flour
1 1/2 cups salt
1 Tbsp. cream of tartar (or alum)
1 Tbsp. ground cinnamon
1 Tbsp. ground ginger
6 Tbsp. oil
3 cups water

Heat mixture on low heat and bring to a boil. Remove from heat and knead. Let cool and keep in an airtight container or zip-top bag.

Linked To...
These Chicks Cooked @ this Chick Cooks

Thursday, December 8, 2011

Hot Chocolate Mix


If giving neighbor gifts around the holidays is your thing, than you might not want to let go of this recipe. Your neighbors will love you! Make sure you keep some for yourself though because it will knock your socks off how delicious it is. It is so rich and chocolaty and you can use whatever kind of milk you want. That's a bonus in our house since we drink two different kinds of milk around here.

...and can I just put in a little plug for my canning jars? I love them, they are so versatile! I use them for home canning but I also store anything and everything in them. They are also great for gift-giving things like soup mix, cookie mix and, of course, this hot chocolate mix.

Hot Chocolate Mix
4 cups granulated sugar
1½ lbs. good quality semi-sweet chocolate, coarsely chopped
9 oz. good quality dark or bittersweet chocolate, coarsely chopped
2 cups cocoa powder

In the bowl of a food processor fitted with the metal blade, combine the sugar, semisweet and bittersweet chocolate, and cocoa powder. Process in 4-second pulses until the chocolate is very finely ground and the mixture is well combined. Store the mix in an airtight container for up to 6 months.

Serving Instructions:
Combine 2 tablespoons hot chocolate mix with 8 oz. of very warm milk and stir to combine until well blended.


SOURCE:Annie's Eats


Linked to...
Sweet Indulgences Sunday @ A Well-Seasoned Life
Related Posts Plugin for WordPress, Blogger...