Showing posts with label Garden Recipes. Show all posts
Monday, October 6, 2014
Tomato, Basil and Goat Cheese Scones
When it comes to scones, I'm pretty much a hoarder. I've tried all sorts of flavor combinations and I love them all! When my friend posted a picture the other day of her tomato-basil-goat cheese biscuit, I knew these would be the next scones I would make. After all this is about the time every year when I pull my tomato plants out for the fall and I have a bajillion cherry tomatoes to use up.
I love, love loved the outcome of these scones. They were every bit as delicious as I had imagined. Since the cook time is relatively short the tomato and basil still had that fresh picked flavor and the soft, tangy goat cheese just melts in your mouth.
Tomato, Basil and Goat Cheese Scones
1 cup all-purpose flour
1 cup whole wheat flour
1 Tbsp. baking powder
1 tsp. salt
5 Tbsp. cold unsalted butter, cut into chunks
1 cup buttermilk
1 cup cherry or grape tomatoes, halved (about half a pint)
2-3 Tbsp. fresh basil, chiffonade
1/4 cup goat cheese, crumbled
Preheat oven to 425 degrees F.
In a food processor fitted with a blade attachment, add the flours, baking powder and salt. Pulse a couple times to blend. Add butter and whiz until mixture becomes a coarse meal. Alternately you could use a pastry blender or two knives to cut butter in.
Pour mixture into a mixing bowl and toss in tomatoes, basil and goat cheese. Gently mix in buttermilk until just combined. Do not over mix!
Turn dough out onto flour dusted counter and knead about 4 times (again, resist the urge to knead much more than that). Pat into a rectangle and cut into 12 squares. Place each scone onto a baking sheet. Place baking sheet into oven and bake 12- 15 minutes, until lightly golden. Cool completely on wire rack.
Scones are best eaten fresh, the same day. You can also freeze uncooked scones to bake fresh as needed. After you cut them out, place them on a large plate and place in freezer for about an hour. Then transfer them to a freezer safe zip loc bag. Do not thaw to bake, just add about 3-4 extra minutes onto bake time.
Labels:
Bread,
Garden Recipes,
Quick n' Easy,
Scones,
Tomatoes
Sunday, September 14, 2014
Tomato Vegetable Soup
'Tis the season for fresh garden tomatoes. It's the time I look forward to every year! You can do so much with them. I usually home can tomatoes in one way or another each fall (salsa, a variety of spaghetti sauces, etc.), but the past few years I've been doing more and more just plain or stewed tomatoes. I do this mostly because I LOVE to turn them into soup. My kids and I absolutely adore this fresh tomato soup, but sometimes I like to make something a little more calorie friendly. Enter this soup.
I don't tend to like soups that are really thin, they just don't fill me up. I like my soups thick and tasty. That's what this soup delivers. It still has that fresh tomato taste but the flavor is punched up with some extra veggies. I love to serve it up with some fresh artisan bread or even a heaping spoonful of this Southwest Cabbage Slaw (which really needs it's own post by now).
Tomato Vegetable Soup
6-8 cups tomatoes, blanched, peeled and cored
3 carrots, chopped
1 green pepper, cut into 1-inch dice
1 small onion, cut into 1-inch dice
3 cloves garlic, minced
1 tsp. smoked paprika
2 cup chicken or vegetable stock
handful of fresh basil (about 1/2 cup or so loosely packed), roughly chopped
salt and fresh ground pepper, to taste
To blanch and peel tomatoes, bring a pot of water to a boil and fill a sink with ice water. Score the tomatoes by making an "x" on them with a serrated knife. Drop about 4-5 tomatoes at a time in the boiling water for 60 seconds. Remove from boiling water and immediately submerge in ice water. Continue with remaining tomatoes. Once tomatoes are cooled skins will slip off easily. remove core with knife or coring utensil. Set tomatoes aside.
In a large pot, heat a drizzle of olive oil. Add chopped onion, carrot and peppers and saute over medium-high heat about 5-6 minutes. Add garlic and paprika and saute another 60 seconds, making sure the garlic doesn't burn. Next add tomatoes by crushing them in your fist over the pot as you put them in. Add chicken stock and bring to a boil. Reduce heat and simmer until veggies are tender; about 10-15 minutes.
Remove soup from heat, add fresh basil and puree to desired consistency. You can either do this with an immersion blender or in a upright blender, blending by batches. Check for seasoning and add salt and pepper, to taste. Feel free to add a splash of whole milk or heavy cream, although it's delicious without it.
SOURCE: Adapted from Season with Spice
Labels:
Garden Recipes,
Quick n' Easy,
Soups,
Tomatoes,
Vegetables
Tuesday, September 2, 2014
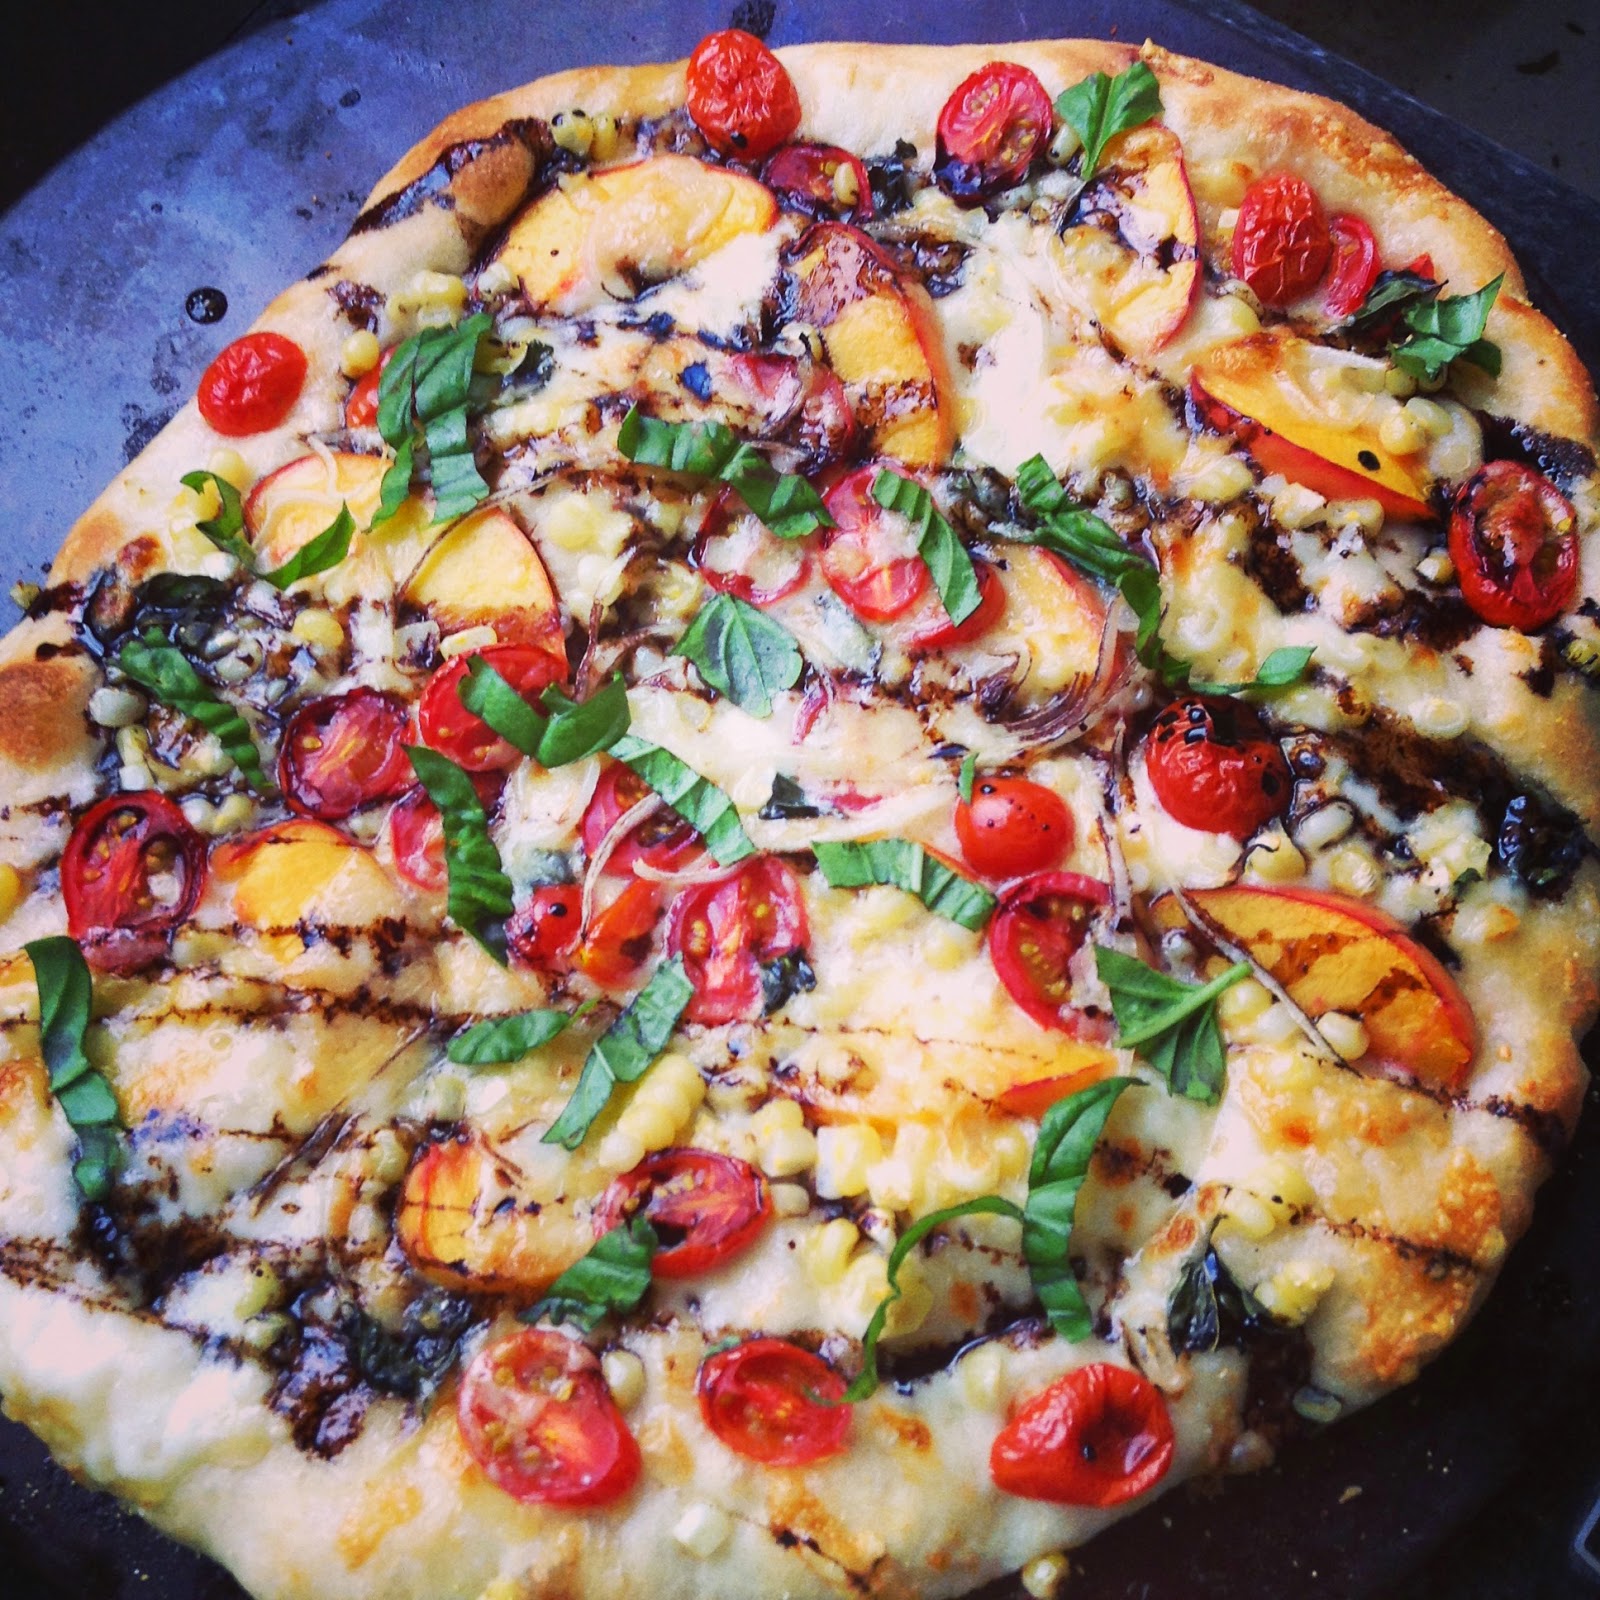
Fresh Peach and Corn Caprese Pizza
So, now that I've basically taken the whole summer off from blogging, I'm going to cram all the summer-luvin' food in your faces the next couple weeks before fall starts. EEEK! I'm just a little excited.
Summer was busy for us, but, hey, who wasn't it busy for? Our most exciting time was a week up in Island Park, Idaho near Yellowstone, with my WHOLE family; all my siblings, their spouses and kids, and of course my parents. It was just awesome to get away and be together, but we also got to see and do some fun things as well. The rest of the summer has not been too incredibly exciting. Lots of trips to the pool and water parks, playing with friends and such.
Anyway, I digress. We got out of our regular Friday night pizza night over the summer and had missed several. I was craving it big time! I was just craving a regular caprese pizza but my mom always gives me stuff from her garden. She gave me some corn and peaches from her tree (fresh peaches=heaven!), and I thought, hey, why not throw it onto a pizza? So, not only does this pizza have homegrown corn, peaches and basil but I also threw on some fresh mozzarella and smoked jack cheese. MMMmmm! I discovered my love for smoked cheese last year, thank you Trader Joes, and it's one of my most favorite things to put on pizza.
This pizza is the essence of summer! It will not disappoint.
Fresh Peach and Corn Caprese Pizza
1 recipe Perfect Pizza Crust
1/4 cup balsamic vinegar
2 cloves garlic, minced
1 small peach, thinly sliced
handful of grape tomatoes (halved or whole)
corn cut from 1 fresh ear
4 oz. fresh mozzarella
1/2 cup smoked cheese (such as mozzarella or jack), shredded
2-3 Tbsp. fresh basil, chiffonade
Mix pizza dough according to directions. While dough is rising, make balsamic reduction.
Pour balsamic vinegar into a small pan and bring to a boil. Reduce heat to medium high and cook until reduced by half, about 2 tablespoons. Set aside.
Preheat oven and pizza stone to 450 degrees F.
Once dough has risen and doubled in size, roll out on a pizza peel generously dusted with corn meal. You can also roll it out on parchment paper (which you can slide right into the oven with the pizza); the more toppings the harder it is to slide off onto the baking stone. Brush the entire top of the dough with olive oil. Spread the garlic around the dough as evenly as you can, either with your fingertips or a pastry brush.
Slice the mozzarella and layer on top of dough, followed by the sliced peaches, tomatoes and corn. Top with the shredded smoked cheese. If you want you can tuck in a few basil leaves too.
Slide pizza onto pizza peel and bake 8-10 minutes or until top is lightly golden and cheese is bubbly. If you're using parchment, slide pizza on top of an inverted cookie sheet, then either place that right into the oven or use it to slide it onto the pizza stone.
Remove pizza from oven, allow to cool slightly, then drizzle the balsamic reduction over the top. Slice and serve warm.
Labels:
Garden Recipes,
pizza,
Quick n' Easy
Saturday, August 30, 2014
Creamy Polenta with Summer Squash Saute
I love the simple and tasty. I've said many times here on the blog that sometimes it amazes me how just a few very simple ingredients can taste so wonderful. And when those ingredients are some you grew yourself, even better! I didn't actually grow the squash, but my mom did and she gave it to me. The basil is ALL mine!! Can't live without that stuff.
This is a quick and easy summer dish. It goes great as a side dish along side some grilled chicken, or keep it meatless and serve it with some salad and a baguette
Creamy Polenta with Summer Squash Saute
for the polenta:
3/4 cup polenta (or cornmeal; not instant)
3 cups low-sodium chicken broth
1/3 cup heavy cream
1/2 cup grated parmesan cheese
for the saute:
1 Tbsp. olive oil
2 small zucchini, cut in half lengthwise and sliced
2 small yellow summer yellow summer squash, cut in half lengthwise and sliced
3 cloves minced garlic
salt and pepper to taste
garnish:
1/4 cup fresh basil, chiffonade
Bring chicken broth to a boil and whisk in polenta. Reduce heat to low and stir polenta as it thickens. Depending on how coarse the grain it, it may take 10-15 minutes. Remove from heat and whisk in cream and cheese. Check for seasoning and salt and pepper to taste.
Meanwhile, heat olive oil in a large frying pan, over medium-high heat. Add garlic and cook about 30 seconds, stirring constantly. Add in zucchini and squash and cook about 5 minutes until it starts to brown a bit. Reduce heat to medium-low, add a couple tablespoons of water and simmer until desired doneness; about 3-5 minutes. Salt and pepper to taste.
Serve polenta on a rimmed plate or wide bowl. Spoon squash saute over the top of the polenta and top with fresh basil.
SOURCE: Adapted from Eating Well
Labels:
Garden Recipes,
Quick n' Easy
Monday, August 25, 2014
Caprese Quinoa Stuffed Peppers
Silly camera is broken so today I bring you these peppers via iPad photo. That's just how we're rolling today. Remember these peppers from last summer? Well I had the same problem a few weeks ago....more peppers than I knew what to do with. I still love red peppers, although a couple of my children have fallen out of fondness with them (hopefully only for the time being). So, it was up to my hubby and me to finish them off.
I don't have a "real" garden this year, but I managed to plant a couple tomato plants and some basil in our flower beds. Tomatoes and basil are two of my most favorite things to eat in the summer, when produce is at it's finest. I try to eat it as much of it as I can, WHILE I can. So these peppers, and anything else I can get my hands on, are stuffed with tomato-y basil-y goodness! You'll love 'em.
*A note on the mozzarella and pesto: I like to use fresh buffalo mozzarella, or just whole milk mozzarella. It can be pretty soft and hard to shred, so I just break it up with my fingers. I also love making my own pesto, especially when I have my own basil plant, but sometimes I don't have a need for all of it at once. If you need to store it longer than a week or two, you can freeze it in smaller containers (4-5 oz), or even in ice cube trays; just pop it out of the tray once it's frozen and put the cubes into a ziploc freezer bag.
Caprese Quinoa Stuffed Peppers
1 cup uncooked quinoa
2 cups chicken (or veggie) stock
4 sweet peppers (red, yellow or orange)
3/4-1 pint cherry (or grape) tomatoes, halved
2 Tbsp. basil pesto (use this recipe or use store bought)
1/2 cup shredded mozzarella cheese, plus more for topping
fresh basil leaves, shredded, for garnish (optional)
Add quinoa and chicken stock to a medium-sized sauce pan. I you have a fine sieve, rinse the quinoa first. Bring to a boil, cover and reduce heat to a simmer. Cook 15-20 minutes.
Preheat oven to 425 degrees F.
Slice peppers in half, lengthwise, and remove seeds. Place, cut side up, in a baking dish and cover with foil. Bake, unfilled, for 10 minutes. Remove from oven and remove foil.
Meanwhile, in a mixing bowl, stir together the cooked quinoa and the pesto. Add in tomatoes and 1/2 cup of the mozzarella and toss. Divide mixture evenly between each of the pepper halves and top with about a tablespoon more of the mozzarella. Cover again with the foil and stick it back in the oven to bake for another 10-15 minutes. I like my peppers more crisp-tender so I tend to bake for less time, but if you like your peppers soft bake longer and check for doneness. Remove the foil the last 5 minutes or so for the cheese to brown a little bit. Serve warm.
Labels:
Garden Recipes,
Meatless,
Quick n' Easy,
Tomatoes,
Vegetables
Monday, April 7, 2014
Zucchini Spinach and Basil Soup
If you have a garden and grow zucchini, this soup recipe will be your best friend. I mean, there's only so much you can do with zucchini before you get tired of eating it. ZUCCHINI is the secret ingredient in this soup that makes it silky creamy without the cream.
Now, I realize I'm posting this before most of you have even planted your gardens this year, but it's really a soup for any season. It's delicious warm, but it is also yummy room temperature or even chilled, like a gazpacho. So make it now and eat it throughout the summer and fall.
Zucchini Spinach and Basil Soup
serves 4-5
Olive oil
1 clove garlic, minced
1/2 onion, diced
2 medium zucchini, trimmed and chopped (about 4 cups)
2 cups chicken broth
3 cups fresh spinach, coarsely chopped
2 Tbsp. fresh basil, chopped
salt and pepper, to taste
In a large pot, heat a drizzle of olive oil over medium heat. Add the chopped onion and saute about 5 minutes, until nice and tender. Add the garlic and zucchini and saute another minute or two. Add the broth and bring to a simmer. Cover, reduce heat and cook until zucchini is very tender and falling apart; about 8-10 minutes.
Remove soup from heat and add spinach. Use an immersion blender to puree the soup. Alternately you can work in batches pureeing the soup in a blender. Check for seasoning and salt and pepper, to taste. Stir in fresh basil.
Serve warm with baguette or homemade bread.
SOURCE: Mel's Kitchen Cafe
Labels:
Garden Recipes,
Quick n' Easy,
Soups,
Vegetables
Monday, September 16, 2013
Grilled Ratatouille Polenta Stack
Most of what you see here is either from my garden or was given to me from a friend's garden. Gotta love it! I wish my garden were bigger, I wish I could grow everything I wanted and I wish I could have my own tomatoes the whole year long. But alas, 'tis not so. So, for now I'll take what I can get.
Last summer I played around with ratatouille a bit and really enjoyed the flavor profile. I also started liking eggplant a little more. When my friend brought me three eggplants a while back I immediately knew I wanted to do something ratatouille-like but wasn't sure what. Then I got inspired and pulled this dish off.
This totally hit the spot and was a great meatless meal. I was a little nervous at the lack of seasoning (other than salt) on the veggies but I forget just how delicious grilled or roasted veggies are by themselves. They were anything but flavorless. Then the marinated fresh tomatoes and herbs up the anti even more. All that sat on top of a creamy polenta cake, giving the dish both flavor and substance.
Grilled Ratatouille Polenta Stack
for the ratatouille:
1 medium zucchini, sliced 1/4 inch thick
1 medium eggplant, sliced 1/4 inch thick
1 large yellow or orange bell pepper, sliced 1/2 inch thick
salt
for the polenta:
3/4 cup polenta/corn grits/cornmeal
3 cups chicken broth or water
3/4 cup freshly shredded parmesan cheese
1/3 cup heavy cream
salt and pepper, to taste
for the marinated tomatoes and herbs:
3-4 medium tomatoes, diced
2 Tbsp. fresh herbs, chopped (I used basil)
1 Tbsp. olive oil
1 Tbsp. balsamic vinegar
salt and pepper, to taste
Slice eggplant and zucchini. Place on a wire rack fitted over a cookie sheet. Alternately you can place them on a paper towel-lined cookie sheet as well. Sprinkle with salt and let sit about 10 minutes to draw the water out. Flip, salt again and let sit another 10 minutes.
Dice tomatoes and place in a bowl with vinegar and olive oil. Add chopped herbs. Season with salt and pepper, to taste. Set aside until ready to plate and serve.
Bring chicken broth or water to a boil. Gently whisk in polenta. Reduce heat and simmer 7-15 minutes. Cook time will depend on coarseness of the grain. If you are using a fine cornmeal, it may only take 4-5 minutes.
While polenta is cooking, preheat outdoor grill or indoor grill pan and grill zucchini, eggplant and peppers on both sides until tender.
When polenta is finished cooking, remove from heat and whisk in cheese and cream. Pour into an 8x8-inch pan, buttered or sprayed with cooking spray. Allow to set until firm. You can briefly refrigerate it if necessary. Cut into 6 squares.
To assemble, place polenta cake on a plate. Layer with about 2-3 slices each eggplant, zucchini and bell pepper. Top with marinated tomatoes and herbs and some of the liquid.
Serve warm.
SOURCE: Slightly adapted from Project Domestication
Labels:
Garden Recipes,
Quick n' Easy,
Tomatoes,
Vegetables
Tuesday, September 10, 2013
Vanilla Bourbon Peach Jam {Low Sugar, No Pectin Recipe}
I've been up to my elbows in peaches lately, but I'm not complaining. They are one of my most favorite things of summer. I usually make freezer jam, but my freezer is full of ... peaches. Go figure. Although I do prefer freezer jam most of the time, peaches are one fruit that make good cooked jam.
I actually decided to make this jam to go with some ice cream I'd planned on making as well. I chose to do it old-school with no pectin because every time I go to make jam it seems I'm always out! I also wanted to control the amount of sugar, so this method worked out perfectly.
I love the addition of cinnamon and bourbon vanilla in this jam; it spices it up just a bit. If you can't find real bourbon vanilla, you can substitute regular vanilla extract or even the real thing!
Vanilla Bourbon Peach Jam
makes about 3 half-pint jars
2 lbs peaches, peeled and pitted
juice of a small lemon
1 1/2 cups sugar
1 1/2 tsp. ground cinnamon
1 Tbsp. real bourbon vanilla extract (or you can use real bourbon)
Place peaches into a blender or food processor and puree until smooth. If you like chunks in your jam, you can puree it a little less.
Add peaches to a heavy saucepan along with lemon juice and sugar. Bring to a boil over medium high heat. Continue boiling until candy thermometer reaches 220 degrees F, stirring frequently (this may take up to an hour or so). Be careful when stirring and scraping off the bottom, mixture will bubble and pop.
When mixture reaches desired temperature, remove from heat and give it a good stir. Add in the cinnamon and vanilla and stir to combine. Taste and add more flavoring as desired.
Ladle into half pint canning jars and secure lids. Cool on counter then keep either in fridge or freezer. If you want to can the jars in a water bath canner, follow instructions for your particular canner.
Monday, December 3, 2012
Fresh Tomato Soup
This soup is a staple at our house during the fall and winter months. At the end of summer when tomatoes are at their ripest, I buy boxes and boxes of them (when I don't have a garden) to preserve. A lot of the tomatoes I turn into salsa and spaghetti sauce. The rest I just peel and puree, then freeze in about 2 quart quantities. It makes preparing this soup a cinch, since most of the work is already done!! Even in the middle of winter, we can have this soup and it still tastes like it just came out of the garden. Simple, fresh ingredients are key to making this soup taste "soup"er.
Fresh Tomato-Basil Soup
8 cups (2 quarts) fresh tomato puree (about 10-12 vine-ripened tomatoes)
chicken soup base
1 cup heavy cream (can substitute full-fat coconut milk for non-dairy)
Coarse salt and black pepper 20 leaves fresh basil, cut into chiffonade, for garnish
To blanch and peel tomatoes, bring a large stockpot of water to a boil. Fill a sink full of ice water. Working in batches, score the bottom of the tomatoes. Place in boiling water for 60 seconds. Remove immediately and place in ice bath. Repeat with remaining tomatoes.
Once tomatoes are cooled, drain water from sink. Core tomatoes and slip skins off. Puree tomatoes either with a food processor or working in batches in a blender. Don't worry If you have a little more or less than 8 cups.
Add tomato puree to a large stock pot. Add enough chicken soup base for 2 cups and bring to a boil. Once chicken base is completely dissolved, taste for seasoning and add more, to taste.
Gently simmer for about 5 minutes, add cream and simmer another 2-3 minutes. Taste again for seasoning and adjust as necessary. Remove from heat and add most of the basil, leaving some for garnish.
Serve warm.
*If you don't have access to fresh tomatoes, you can use 2 28-oz can of good quality crushed tomatoes (Cento, San Marzano).
Labels:
Figure Friendly,
Garden Recipes,
Kid-Friendly,
Meatless,
Quick n' Easy,
Soups,
Tomatoes
Friday, November 16, 2012
Lentil and Kale Pasta
It's so good to get back to healthy! After spending the better part of a week in Las Vegas indulging and splurging, my body started craving warm, earthy and hearty flavors and food. This totally fit the bill. I was pleasantly surprised how much I liked the lentils. They are a lot more flavorful than I remember them being. It's been a while, but like I said, I'm trying to clean out my pantry so I really wanted to use them up.
The kale is amazing here too, adding not only color and texture but a ton of nutrition too. I used my own sun-dried tomatoes that I dehydrated then reconstituted but you could also use oil-packed sun-dried tomatoes from the store.
Lentil and Kale Pasta
1/2 lb. whole wheat pasta (I used shells)
1 1/2 cups cooked lentils
1/2 cup sun-dried tomatoes, reconstitued and chopped
4 cups kale, rinsed and chopped
3 cloves garlic, minced
pinch red pepper flakes
12-15 oz jar marinated artichoke hearts, drained and choped
1/2 cup crumbled feta
olive oil
juice of half a lemon (about 1-2 Tbsp.)
1/4 cup fresh basil, chopped
salt and pepper, to taste
garnish: finely grated parmesan cheese (to your liking)
Start cooking the lentils first or even ahead of time, they will take the longest; about 15-20 minutes. Follow package directions. Cook, drain and set aside.
In the meantime, cover sun-dried tomatoes in about 1-inch of water in a small saucepan. Bring to a boil and cook about 5 minutes. Remove from heat, drain and chop.
Bring a large pot of water to boil and cook pasta according to package directions. Drain and rinse with cold water for about 10 seconds to cool it off a bit. Put pasta and lentils and chopped tomatoes in a large salad bowl.
Using the same pot as you cooked the pasta in, drizzle a good amount of olive oil on the bottom. Drop the kale and sprinkle with a pinch or two of red pepper flakes. Saute 2-3 minutes, adding the garlic in the last 20 seconds or so, to avoid burning. Add the kale to the salad bowl. Wait for it to cool slightly before stirring it in.
Add chopped artichokes, feta, 1-2 tablespoons olive oil, lemon juice, basil and salt and pepper to the lentils and pasta, stirring to incorporate. Taste for seasoning and adjust as necessary.
Serve at room temperature, topped with finely grated parmesan cheese.
Saturday, October 27, 2012
Fresh Spaghetti Sauce
I've been home canning my own spaghetti sauce for years. I love gathering the last of the tomatoes in the fall and filling up my jars that line my pantry throughout the winter until next year. The first sauce I used to make was from a dry mix, and although I loved it, it wasn't my husband's favorite. So, the last few summers I've been trying different recipes, searching for "the one."
The last couple years I made this Tomato-Basil Simmer Sauce which I actually do love, but I also wanted a sauce that was more substantial, something that would stick to the noodles without running off.
This, my friends, is "THE ONE," the very sauce I will can for the rest of my existence! Ok, well maybe not that long, but I think my search is over. This recipe uses fresh, vine-ripened tomatoes, but also uses just a little canned tomato sauce and paste which allow the sauce to thicken without cooking it to death, thus preserving that fresh tomato taste (and not keeping you in the kitchen all day).
I love the sweet bell peppers in this sauce. I chose to use only about half green pepper and the rest red. I find the green ones have a more bitter taste, but any other colored ones (yellow, red or orange) work perfectly. I think next time I will replace all of the green pepper with a different color.
This recipe makes roughly 12 cups, 6 pints. If you're not a canner, you can also freeze the sauce in 2-4 cup portions in zip-loc freezer bags or freezer safe plastic ware. You could also just half the recipe for short-term use.
Fresh Spaghetti Sauce
makes about 6 pints
8 cups vine-ripened tomatoes (best from the garden), peeled and chopped (about 10-12 large)*
2 cups onion, chopped
1 1/2 cups sweet bell pepper, chopped
6 cloves garlic, minced
2 tsp. dried oregano
2 Tbsp. canning salt (if you don't have canning salt, just salt to taste)
2 tsp. freshly ground black pepper
1 Tbsp. fennel seed
1/4 cup sugar
1 cup apple cider vinegar
16 oz. tomato sauce
12 oz. tomato paste
The last couple years I made this Tomato-Basil Simmer Sauce which I actually do love, but I also wanted a sauce that was more substantial, something that would stick to the noodles without running off.
This, my friends, is "THE ONE," the very sauce I will can for the rest of my existence! Ok, well maybe not that long, but I think my search is over. This recipe uses fresh, vine-ripened tomatoes, but also uses just a little canned tomato sauce and paste which allow the sauce to thicken without cooking it to death, thus preserving that fresh tomato taste (and not keeping you in the kitchen all day).
I love the sweet bell peppers in this sauce. I chose to use only about half green pepper and the rest red. I find the green ones have a more bitter taste, but any other colored ones (yellow, red or orange) work perfectly. I think next time I will replace all of the green pepper with a different color.
This recipe makes roughly 12 cups, 6 pints. If you're not a canner, you can also freeze the sauce in 2-4 cup portions in zip-loc freezer bags or freezer safe plastic ware. You could also just half the recipe for short-term use.
Fresh Spaghetti Sauce
makes about 6 pints
8 cups vine-ripened tomatoes (best from the garden), peeled and chopped (about 10-12 large)*
2 cups onion, chopped
1 1/2 cups sweet bell pepper, chopped
6 cloves garlic, minced
2 tsp. dried oregano
2 Tbsp. canning salt (if you don't have canning salt, just salt to taste)
2 tsp. freshly ground black pepper
1 Tbsp. fennel seed
1/4 cup sugar
1 cup apple cider vinegar
16 oz. tomato sauce
12 oz. tomato paste
1/2 cup fresh basil, chopped
Blanch and peel tomatoes. Pulse in blender until desired "chunkiness" and set aside. Drizzle a couple tablespoons of olive oil in a large stock pot and add chopped onions and peppers. Saute over medium high heat about 5 minutes. Add tomatoes, garlic and the next 8 ingredients. Bring to a boil, then simmer for 10 minutes. Remove from heat and stir in fresh basil.
To can sauce you must use a boiling water bath canner. Pour hot sauce into hot jars. Wipe mouth of each jar clean and place a lid and ring on each jar, only screwing lid to finger tightness. Process pint jars 15 minutes.
*To blanch and peel tomatoes, bring a pot of water to a boil and fill the sink with cold water. Using a knife, serrated works best for me, score the tomato by making an "x." Place as many tomatoes in the pot as will cover the bottom in ONE layer. Boil for 60 seconds, then ladle them out and immediately put them in the sink filled with cold water. Continue with the rest of the tomatoes.
You will notice the skins already starting to peel off where they have been scored. Slip off the skins, they come off easily, and core them and place them in a blender or food processor to chop or puree, whichever you prefer.
Make sure you do enough tomatoes to equal 8 cups, chopped.
Friday, September 14, 2012
Zucchini Bites
I know I'm totally hanging onto summer with this post, but I know there are some of you out there that still have zucchini coming out your ears and need something to do with it besides make bread....for the tenth time!
I love that each of these is one perfect little mouthful. You can pop them almost as mindlessly as chips or tater tots, but feel no regret because they are totally healthy!
These haven't quite yet made it to the dinner table because they are just do darned good to snack on, but they would make a great addition to any dinner menu!
Zucchini Bites
Yields 24
2 cups finely shredded zucchini, water squeezed out
2 eggs
1/2 cup whole grain or panko bread crumbs
1/2 cup parmesan cheese, finely shredded
1/2 red bell pepper, finely diced
1/4 cup onion, finely diced
4-6 fresh basil leaves, chopped
salt and pepper
Preheat oven to 400 degrees F. Spray a mini muffin pan with cooking spray.
Squeeze as much water out of the zucchini as you can, otherwise it will become soggy. Place everything in a mixing bowl and either stir with a spoon, or you can use your hand and give it a few good squeezes through your fingers to get it all nice and mixed up.
Using a tablespoon, or I like a small cookie scoop best, scoop mixture into prepared pan and bake for about 15-18 minutes or until slightly golden. Remove to a cooling rack and cool completely. Enjoy!
SOURCE: Adapted from The Curious Country Cook
Labels:
Figure Friendly,
Garden Recipes,
Kid-Friendly,
Meatless,
Muffins,
Quick n' Easy,
Sides,
Snacks,
Vegetables
Monday, September 3, 2012
End-of-Summer Smoothies
Not having my computer is totally killing me. My husband has a MacBook Air, which I have been using a little but I don't like it. I can't wait to get my own laptop back! I just couldn't wait another second to post though, I know it's been sparse the past few weeks. I've got not one but TWO wonderfully delicious end-of-summer smoothies to share with you today. Have a great holiday!!
This first smoothie was born out of necessity. Like, howmagonnauseupallthosepeaches my mom just gave me (from her tree)? I know, what a problem right? I knew I liked peaches and blueberries in my green smoothies, but had yet to try them in just an all fruit smoothie (something my girls would more likely like and finish). So, my first trial was a big score, didn't have to change a thing. It was absolutely love at first sight.
Fresh peaches at their peak are the most wonderful thing in the world to eat. I crave them every summer and am always very sad to see them go. If you can get your hands on some before they're gone, you gotta give this a try!
Blueberry Peach and Basil Smoothie
1 cup frozen blueberries
2 fresh, ripe peaches, peeled if you prefer and pitted
1/2 cup water
1/2 cup almond milk
about 4 fresh basil leaves
Put everything in your blender and whiz away!
I couldn't get this next smoothie out of my mind after I saw it. I think I made it that very day. Watermelon is another one of those quintessential fruits of summer that only lasts so long. So we gorge ourselves on it while it lasts then bid farewell until next time.
This smoothie is also paired with basil. I know you're thinking really??? c'mon here! Not more basil. But, seriously, don't underestimate the basil. It adds flavor and life to so many things. It's a subtle flavor that just knocks your socks off. If you're really not a fan, fresh mint would actually be a great substitution.
This is a super refreshing smoothie with the watermelon and cool cucumber. No need to add any extra liquid because the fruit is already full of it.
Watermelon Strawberry and Basil Smoothie
2 heaping cups watermelon
1/2 cup cucumber
1 cup frozen strawberries
3-4 fresh basil leaves
Put it all in your blender and whiz to you liking. Slurp away.
Enjoy!
SOURCE: Watermelon smoothie from My Green Diet
This first smoothie was born out of necessity. Like, howmagonnauseupallthosepeaches my mom just gave me (from her tree)? I know, what a problem right? I knew I liked peaches and blueberries in my green smoothies, but had yet to try them in just an all fruit smoothie (something my girls would more likely like and finish). So, my first trial was a big score, didn't have to change a thing. It was absolutely love at first sight.
Fresh peaches at their peak are the most wonderful thing in the world to eat. I crave them every summer and am always very sad to see them go. If you can get your hands on some before they're gone, you gotta give this a try!
Blueberry Peach and Basil Smoothie
1 cup frozen blueberries
2 fresh, ripe peaches, peeled if you prefer and pitted
1/2 cup water
1/2 cup almond milk
about 4 fresh basil leaves
Put everything in your blender and whiz away!
I couldn't get this next smoothie out of my mind after I saw it. I think I made it that very day. Watermelon is another one of those quintessential fruits of summer that only lasts so long. So we gorge ourselves on it while it lasts then bid farewell until next time.
This smoothie is also paired with basil. I know you're thinking really??? c'mon here! Not more basil. But, seriously, don't underestimate the basil. It adds flavor and life to so many things. It's a subtle flavor that just knocks your socks off. If you're really not a fan, fresh mint would actually be a great substitution.
This is a super refreshing smoothie with the watermelon and cool cucumber. No need to add any extra liquid because the fruit is already full of it.
Watermelon Strawberry and Basil Smoothie
2 heaping cups watermelon
1/2 cup cucumber
1 cup frozen strawberries
3-4 fresh basil leaves
Put it all in your blender and whiz to you liking. Slurp away.
Enjoy!
SOURCE: Watermelon smoothie from My Green Diet
Labels:
Fruit,
Garden Recipes,
Kid-Friendly,
Quick n' Easy,
Raw,
Smoothies
Monday, August 13, 2012
Chicken Bruschetta
I love seasonal food for all different reasons and summer food is no different. I love that it is fresh, bursting with flavor, you don't have to cook it most of the time and it is usually quick to prepare.
Some of my favorite hallmark flavors of summer include anything grilled, fresh herbs (mostly basil), garden fresh tomatoes, cucumbers, corn and fresh picked peaches and raspberries. I got to play farm girl for a couple of years a while back while we rented a house and it ruined me forever! Now all I want to be when I grow up is a farmer.
So, anyway, back to the topic of this delicious chicken. As you can tell from the list above, this has many of my favorite summertime flavors all wrapped up in one. My mom made something similar for me a while back when we were at her house for dinner and I couldn't wait to recreate something at home, just as delicious. I got to share this chicken with some friends a few weeks back and got thumbs up all around, even two from the chicken-haters club. So I'd say it's pretty tasty!
Chicken Bruschetta
For the chicken:
4 boneless, skinless chicken breasts, butterflied to make two thin halves
olive oil
Garlic butter seasoning (Like Johnny's)
For the bruschetta topping:
1 Tbsp. Olive Oil
5 cloves Garlic, Finely Minced
2 pints grape tomatoes, halved lengthwise
1 Tbsp. balsamic binegar
handful of fresh basil leaves, chiffonade
salt and pepper, to taste
freshly grated parmesan cheese
Prepare chicken breasts by slicing them thin. Place them in a large baking dish. Generously drizzle them with olive oil and give them a good sprinkle of the garlic butter seasoning. Using your hands, make sure all the chicken is evenly coated with the mixture. Cover and chill several hours. (Make sure you take chicken out of fridge about a half hour before you are ready to grill them.)
In a small skillet, heat 1 tablespoon og olive oil over medium-high heat. Add garlic and stir, lightly frying for about 30 seconds. Pour into a mixing bowl and allow to cool slightly.
Add tomatoes, balsamic, basil, and salt and pepper to the bowl. Toss to combine, then taste and add more basil if needed, and more salt if needed, making sure not to over-salt. Cover and refrigerate for an hour or two, if possible.
Preheat outdoor grill or indoor grill pan, then grill until done in the middle; about 4 minutes per side.
To serve, give the tomato mixture a final stir. Arrange chicken breasts on a plate then spoon a generous amount of bruschetta topping over the top. Sprinkle with fresh grated parmesan cheese.
Use extra topping on slices of grilled baguette!
SOURCE: Slightly adapted from Pioneer Woman
Some of my favorite hallmark flavors of summer include anything grilled, fresh herbs (mostly basil), garden fresh tomatoes, cucumbers, corn and fresh picked peaches and raspberries. I got to play farm girl for a couple of years a while back while we rented a house and it ruined me forever! Now all I want to be when I grow up is a farmer.
So, anyway, back to the topic of this delicious chicken. As you can tell from the list above, this has many of my favorite summertime flavors all wrapped up in one. My mom made something similar for me a while back when we were at her house for dinner and I couldn't wait to recreate something at home, just as delicious. I got to share this chicken with some friends a few weeks back and got thumbs up all around, even two from the chicken-haters club. So I'd say it's pretty tasty!
Chicken Bruschetta
For the chicken:
4 boneless, skinless chicken breasts, butterflied to make two thin halves
olive oil
Garlic butter seasoning (Like Johnny's)
For the bruschetta topping:
1 Tbsp. Olive Oil
5 cloves Garlic, Finely Minced
2 pints grape tomatoes, halved lengthwise
1 Tbsp. balsamic binegar
handful of fresh basil leaves, chiffonade
salt and pepper, to taste
freshly grated parmesan cheese
Prepare chicken breasts by slicing them thin. Place them in a large baking dish. Generously drizzle them with olive oil and give them a good sprinkle of the garlic butter seasoning. Using your hands, make sure all the chicken is evenly coated with the mixture. Cover and chill several hours. (Make sure you take chicken out of fridge about a half hour before you are ready to grill them.)
In a small skillet, heat 1 tablespoon og olive oil over medium-high heat. Add garlic and stir, lightly frying for about 30 seconds. Pour into a mixing bowl and allow to cool slightly.
Add tomatoes, balsamic, basil, and salt and pepper to the bowl. Toss to combine, then taste and add more basil if needed, and more salt if needed, making sure not to over-salt. Cover and refrigerate for an hour or two, if possible.
Preheat outdoor grill or indoor grill pan, then grill until done in the middle; about 4 minutes per side.
To serve, give the tomato mixture a final stir. Arrange chicken breasts on a plate then spoon a generous amount of bruschetta topping over the top. Sprinkle with fresh grated parmesan cheese.
Use extra topping on slices of grilled baguette!
SOURCE: Slightly adapted from Pioneer Woman
Labels:
Chicken,
Garden Recipes,
grilled,
Quick n' Easy
Friday, August 3, 2012
Melon Mozzarella Salad
This is another salad that epitomizes summer for me. Fresh cool crisp melons and grapes, heloooooo juicy slurpy peaches, scrumptious strawberries and I told you already I swoon over fresh basil. Kind of an unexpected little burst of flavor, but oh so delish! What's also fun about this salad is the little bites of salty, soft fresh mozzarella, also a little unexpected here, but I'm loving the contrast. All of this is paired with the delicious lemon poppy-seed dressing from this salad and you've got yourself a perfect little dessert for a hot summer night. Sweet and filling and won't weigh you down. You'll be luvin' it too
Melon and Mozzarella salad
3 cups peeled, coarsely chopped fresh peaches (about 1 1/2 lb.)
1 (8-oz.) tub fresh small mozzarella cheese balls, cut in half
3 Tbsp. chopped fresh basil
3/4 cup Lemon-Poppy Seed Dressing
4 cups seeded and cubed watermelon
4 cups cubed honeydew melon
3 cups sliced fresh strawberries
2 cups seedless green grapes, cut in half
Garnishes: mint leaves
Toss first 3 ingredients with 1/4 cup Lemon-Poppy Seed Dressing
Add all salad ingredients into a large glass trifle dish or tall glass bowl. Serve immediately, or cover and chill up to 8 hours. Toss with remaining 1/2 cup dressing just before serving. Garnish, if desired.
SOURCE:Southern Living
Melon and Mozzarella salad
3 cups peeled, coarsely chopped fresh peaches (about 1 1/2 lb.)
1 (8-oz.) tub fresh small mozzarella cheese balls, cut in half
3 Tbsp. chopped fresh basil
3/4 cup Lemon-Poppy Seed Dressing
4 cups seeded and cubed watermelon
4 cups cubed honeydew melon
3 cups sliced fresh strawberries
2 cups seedless green grapes, cut in half
Garnishes: mint leaves
Toss first 3 ingredients with 1/4 cup Lemon-Poppy Seed Dressing
Add all salad ingredients into a large glass trifle dish or tall glass bowl. Serve immediately, or cover and chill up to 8 hours. Toss with remaining 1/2 cup dressing just before serving. Garnish, if desired.
SOURCE:Southern Living
Labels:
Fruit,
Garden Recipes,
Quick n' Easy,
Raw,
Salads
Sunday, July 29, 2012
Backyard Mint Ice Cream
National Ice Cream Month is almost over and I've got a new flavor for you today. Mint ice cream literally from your own backyard! Does it get any better?
This recipe comes from Jeni's Splendid Ice Creams at Home and is amazing. Her method is unique in that she doesn't use eggs as a thickener, rather cornstarch and a little cream cheese. I think that worked perfectly here because it kept the ice cream nice and minty white in color and didn't give off an eggy flavor for the base. It also kept it nice and smooth, rather than icy, which often results when there's not enough fat. Another thing I love is that this ice cream is infused with fresh mint leaves, rather than an extract so there's no funky aftertaste from fake ingredients.
When my mom brought me a bunch of mint from her garden I was so excited I finally got to try this ice cream. I made a double batch and have probably eaten most of it myself!
So, whether you have to step out the back porch, run to the farmer's market, or just the regular marker, make sure you save some mint (and some room in your belly) for this delicious frozen treat!
Backyard Mint Ice Cream
1 Tbsp. plus 1 tsp cornstarch
1 1/2 ounces (3 Tbsp.) cream cheese, softened
1/8 tsp fine sea salt
2 cups whole milk
1 1/4 cups heavy cream
2/3 cups sugar
2 Tbsp. light corn syrup
large handful of fresh mint, leaves roughly torn into small pieces.
Mix about 2 tablespoons of the milk with the cornstarch in a small bowl to make a smooth slurry.
Whisk the cream cheese and salt in a medium bowl until smooth. If you have trouble whisking the cream cheese, microwave it for 5-10 seconds to soften it a bit more.
Combine the remaining milk, the cream, sugar and corn syrup in a 4-quart saucepan. Bring to a rolling boil over medium-high heat and boil for 4 minutes. Remove from the heat, and gradually whisk in the cornstarch slurry.
Bring the mixture back to a boil over medium-high heat and cook, stirring with a heatproof spatula, until slightly thickened, about 1 minute. Remove from the heat.
Gradually whisk the hot milk mixture into the cream cheese until smooth. Make sure not to pour too fast, if you add it all at once, it will be lumpy and it will be very difficult to get them out. Add the mint. Pour the mixture into a large container with tight-fitting lid, or a gallon size ziploc bag.
Refrigerate to steep for 4 to 12 hours.
Strain out the mint. Pour the ice cream base into ice cream maker and freeze according to manufacturers instructions.
Pack the ice cream into a freezer-safe storage container, and seal with an airtight lid. Freeze in the coldest park of your freezer until firm, at least 4 hours. Enjoy!
SOURCE: Jenni's Splendid Ice Creams at Home
This recipe comes from Jeni's Splendid Ice Creams at Home and is amazing. Her method is unique in that she doesn't use eggs as a thickener, rather cornstarch and a little cream cheese. I think that worked perfectly here because it kept the ice cream nice and minty white in color and didn't give off an eggy flavor for the base. It also kept it nice and smooth, rather than icy, which often results when there's not enough fat. Another thing I love is that this ice cream is infused with fresh mint leaves, rather than an extract so there's no funky aftertaste from fake ingredients.
When my mom brought me a bunch of mint from her garden I was so excited I finally got to try this ice cream. I made a double batch and have probably eaten most of it myself!
So, whether you have to step out the back porch, run to the farmer's market, or just the regular marker, make sure you save some mint (and some room in your belly) for this delicious frozen treat!
Backyard Mint Ice Cream
1 Tbsp. plus 1 tsp cornstarch
1 1/2 ounces (3 Tbsp.) cream cheese, softened
1/8 tsp fine sea salt
2 cups whole milk
1 1/4 cups heavy cream
2/3 cups sugar
2 Tbsp. light corn syrup
large handful of fresh mint, leaves roughly torn into small pieces.
Mix about 2 tablespoons of the milk with the cornstarch in a small bowl to make a smooth slurry.
Whisk the cream cheese and salt in a medium bowl until smooth. If you have trouble whisking the cream cheese, microwave it for 5-10 seconds to soften it a bit more.
Combine the remaining milk, the cream, sugar and corn syrup in a 4-quart saucepan. Bring to a rolling boil over medium-high heat and boil for 4 minutes. Remove from the heat, and gradually whisk in the cornstarch slurry.
Bring the mixture back to a boil over medium-high heat and cook, stirring with a heatproof spatula, until slightly thickened, about 1 minute. Remove from the heat.
Gradually whisk the hot milk mixture into the cream cheese until smooth. Make sure not to pour too fast, if you add it all at once, it will be lumpy and it will be very difficult to get them out. Add the mint. Pour the mixture into a large container with tight-fitting lid, or a gallon size ziploc bag.
Refrigerate to steep for 4 to 12 hours.
Strain out the mint. Pour the ice cream base into ice cream maker and freeze according to manufacturers instructions.
Pack the ice cream into a freezer-safe storage container, and seal with an airtight lid. Freeze in the coldest park of your freezer until firm, at least 4 hours. Enjoy!
SOURCE: Jenni's Splendid Ice Creams at Home
Labels:
Desserts,
Garden Recipes,
Ice Cream
Monday, September 12, 2011
Cool Zucchini Slaw
*I know, I know, I just signed off the other day. I forgot I had this ready to post and I couldn't leave you at the end of the summer without it. I've made it a couple of time recently and just love it!

Since I don't have my own garden this year, I haven't had to deal with zucchini and summer squash coming out my ears like I have in the past. However, I was given a bunch of it all within a couple of days and needed a new idea of how to use it. My kids won't really eat it cooked and I'll just say it's not my husband's favorite vegetable. So, I thought about making a raw zucchini salad and thought a slaw would be perfect. I found this recipe right away, made my own little tweaks and came up with this wonderful, fresh, slightly crunchy and definitely tasty salad. So, if you're looking to use up what's left in your garden, look no further!
Cool Zucchini Slaw
For the slaw:
1 1/2 pounds zucchini and/or summer squash, (about 3 medium), grated
1/2 medium sweet onion, such as Vidalia or Walla Walla, very thinly sliced (I just used a small amount of a red onion)
1 large granny smith apple, peeled and grated
1 large red or green bell pepper, julienned
2-4 Tbsp. chopped fresh basil
For the vinaigrette:
1/4 cup cider vinegar
3 tablespoons frozen apple juice concentrate
drizzle of olive oil
Salt & freshly ground pepper, to taste
Shred the zucchini/squash, as well as the onion and set it in a colander for about half an hour to drain out some of the liquid. Once drained, add the zucchini and onion to a salad bowl, and add the apple pepper and fresh basil.
In a small bowl, whisk together the vinaigrette ingredients. Taste for seasoning and adjust, if necessary. Pour over slaw and toss to coat. Serve immediately.
Since I don't have my own garden this year, I haven't had to deal with zucchini and summer squash coming out my ears like I have in the past. However, I was given a bunch of it all within a couple of days and needed a new idea of how to use it. My kids won't really eat it cooked and I'll just say it's not my husband's favorite vegetable. So, I thought about making a raw zucchini salad and thought a slaw would be perfect. I found this recipe right away, made my own little tweaks and came up with this wonderful, fresh, slightly crunchy and definitely tasty salad. So, if you're looking to use up what's left in your garden, look no further!
Cool Zucchini Slaw
For the slaw:
1 1/2 pounds zucchini and/or summer squash, (about 3 medium), grated
1/2 medium sweet onion, such as Vidalia or Walla Walla, very thinly sliced (I just used a small amount of a red onion)
1 large granny smith apple, peeled and grated
1 large red or green bell pepper, julienned
2-4 Tbsp. chopped fresh basil
For the vinaigrette:
1/4 cup cider vinegar
3 tablespoons frozen apple juice concentrate
drizzle of olive oil
Salt & freshly ground pepper, to taste
Shred the zucchini/squash, as well as the onion and set it in a colander for about half an hour to drain out some of the liquid. Once drained, add the zucchini and onion to a salad bowl, and add the apple pepper and fresh basil.
In a small bowl, whisk together the vinaigrette ingredients. Taste for seasoning and adjust, if necessary. Pour over slaw and toss to coat. Serve immediately.
Labels:
Figure Friendly,
Garden Recipes,
Quick n' Easy,
Raw,
Salads,
Vegetables
Saturday, September 10, 2011
Panzanella
If you can't already tell (by the amount of salads I've posted lately), I love salads and I love to eat them in the summer when everything is so fresh. Last summer I discovered this Greek Panzanella which I absolutely love, but I recently re-discovered this more traditional panzanella (in my ever long list of bookmarked recipes) that is wonderful and just as delicious. If you are unfamiliar with the word panzanella, it's Italian, basically a leftover bread salad. Typically panzanellas don't sport lettuce but I like to throw it in because I'm all about getting your daily greens, and this seemed like a no-brainer to me.
This recipe comes from Ina Garten, the Barefoot Contessa, so you know it's gonna be good. I only expect the best from her and she ALWAYS delivers. I hope you enjoy this salad as much as I do.
Panzanella
For the salad:
3 Tbsp. olive oil
1 small French bread or boule, cut into 1-inch cubes (6 cups)
1 tsp. salt
2 large, ripe tomatoes, cut into 1-inch cubes
1 English cucumber, unpeeled, seeded, and sliced 1/2-inch thick
1 red bell pepper, seeded and cut into 1-inch cubes
1 yellow bell pepper, seeded and cut into 1-inch cubes
1/2 red onion, cut in 1/2 and thinly sliced
1/2 - 1 head romaine lettuce, shredded
20 large basil leaves, coarsely chopped
For the vinaigrette:
1 tsp. finely minced garlic
1/2 tsp. Dijon mustard
1/4 cup Champagne vinegar (I used red wine vinegar)
1/4 cup olive oil
1/2 tsp. salt
1/4 tsp.freshly ground black pepper
Heat the oil in a large saute pan. Add the bread and salt; cook over low to medium heat, tossing frequently, for 10 minutes, or until nicely browned. Add more oil as needed.
For the vinaigrette, whisk all the ingredients together.
In a large bowl, mix the tomatoes, cucumber, red pepper, yellow pepper, red onion and basil. Add the bread cubes and toss with the vinaigrette. Season liberally with salt and pepper. Serve, or allow the salad to sit for about half an hour for the flavors to blend.
SOURCE: Ina Garten
Labels:
Condiments,
Figure Friendly,
Garden Recipes,
Italian,
Quick n' Easy,
Raw,
Salads,
Tomatoes,
Vegetables
Thursday, August 25, 2011
Creamy Lemon-Herb Pasta
Let me just tell you, this is the perfect summer dish! It is easy, quick and uses what most people have in abundance this time of year: zucchini and fresh herbs from the garden. Really, it takes no longer to throw together than the time it takes you to boil your pasta, especially if your chicken is already cooked. I used the leftover chicken from the Lemon and Oregano Chicken I roasted earlier in the week so all I had to do was take it out of the fridge when it was time to throw it all together.
Feel free to use whatever chicken you have on hand, chopped or shredded. If you want a simple marinade, just throw a couple drizzles of olive oil, juice of a lemon and some salt and pepper in a zip-top bag with your uncooked chicken and let it sit for 30 minutes or so then throw it on the grill when you're ready to prepare the rest of the meal.
If I were Rachel Ray, this would be one of my 30-minute meals. And on a good day, I bet you could whip this dish up in 15 minutes; I'd say pretty perfect for a weeknight dinner.
Creamy Lemon-Herb Pasta
1 1/2 cups cooked chicken, grilled and sliced or shredded
1/2 lb pasta
2 medium zucchini (I used one zucchini and one yellow squash)
1/2 small red onion, thinly sliced
olive oil
5-6 cloves garlic
Juice of 2 lemons
2 oz. cream cheese
1 C shredded parmesan cheese
about 8-10 fresh basil leaves, chopped
1 tsp. oregano, dried (or a small handful of fresh, chopped)
salt and pepper
Season and cook/grill/roast your chicken as desired, or use leftovers from a rotisserie chicken. Set aside.
Bring a large pot of water to boil. Preheat grill or or indoor grill pan. Slice zucchini and/or squash, on the diagonal, about 1/8th-inch thick. Grill zucchini/squash and onion, just until lightly browned; about 2-3 minutes per side. Remove from grill and set aside. Drop pasta into boiling water and cook according to package directions.
In a large skillet, add a drizzle of olive oil to heat up, over medium high heat. Add garlic and dried oregano and saute 1 minute. Add lemon juice and cream cheese. Once cream cheese starts melting, start whisking it together so the sauce is smooth. Remove from heat and add the parmesan. Continue whisking until cheese is melted and sauce is once again smooth. Check for seasonings and add salt and pepper to taste. Add reserved chicken and grilled veggies. Toss to coat.
Drain pasta and pour into a large ceramic dish. Pour sauce mixture over pasta, gently folding in the chicken and veggies. Add fresh basil (if using fresh oregano, add it here as well) and toss one more time.
Serve warm.
SOURCE: Adapted from Our Best Bites
Labels:
Chicken,
Citrus,
Figure Friendly,
Garden Recipes,
Kid-Friendly,
main dishes,
Pasta,
Quick n' Easy,
Vegetables
Friday, August 12, 2011
Asian Wonton Salad
This was a fun salad to make and eat! I absolutely loved it. If you look at the ingredients, it doesn't look much different than a lot of other salads. But, what sets it apart is the delicious sesame dressing and the crunchy won tons....oh, the crunchy won tons; talk about fun to eat. I'm all about color in my salads too, because I want it to be eye appealing as well as good tasting, and there was some definite color going on here.
If you like to eat salad a lot, then add this to your repertoire. I love to change up my salads so I don't get tired of eating the same thing all the time. I don't know about you, but I'm also more likely to eat them more often as well if it's not the same old, same old.
I ate this as a main dish without any meat, but if you feel like adding something more substantial, try some grilled or shredded chicken, or even toasted cashews if you want to keep it meatless.
Asian Wonton Salad
1 head romaine lettuce, shredded
1 small head cabbage, shredded
1 pint cherry tomatoes
1/2 red onion, sliced thinly
1 cucumber, sliced
1 cup thinly sliced carrots
1/2 package wonton wrappers (save the other half in the freezer to make for another time)
vegetable oil for frying
Heat about 1 inch of oil in a small or medium frying pan. Use pizza cutter or sharp knife to cut wontons into thirds (3 strips). The oil should be around 375 degrees. Place only 3-4 strips in the pan at once; fry for 10 seconds, flip and fry for another 10 seconds or so. They go quickly so watch closely. Remove fried wontons to a paper towel-lined plate or tray. (These can be made ahead of time and kept in an air tight container.)
Shred lettuce and cabbage and place in a large salad bowl. Top with cherry tomatoes, sliced cucumber, carrots and red onion. If you are serving the salad immediately, pour only enough salad dressing to lightly coat everything and toss to combine; add wontons and gently toss again or just place them on top. Otherwise, dish out salad portions to each plate and top with dressing and wontons.
Sesame Dressing
2/3 cup rice vinegar
2/3 cup canola oil
2 Tbsp sesame oil
4 cloves garlic, minced
2 Tbsp soy sauce
1/2 cup sugar
4 Tbsp sesame seeds
Place all ingredients into a pint jar (or something equivalent) and shake vigorously. If desired, make ahead of time and store in the fridge.
SOURCE: Adapted from Our Best Bites
Labels:
Asian,
Figure Friendly,
Garden Recipes,
Meatless,
Quick n' Easy,
Raw,
Salads,
Tomatoes,
Vegetables
Subscribe to:
Posts (Atom)