Friday, November 16, 2012
Lentil and Kale Pasta
It's so good to get back to healthy! After spending the better part of a week in Las Vegas indulging and splurging, my body started craving warm, earthy and hearty flavors and food. This totally fit the bill. I was pleasantly surprised how much I liked the lentils. They are a lot more flavorful than I remember them being. It's been a while, but like I said, I'm trying to clean out my pantry so I really wanted to use them up.
The kale is amazing here too, adding not only color and texture but a ton of nutrition too. I used my own sun-dried tomatoes that I dehydrated then reconstituted but you could also use oil-packed sun-dried tomatoes from the store.
Lentil and Kale Pasta
1/2 lb. whole wheat pasta (I used shells)
1 1/2 cups cooked lentils
1/2 cup sun-dried tomatoes, reconstitued and chopped
4 cups kale, rinsed and chopped
3 cloves garlic, minced
pinch red pepper flakes
12-15 oz jar marinated artichoke hearts, drained and choped
1/2 cup crumbled feta
olive oil
juice of half a lemon (about 1-2 Tbsp.)
1/4 cup fresh basil, chopped
salt and pepper, to taste
garnish: finely grated parmesan cheese (to your liking)
Start cooking the lentils first or even ahead of time, they will take the longest; about 15-20 minutes. Follow package directions. Cook, drain and set aside.
In the meantime, cover sun-dried tomatoes in about 1-inch of water in a small saucepan. Bring to a boil and cook about 5 minutes. Remove from heat, drain and chop.
Bring a large pot of water to boil and cook pasta according to package directions. Drain and rinse with cold water for about 10 seconds to cool it off a bit. Put pasta and lentils and chopped tomatoes in a large salad bowl.
Using the same pot as you cooked the pasta in, drizzle a good amount of olive oil on the bottom. Drop the kale and sprinkle with a pinch or two of red pepper flakes. Saute 2-3 minutes, adding the garlic in the last 20 seconds or so, to avoid burning. Add the kale to the salad bowl. Wait for it to cool slightly before stirring it in.
Add chopped artichokes, feta, 1-2 tablespoons olive oil, lemon juice, basil and salt and pepper to the lentils and pasta, stirring to incorporate. Taste for seasoning and adjust as necessary.
Serve at room temperature, topped with finely grated parmesan cheese.
Tuesday, November 13, 2012
Caramel Apple Upside Down Cake
Apples are one of my favorite things
about fall. Almost every year for the past 5 or 6 years we find a local apple
orchard and take our kids to pick apples. It's the whole experience of being
together, picking delicious home grown fruit, then taking it home to eat and
make into wonderful things!
This year must have been a bad year
for apples because several of the orchards we tried to go to said they hardly
had any and there were none left to pick-bummer! So, instead, I
ordered a box of LOVELY honey crisps from our local CSA and have been thrilled
to have them even though we didn't pick them.
Honey crisps are my absolute
favorite apple. They are sweet and mild and nice and crisp and keep a long time
under the right circumstances. They are the perfect apple for this dessert.
They compliment the dense sweetness of the cake and the slight saltiness of the
caramel sauce. I made this cake within hours of finding the recipe and it was
gone in less than 24! And I've been craving it ever since! It's mouth-watering
and delicious. It would be a beautiful addition to any family gathering or
holiday party this season.
Caramel Apple Upside Down Cake
For the caramel sauce:
1 cup brown sugar, packed1 cup heavy cream
2 Tbsp. thawed apple juice concentrate
4 Tbsp. butter
pinch salt
1/4 tsp. cinnamon
1 Tbsp. vanilla extract
Mix the brown sugar, heavy cream,
apple juice concentrate, butter, salt and cinnamon in a saucepan over medium-low
heat. Cook while whisking gently for 5 to 7 minutes, until it gets thicker. Add
the vanilla and cook another minute to thicken further. Turn off the heat, cool
slightly.
3/4 cup oil (I used coconut oil, melted)
1 cup brown sugar, firmly packed
2 Tbsp. thawed apple juice concentrate
2 large eggs
1 1/2 tsp. ground cinnamon
1/4 tsp. ground ginger
1/8 tsp. ground cloves
1/2 tsp. salt
1 tsp. baking soda
1 1/2 cups flour
1 large apple, peeled and shredded
(I used Honey Crisp)
3/4 cup chopped pecans or walnuts, optional
Preheat oven to 350 degrees F. Lightly grease a 9-inch round cake pan at least 2-inches deep. Line the bottom with parchment, and grease the parchment. Make sure you measure your pan. If it's pretty close to 2 inches deep, make sure you put the pan on a cookie sheet in case of any spills.
Peel and slice the 2 medium apples into 1/4-inch thick wedges. Overlap the apple wedges in a ring around the bottom of the pan. Pour about 1/3-1/2 cup of the caramel sauce over the apples and set it aside.To make the cake, beat the oil, brown sugar, apple juice concentrate, eggs, spices and salt together for 2 minutes on medium speed. Add the flour and baking soda and mix to combine. Fold in the shredded apple and nuts, if desired, until just incorporated.
Drop batter by scoops on top of the apples in the pan, gently spreading to even out and cover the bottom. Bake for 50-55 minutes, or until cake tester inserted near center comes out clean.
Let cake cool in pan for 5 minutes. Run a spatula around the edge to loosen it, then turn cake out onto a serving plate, bottom side up. Pour reserved caramel sauce over the top of the cake and serve warm or room temperature.
SOURCE: Cake from King Arthur Flour and sauce adapted from Pioneer Woman
Labels:
Cakes,
Desserts,
Fall Baking,
Fruit
Monday, November 12, 2012
November Menu 2012 (Week 2)
Wow, what a whirlwind week we had last week! We spent the latter half in Las Vegas. We went down for my husband to run the Ragnar Relay Race and decided to go a day ahead and stay a day later to make a little mini vacation out of it. Other than the first night we were there it was pretty much an all girls weekend! As in me and my three darling daughters under the age of 6. I braved the Bellagio by myself with all three kids (hubs said he was impressed) but decided to stay away from the strip the rest of the time, unless hubby was with me. We ventured out and did a few other fun things and tasted some delicious food! I was also happy to encounter not one but two Trader Joe's close by, love that store, as well as Whole Foods. I could have spent much more time perusing the aisles of both stores, but alas, with three kids in tow, it just wasn't possible.
So, glad to be home and getting back to our normal crazy busy life. This week I still don't want to go shopping (still have a little sticker shock after the first meal we ate in Vegas) but I know I at least have to go get some fresh fruit and veggies to stock up on. So, I'll be pulling from my pantry again and a little from my freezer to get through the week. Here's the simple menu I threw together last night after we got home. Hopefully we can stick to it, but it's totally subject to change.
November Menu 2012 (week 1)
Monday
Easy Thai Peanut Noodles
Roasted Brussels Sprouts
chopped fresh veggies
Tuesday
Crispy Coconut Chicken Fingers
Jasmine rice
Steamed broccoli
Wednesday
Kale and Lentil Pasta
Thursday
Smoky Pumpkin Soup
Sourdough Baguettte
Friday
Spaghetti
Salad
Saturday
Leftovers
Sunday
Lemon and Oregano Roast Chicken
mashed potatoes
Sweet Peas
Autumn Chopped Salad
Other things we'll be having:
Cake Batter Pancakes
Ginger Sweet Potato Muffins
Mango-Strawberry Smoothie
So, glad to be home and getting back to our normal crazy busy life. This week I still don't want to go shopping (still have a little sticker shock after the first meal we ate in Vegas) but I know I at least have to go get some fresh fruit and veggies to stock up on. So, I'll be pulling from my pantry again and a little from my freezer to get through the week. Here's the simple menu I threw together last night after we got home. Hopefully we can stick to it, but it's totally subject to change.
November Menu 2012 (week 1)
Monday
Easy Thai Peanut Noodles
Roasted Brussels Sprouts
chopped fresh veggies
Tuesday
Crispy Coconut Chicken Fingers
Jasmine rice
Steamed broccoli
Wednesday
Kale and Lentil Pasta
Thursday
Smoky Pumpkin Soup
Sourdough Baguettte
Friday
Spaghetti
Salad
Saturday
Leftovers
Sunday
Lemon and Oregano Roast Chicken
mashed potatoes
Sweet Peas
Autumn Chopped Salad
Other things we'll be having:
Cake Batter Pancakes
Ginger Sweet Potato Muffins
Mango-Strawberry Smoothie
Thursday, November 8, 2012
Thai Chicken Slaw
Asian slaws are one of my most favorite salads of all time! They are hearty, don't wilt and have tons of flavor and COLOR! With colder temps upon us things can get kind of dreary and boring. Who wouldn't welcome a pop of color and flavor? This is a great salad to eat throughout the colder months because cabbage is readily available and even inexpensive. In fact, the components of this salad are all inexpensive and pack a lot of nutritional punch!
I don't usually put chicken on my Asian salads but I couldn't resist slow cooking this chicken in the crock pot with some sweet chili sauce and coconut milk! I love those flavors in Asian dishes. The result is an amazingly moist and delicious meat to shred over your salad.
Thai Chicken Slaw
2-3 boneless, skinless chicken breasts
For the marinade:
1/2 cup sweet chili sauce
1/4 cup rice vinegar
1/2 cup canned coconut milk (full-fat)
1 Tbsp. brown sugar
2-3 garlic cloves, pressed or finely minced
1/4 cup natural peanut butter
2 Tbsp. fresh ginger, grated
1 lime, juiced
1 Tbsp. soy sauce
Whisk marinade ingredients together in a medium-sized saucepan. If sauce seems too thick feel free to add more lime juice or vinegar. Bring to a simmer over medium-high heat. Reduce heat and simmer about 3-4 minutes.
Place chicken in a crock pot and pour about 1/3 cup of the marinade over it, reserving the rest for the dressing on the salad. Cook on high heat 4-5 hours or until shreds easily. Remove chicken from crock pot and shred the return it to crock pot to sit in the juices.
For the salad:
1/4 red cabbage, thinly shredded
1/4 green cabbage, thinly shredded
3 green onions, sliced
1 large cucumber, peeled and chopped
1 sweet red bell pepper, sliced and chopped
1 cup frozen, thawed edamame (look for non-GMO on the packaging)
1 large carrot, peeled and diced
1/2 cup cilantro, chopped
1/4 cup fresh basil, chopped
2-3 Tbsp. fresh mint, chopped
Place all salad ingredients in a large salad bowl and toss.
To serve, top individual salad servings with shredded chicken and reserved dressing.
SOURCE: Adapted from How Sweet It Is
I don't usually put chicken on my Asian salads but I couldn't resist slow cooking this chicken in the crock pot with some sweet chili sauce and coconut milk! I love those flavors in Asian dishes. The result is an amazingly moist and delicious meat to shred over your salad.
Thai Chicken Slaw
2-3 boneless, skinless chicken breasts
For the marinade:
1/2 cup sweet chili sauce
1/4 cup rice vinegar
1/2 cup canned coconut milk (full-fat)
1 Tbsp. brown sugar
2-3 garlic cloves, pressed or finely minced
1/4 cup natural peanut butter
2 Tbsp. fresh ginger, grated
1 lime, juiced
1 Tbsp. soy sauce
Whisk marinade ingredients together in a medium-sized saucepan. If sauce seems too thick feel free to add more lime juice or vinegar. Bring to a simmer over medium-high heat. Reduce heat and simmer about 3-4 minutes.
Place chicken in a crock pot and pour about 1/3 cup of the marinade over it, reserving the rest for the dressing on the salad. Cook on high heat 4-5 hours or until shreds easily. Remove chicken from crock pot and shred the return it to crock pot to sit in the juices.
For the salad:
1/4 red cabbage, thinly shredded
1/4 green cabbage, thinly shredded
3 green onions, sliced
1 large cucumber, peeled and chopped
1 sweet red bell pepper, sliced and chopped
1 cup frozen, thawed edamame (look for non-GMO on the packaging)
1 large carrot, peeled and diced
1/2 cup cilantro, chopped
1/4 cup fresh basil, chopped
2-3 Tbsp. fresh mint, chopped
Place all salad ingredients in a large salad bowl and toss.
To serve, top individual salad servings with shredded chicken and reserved dressing.
SOURCE: Adapted from How Sweet It Is
Labels:
Asian,
Chicken,
Crock pot,
main dishes,
Quick n' Easy,
Salads,
Vegetables
Sunday, November 4, 2012
November Menu 2012 (Week 1)
My goal for this week's menu is to not have to go shopping! Now, I know it is almost inevitable that I WILL go, but I want to go for as little as possible. I still have a bunch of produce leftover from my CSA basket from last week and I have a lot of bulk items in my pantry that I seem to accmulate, like lentils, dry beans and split peas and pastas. I want to use them up before I stock up again soon. We're also going to be away from home a couple nights this week and will be either eating out or having leftovers. So, here's to a creative menu this week for using what I've got.
November Menu 2012 (Week 1)
Monday
Vegetable Stir-Fry
Jasmine Rice
Tuesday
Penne with Pumpkin and Sausage (this recipe will get a face lift!!)
Apple Walnut and Feta Salad with Raspberry Vinaigrette
Wednesday
Cauliflower Soup
Thursday
Leftovers
Friday
Eat out
Saturday
Lentil Kale Pasta
Sunday
Homemade Pizza
Other things we'll be having:
Chocolate Earth Balls
Tabbouleh
Overnight Refrigerator Oatmeal
November Menu 2012 (Week 1)
Monday
Vegetable Stir-Fry
Jasmine Rice
Tuesday
Penne with Pumpkin and Sausage (this recipe will get a face lift!!)
Apple Walnut and Feta Salad with Raspberry Vinaigrette
Wednesday
Cauliflower Soup
Thursday
Leftovers
Friday
Eat out
Saturday
Lentil Kale Pasta
Sunday
Homemade Pizza
Other things we'll be having:
Chocolate Earth Balls
Tabbouleh
Overnight Refrigerator Oatmeal
Labels:
Menus
Saturday, November 3, 2012
Fall Vegetable Curry
Here is another quick and nutritious meal you can add to your fall repertoire of dinners. It's also meatless (if that's your thing)! If you're a fan of curry, you'll definitely like this one.
This curry is similar to this other Bean Curry on the blog in that it uses Garam Masala spice and turmeric. However, I've kicked up the spiciness with some jalapeno and topped it with a yummy cilantro-yogurt sauce and fresh tomatoes.
Fall Vegetable Curry
1-2 Tbsp. olive or coconut oil
1 cup diced peeled sweet potato (about 1 medium)
1 cup small cauliflower florets
1/2 cup thinly sliced yellow onion
1 (15-ounce) can chickpeas (garbanzo beans), rinsed and drained
1 sweet bell pepper (I used red), chopped
1 small jalapeno, finely diced
3 cloves garlic, minced
1 Tbsp. fresh ginger, grated
1 tsp. Garam Masala
1/2 tsp. turmeric
1/2 tsp. salt
1/2 cup canned coconut milk (can sub vegetable broth as well or add to make it more saucy)
2 medium vine-ripened tomatoes, chopped
1/4 cup chopped fresh cilantro
1/2 cup plain yogurt
Heat oil in a large skillet over medium-high heat. Add sweet potato and saute about 3-4 minutes. Add onion, cauliflower and cook another 2 minutes or so. Add chick peas, pepper, jalapeno, garlic, ginger,Garam Masala, turmeric and salt and saute about 30 seconds. Add coconut milk, cover with lid, reduce heat and simmer for about 10 minutes, or until vegetables are tender.
Meanwhile, finely chop cilantro and stir it together with the yogurt and a pinch of salt. Alternately you can blend it together in a small food processor.
Once vegetables are tender, remove from heat and add the fresh tomatoes. Garnish individual portions with cilantro-yogurt sauce. Serve warm with Thai Coconut Rice, Naan bread or cous cous.
SOURCE: Adapted from Cooking Light
This curry is similar to this other Bean Curry on the blog in that it uses Garam Masala spice and turmeric. However, I've kicked up the spiciness with some jalapeno and topped it with a yummy cilantro-yogurt sauce and fresh tomatoes.
Fall Vegetable Curry
1-2 Tbsp. olive or coconut oil
1 cup diced peeled sweet potato (about 1 medium)
1 cup small cauliflower florets
1/2 cup thinly sliced yellow onion
1 (15-ounce) can chickpeas (garbanzo beans), rinsed and drained
1 sweet bell pepper (I used red), chopped
1 small jalapeno, finely diced
3 cloves garlic, minced
1 Tbsp. fresh ginger, grated
1 tsp. Garam Masala
1/2 tsp. turmeric
1/2 tsp. salt
1/2 cup canned coconut milk (can sub vegetable broth as well or add to make it more saucy)
2 medium vine-ripened tomatoes, chopped
1/4 cup chopped fresh cilantro
1/2 cup plain yogurt
Heat oil in a large skillet over medium-high heat. Add sweet potato and saute about 3-4 minutes. Add onion, cauliflower and cook another 2 minutes or so. Add chick peas, pepper, jalapeno, garlic, ginger,Garam Masala, turmeric and salt and saute about 30 seconds. Add coconut milk, cover with lid, reduce heat and simmer for about 10 minutes, or until vegetables are tender.
Meanwhile, finely chop cilantro and stir it together with the yogurt and a pinch of salt. Alternately you can blend it together in a small food processor.
Once vegetables are tender, remove from heat and add the fresh tomatoes. Garnish individual portions with cilantro-yogurt sauce. Serve warm with Thai Coconut Rice, Naan bread or cous cous.
SOURCE: Adapted from Cooking Light
Tuesday, October 30, 2012
Apple Walnut and Feta Salad with Raspberry Vinaigrette
This is the perfect salad for fall and embraces many of those flavors I love! If I had to pick a component I love best I would definitely say the vinaigrette because I think the dressing totally makes the salad and this one is divine. It's light and fresh and only slightly sweet, perfectly complimenting the salad.
I do love everything about the salad though, it is a perfect combination from the sweet-tart and chewiness of the dried cranberries to the crispness of the apples and the soft and saltiness of the cheese. All together it is one great salad. I made extra vinaigrette so we can keep this salad on hand for a while.
Apple Walnut and Feta Salad with Raspberry Vinaigrette
For the salad:
1/2 head of Romaine lettuce, chopped
1 large apple, sliced and chopped (I used golden delicious)
1/3 cup dried cranberries
1/3 cup walnuts, roughly chopped
1/3 cup feta cheese, crumbled (can also substitute another soft, salty cheese such as queso fresco)
Chop lettuce and place in a large salad bowl. Layer the rest of the ingredients on top in the order given. Serve with raspberry vinaigrette.
For the vinaigrette:
1/2 cup raspberries (fresh or unsweetened thawed frozen)
1/4 cup extra virgin olive oil
2 Tbsp. fresh lemon juice
1 Tbsp. honey
salt and pepper, to taste
Mix everything in a blender and blend until smooth.
SOURCE: Vinaigrette from Giada De Laurentiis
Labels:
Condiments,
Fruit,
Quick n' Easy,
Raw,
Salads
Sunday, October 28, 2012
Menu Plan Monday October 2012
Well, this week we're playing catch-up. On top of having a sinus infection, we had a flood a few weeks ago. Worst day ever waking up to water dripping everywhere! But, the repairs have finally been finished! No more laundry room taking over my baby's room, bathroom taking over my bedroom and construction crew coming in and out of my house all day. I'm happy to have my house put back together.
Although the house is back to normal I'm still trying to kick the sinus stuff. It's being very stubborn and has left me exhausted. So, this week I'm trying to keep it simple. Cook once, eat twice, have leftovers and quick and easy will be my go to words this week.
Monday
Simple Sesame Noodles and Veggies
Tuesday
Lemon Chicken and Orzo Soup
Wednesday
Dinner in a pumpkin
Thursday
Spaghetti Squash with Sage, Roasted Garlic and Browned Butter
Roasted Cauliflower
Friday
Leftovers
Saturday
Caprese Lasagna Roll-Ups
Italian Salad with Basil Vinaigrette
Sunday
Homemade Pizza
Leftover Italian Salad with Basil Vinaigrette
Other things we'll be having:
Pepita Granola with Pumpkin Butter
Caramel Apple Upside Down Cake
Fauxtisserie Chicken
Overnight Applesauce
Ginger Sweet Potato Muffins
Although the house is back to normal I'm still trying to kick the sinus stuff. It's being very stubborn and has left me exhausted. So, this week I'm trying to keep it simple. Cook once, eat twice, have leftovers and quick and easy will be my go to words this week.
Monday
Simple Sesame Noodles and Veggies
Tuesday
Lemon Chicken and Orzo Soup
Wednesday
Dinner in a pumpkin
Thursday
Spaghetti Squash with Sage, Roasted Garlic and Browned Butter
Roasted Cauliflower
Friday
Leftovers
Saturday
Caprese Lasagna Roll-Ups
Italian Salad with Basil Vinaigrette
Sunday
Homemade Pizza
Leftover Italian Salad with Basil Vinaigrette
Other things we'll be having:
Pepita Granola with Pumpkin Butter
Caramel Apple Upside Down Cake
Fauxtisserie Chicken
Overnight Applesauce
Ginger Sweet Potato Muffins
Labels:
Menus
Saturday, October 27, 2012
Fresh Spaghetti Sauce
I've been home canning my own spaghetti sauce for years. I love gathering the last of the tomatoes in the fall and filling up my jars that line my pantry throughout the winter until next year. The first sauce I used to make was from a dry mix, and although I loved it, it wasn't my husband's favorite. So, the last few summers I've been trying different recipes, searching for "the one."
The last couple years I made this Tomato-Basil Simmer Sauce which I actually do love, but I also wanted a sauce that was more substantial, something that would stick to the noodles without running off.
This, my friends, is "THE ONE," the very sauce I will can for the rest of my existence! Ok, well maybe not that long, but I think my search is over. This recipe uses fresh, vine-ripened tomatoes, but also uses just a little canned tomato sauce and paste which allow the sauce to thicken without cooking it to death, thus preserving that fresh tomato taste (and not keeping you in the kitchen all day).
I love the sweet bell peppers in this sauce. I chose to use only about half green pepper and the rest red. I find the green ones have a more bitter taste, but any other colored ones (yellow, red or orange) work perfectly. I think next time I will replace all of the green pepper with a different color.
This recipe makes roughly 12 cups, 6 pints. If you're not a canner, you can also freeze the sauce in 2-4 cup portions in zip-loc freezer bags or freezer safe plastic ware. You could also just half the recipe for short-term use.
Fresh Spaghetti Sauce
makes about 6 pints
8 cups vine-ripened tomatoes (best from the garden), peeled and chopped (about 10-12 large)*
2 cups onion, chopped
1 1/2 cups sweet bell pepper, chopped
6 cloves garlic, minced
2 tsp. dried oregano
2 Tbsp. canning salt (if you don't have canning salt, just salt to taste)
2 tsp. freshly ground black pepper
1 Tbsp. fennel seed
1/4 cup sugar
1 cup apple cider vinegar
16 oz. tomato sauce
12 oz. tomato paste
The last couple years I made this Tomato-Basil Simmer Sauce which I actually do love, but I also wanted a sauce that was more substantial, something that would stick to the noodles without running off.
This, my friends, is "THE ONE," the very sauce I will can for the rest of my existence! Ok, well maybe not that long, but I think my search is over. This recipe uses fresh, vine-ripened tomatoes, but also uses just a little canned tomato sauce and paste which allow the sauce to thicken without cooking it to death, thus preserving that fresh tomato taste (and not keeping you in the kitchen all day).
I love the sweet bell peppers in this sauce. I chose to use only about half green pepper and the rest red. I find the green ones have a more bitter taste, but any other colored ones (yellow, red or orange) work perfectly. I think next time I will replace all of the green pepper with a different color.
This recipe makes roughly 12 cups, 6 pints. If you're not a canner, you can also freeze the sauce in 2-4 cup portions in zip-loc freezer bags or freezer safe plastic ware. You could also just half the recipe for short-term use.
Fresh Spaghetti Sauce
makes about 6 pints
8 cups vine-ripened tomatoes (best from the garden), peeled and chopped (about 10-12 large)*
2 cups onion, chopped
1 1/2 cups sweet bell pepper, chopped
6 cloves garlic, minced
2 tsp. dried oregano
2 Tbsp. canning salt (if you don't have canning salt, just salt to taste)
2 tsp. freshly ground black pepper
1 Tbsp. fennel seed
1/4 cup sugar
1 cup apple cider vinegar
16 oz. tomato sauce
12 oz. tomato paste
1/2 cup fresh basil, chopped
Blanch and peel tomatoes. Pulse in blender until desired "chunkiness" and set aside. Drizzle a couple tablespoons of olive oil in a large stock pot and add chopped onions and peppers. Saute over medium high heat about 5 minutes. Add tomatoes, garlic and the next 8 ingredients. Bring to a boil, then simmer for 10 minutes. Remove from heat and stir in fresh basil.
To can sauce you must use a boiling water bath canner. Pour hot sauce into hot jars. Wipe mouth of each jar clean and place a lid and ring on each jar, only screwing lid to finger tightness. Process pint jars 15 minutes.
*To blanch and peel tomatoes, bring a pot of water to a boil and fill the sink with cold water. Using a knife, serrated works best for me, score the tomato by making an "x." Place as many tomatoes in the pot as will cover the bottom in ONE layer. Boil for 60 seconds, then ladle them out and immediately put them in the sink filled with cold water. Continue with the rest of the tomatoes.
You will notice the skins already starting to peel off where they have been scored. Slip off the skins, they come off easily, and core them and place them in a blender or food processor to chop or puree, whichever you prefer.
Make sure you do enough tomatoes to equal 8 cups, chopped.
Tuesday, October 23, 2012
Winter Squash Sage and Pine Nut Pizza
One thing I love about our family pizza nights is that we always get to try new things! Now granted my 4 and 6 year old daughters will eat nothing but cheese pizza, but hubby and I love experimenting. Pizza is another great way to embrace the flavors of seasons, so that is exactly what I did. Sage and winter squash are a perfect pairing and get used a lot around this time of year.
Pizza does not have to be boring! We've had weekly pizza nights (give or take a week here and there) for quite a while now and I never tire of it because were always thinking of something new to put on top. It's a fun tradition to do with my family that creates memories and a tradition I hope to carry on for a while.
Winter Squash Sage and Pine Nut Pizza
1 recipe Whole Wheat Crust
1 cup butternut squash puree (you can either roast your own squash and puree it or buy it already pureed)
1 small onion, sliced thin
2 tsp. fresh sage leaves, minced
10-12 fresh sage leaves, whole
1/4 tsp. ground nutmeg
1/4 tsp. salt
1/4 tsp. pepper
6 oz. mozzarella cheese, shredded
2 oz. Parmesan cheese, shredded
1-2 Tbsp. pine nuts
4 Tbsp. butter
Mix dough according to directions. Allow to rise.
While dough is rising, caramelize onions. Drizzle 1-2 Tbsp. olive oil in a saute pan and heat over medium-high heat. Add onions and allow to cook until translucent and browning; about 10-15 minutes. Meanwhile, melt the butter. Add whole sage leaves and cook until crisp and butter is browned and has a nutty fragrance. Remove sage leaves and set aside.
Preheat pizza stone and oven to 450 degrees F.
Stir the squash puree, nutmeg, salt and pepper until mixed well. Stretch pizza dough over pizza peel dusted with cornmeal or parchment paper. Spread squash mixture over the top, leaving about 1/2-inch border. Brush the edges with some of the browned butter. Top with caramelized onions, minced sage, mozzarella cheese, pine nuts and Parmesan.
Slide pizza into the oven onto preheated pizza stone or an inverted cookie sheet, no need to remove parchment if using, just slide it right in there with the pizza. Bake 8-10 minutes or until top is golden and bubbly.
Remove pizza from oven and drizzle with some of the remaining browned butter and crisped sage leaves.
Labels:
pizza
Sunday, October 21, 2012
Menu Plan Monday-October 2012 (Week 4)
I was all ready to put up a Halloween meal plan but realized it's still not until next week. Do you have any Halloween meal traditions? I've tried soup in a pumpkin before without much luck and haven't attempted much since. Having young children, it's always fun to celebrate everything! Keeps life exciting don't you think?
I've got lots of comfort food going on this week, I'm so excited!!! I wish I could make it all at once. I think I'm mostly excited about the soup. We'll see if the kiddos go for it. One thing I know they're going to love is spaghetti night. I found a new sauce recipe this summer which I love. Can't wait to share that!
If you are new this week, recipes that are linked have already been shared on the blog. Other menu items will be shared within a week or so. So if you spy something good, don't forget to come back and visit!
October Menu (Week 4)
Monday
Creamy Avocado Pasta
Asian Slaw
Tuesday
Thai Chicken Salad (this is going to happen this week or else!!!)
Wednesday
Lemon and Oregano Roast Chicken
steamed broccoli
Sourdough Baguette (half)
Apple, walnut and feta Salad with Raspberry Vinaigrette
Thursday
Spaghetti
Sourdough Baguette (half)
fresh steamed green beans
leftover Apple, Walnut and feta Salad with Raspberry Vinaigrette
Friday
Vegetable Curry
Couscous
Saturday
Yellow Split Pea and Sweet Potato Soup with Pepitas
Sunday
Family Pizza night
Other Things We'll be having:
Bulgar Tabbouleh
Chocolate Coconut Bread Pudding
Whole Wheat Apple Cinnamon Pancakes
Baked Oatmeal
I've got lots of comfort food going on this week, I'm so excited!!! I wish I could make it all at once. I think I'm mostly excited about the soup. We'll see if the kiddos go for it. One thing I know they're going to love is spaghetti night. I found a new sauce recipe this summer which I love. Can't wait to share that!
If you are new this week, recipes that are linked have already been shared on the blog. Other menu items will be shared within a week or so. So if you spy something good, don't forget to come back and visit!
October Menu (Week 4)
Monday
Creamy Avocado Pasta
Asian Slaw
Tuesday
Thai Chicken Salad (this is going to happen this week or else!!!)
Wednesday
Lemon and Oregano Roast Chicken
steamed broccoli
Sourdough Baguette (half)
Apple, walnut and feta Salad with Raspberry Vinaigrette
Thursday
Spaghetti
Sourdough Baguette (half)
fresh steamed green beans
leftover Apple, Walnut and feta Salad with Raspberry Vinaigrette
Friday
Vegetable Curry
Couscous
Saturday
Yellow Split Pea and Sweet Potato Soup with Pepitas
Sunday
Family Pizza night
Other Things We'll be having:
Bulgar Tabbouleh
Chocolate Coconut Bread Pudding
Whole Wheat Apple Cinnamon Pancakes
Baked Oatmeal
Labels:
Menus
Friday, October 19, 2012
Caramel Apple Cheesecake Bars
'Tis the season to make anything apple. I'm always looking for a reason to make a yummy dessert and Sunday night family dinner is no better time. In the fall I crave anything with apple, from pancakes, to oatmeal.
This is a simple dessert with a taste that will blow the socks off of anyone! It may seem like a lot of steps but it really comes together quickly. I used the leftover caramel sauce from these pancakes but feel free to use store bought if you prefer.
Caramel Apple Cheesecake Bars
For the crust:
2 cups all-purpose flour
1/2 cup firmly packed brown sugar
1 cup (2 sticks) butter, softened For the cheesecake filling:
3 (8-ounce) packages cream cheese, softened
3/4 cup sugar
3 large eggs
1 1/2 tsp. vanilla extract
For the apple topping:
3 Granny Smith apples, peeled, cored and finely chopped
2 Tbsp. sugar
1 tsp. cinnamon
1/2 tsp. nutmeg
For the streusel topping:
1 cup firmly packed brown sugar
1 cup all-purpose flour
1 tsp. cinnamon
1/2 tsp. nutmeg
1/2 cup quick cooking oats
1/2 cup (1 stick) butter, softened
1/2 cup caramel sauce
Preheat oven to 350 degrees F.
In a
medium bowl, combine flour and brown sugar. Cut in butter with a pastry
blender (or 2 knives) until mixture is crumbly. Press evenly into a 9x13
baking pan sprayed with cooking spray. Bake 15 minutes or until
lightly browned.
In a large bowl, beat cream cheese and sugar in an electric mixer at medium speed until smooth. Then add
eggs, 1 at a time, and vanilla. Beat to combine. Pour over warm crust.
In
a small bowl, stir together chopped apples, sugar, cinnamon, and nutmeg. Spoon evenly over cream cheese mixture.
For the streusel topping, combine all ingredients in a small mixing bowl. Cut butter until mixture is crumbly and resembles a coarse meal.
Sprinkle streusel topping over apples. Bake 40-45 minutes, or until filling is set. Filling should look a little wiggly in the center but firm everywhere else. Cheesecake will finish setting once cooled.
Once cooled but still warm, cut into squares, drizzle with caramel sauce and whipped topping, if desired.
SOURCE: Adapted from The Girl Who Ate Everything
Labels:
Cakes,
Desserts,
Fall Baking,
Fruit
Tuesday, October 16, 2012
Crispy Quinoa Sliders
At first glance atf these, I knew I wanted to make them, but was a little apprehensive. I wasn't sure how my all-of-a-sudden picky eater oldest daughter would handle these and it didn't seem like they would be flavorful enough.
With my oldest daughter I thought I would pull THIS trick and just serve it to her like it was a regular hamburger and not let her on about it. Hmm, that didn't work so much. She looked at it, then looked at me and asked why it was that color. Needless to say, daughter #1 didn't eat it. Daughter #2 needed a little coaxing and distraction, plus some ketchup dipping action, and she ate hers right up. Daughter #3 eats just about anything, so we're good there.
Hubby and I actually really loved these. As it turns out they really are flavorful! Never underestimate the power of simple ingredients. It is really key in this recipe to get the patties nice and golden. It not only helps them stick together, it really adds to the flavor. I love that these patties are so healthful. Lots of protein from the beans and quinoa and some good, healthy (and tasty) fats from the olive oil and avocado. I opted for just the avocado rather than the mayo to top my patties, in keeping with the whole foods idea, but top yours however you desire and enjoy!!
Crispy Quinoa Sliders
2 cups quinoa, cooked in chicken or vegetable stock
1 cup cooked white beans
1/2 cup carrots, diced
1/2 small onion, finely diced
2 garlic cloves, minced
2 eggs
1/2 cup freshly grated Parmesan cheese
1/4 cup panko bread crumbs
1/2 teaspoon salt
1/4 teaspoon pepper
2 Tbsp. olive oil
12 whole wheat slider buns or dinner rolls
2 avocados, mashed
1/2-1 tsp. chipotle powder
Cook quinoa in chicken or vegetable stock, according to package directions.
Mash avocado and add chipotle powder according to your likeness. Set aside.
1 cup cooked white beans
1/2 cup carrots, diced
1/2 small onion, finely diced
2 garlic cloves, minced
2 eggs
1/2 cup freshly grated Parmesan cheese
1/4 cup panko bread crumbs
1/2 teaspoon salt
1/4 teaspoon pepper
2 Tbsp. olive oil
12 whole wheat slider buns or dinner rolls
2 avocados, mashed
1/2-1 tsp. chipotle powder
Cook quinoa in chicken or vegetable stock, according to package directions.
Mash avocado and add chipotle powder according to your likeness. Set aside.
Drizzle about 1 tablespoon of olive oil in a skillet and saute onions and carrots over medium high heat until soft and onions are translucent. Add garlic the last 30 seconds of cooking. Mash beans and add them to the onion mixture. Place mixture into a large bowl, along with the cooked quinoa and allow to cool slightly.
Once mixture is cool, add eggs, cheese, bread crumbs, salt and pepper and olive oil. Either using hands or a wooden spoon, stir together until all ingredients are well-incorporated.
Heat a large skillet over medium-high heat and add a couple drizzles of
olive oil. Once good and hot, make the patties. I found it easiest to use a large scoop, like a muffin scoop, to make the patties and just just scoop it out right into the pan, flattening it out a little bit with the tips of your fingers. Add 5-6 quinoa patties, or however many fit in your pan, and cook until DEEPLY golden
brown and crispy, about 5 minutes. If you cook it any less, patties will be too tender and will begin to crumble. Gently flip and cook 5 minutes more.
Remove and continue with remaining olive oil and patties.
Serve warm on slider or dinner rolls topped with mashed avocado. (Feel free to embellish here. You can add mayo if you like, or my daughter even liked them dipped in ketchup!)
Labels:
Beans n' Legumes,
Quick n' Easy
Monday, October 15, 2012
Menu Plan Monday-October 2012 (Week 3)
Well, my friends, as luck would have it, we had a flood in our house mid way through the week last week and had to leave until today. Lucky for us we have family close by we were able to stay with. But, not so lucky for my menu because I didn't get very far down the list before we had to leave. I did, however make the quinoa sliders from last week's menu which were absolutely delicious, so keep your eyes open tomorrow for that post.
Since I already have the groceries from last week's menu, I'm keeping those meals the same. I've thrown in a few others to fill the rest of the week.
October Menu (Week 3)
Monday
Tortilla Soup with Southwest Cabbage Slaw
Tuesday
Bean Curry
Thai Coconut Rice
Wednesday
Pizza with Garlic Bread Crust
Thursday
Thai Chicken Salad
Friday
Ginger-Garlic Salmon
Asian Cabbage Salad
Saturday
Sesame Noodles
Sunday
Fresh Tomato-Basil Soup in homemade bread bowls (I will have an updated recipe and add a picture as well to this post-an oldie but a goodie.)
Other things we'll be having:
Baked oatmeal
Caramel Apple Cheesecake Bars
Scones
Apples and Cinnamon Breakfast Quinoa
Since I already have the groceries from last week's menu, I'm keeping those meals the same. I've thrown in a few others to fill the rest of the week.
October Menu (Week 3)
Monday
Tortilla Soup with Southwest Cabbage Slaw
Tuesday
Bean Curry
Thai Coconut Rice
Wednesday
Pizza with Garlic Bread Crust
Thursday
Thai Chicken Salad
Friday
Ginger-Garlic Salmon
Asian Cabbage Salad
Saturday
Sesame Noodles
Sunday
Fresh Tomato-Basil Soup in homemade bread bowls (I will have an updated recipe and add a picture as well to this post-an oldie but a goodie.)
Other things we'll be having:
Baked oatmeal
Caramel Apple Cheesecake Bars
Scones
Apples and Cinnamon Breakfast Quinoa
Labels:
Menus
Saturday, October 13, 2012
Snickers Pancakes
Happy Saturday! It is high time for a new pancake recipe around here! Believe me, we still eat plenty of pancakes but I've been mostly sticking to these for convenience. Ever since school started, my oldest just started kindergarten, I feel like a crazy busy woman. Weird how just one little thing can cause such a dynamic change! So we have been sticking to quick and easy, but healthy too. Well, except for maybe these this morning.
Now these are not your every day pancakes. They ARE named after a candy bar, so I wouldn't go eating them every day. But they are much better than a candy bar and not incredibly bad for you either. With whole wheat flour and oats and just a pinch of added sugar and light on the add-ins, it's only slightly more indulgent than your every day pancakes and syrup. You're going to love this easy caramel sauce too!!! Divine.
Snickers Pancakes
2 cups buttermilk
2 eggs
splash of vanilla (optional)
1/4 cup butter, melted
1 cup whole wheat flour
1/3 cup all-purpose flour
2/3 cup oats
2 Tbsp. sugar
2 tsp. baking powder
1 tsp. baking soda
3/4 tsp. salt
1/4 cup mini semi-sweet chocolate chips (plus more for garnish, if desired)
1/4 cup salted, roasted peanuts, roughly chopped (plus more for garnish, if desired)
Simple caramel sauce (recipe below)
In a mixing bowl, mix buttermilk, eggs, butter and vanilla. Whisk to incorporate. Add the rest of the dry ingredients and whisk until just combined. Add chocolate chips and peanuts last and stir briefly to combine.
Let batter sit while griddle heats up. Drop batter by 1/4 cup onto griddle and cook until bubbles start to form and edges start looking dry; about 2-3 minutes. Flip and cook another minute or two. Repeat with remaining batter.
Serve warm and garnish as desired.
Simple caramel sauce
1 cup granulated sugar
2 Tbsp. water
1/3-1/2 cup heavy cream
In a saucepan combine sugar and water over medium heat. Swirl together rather than stir. Cook until light brown in color, about 10-15 minutes. Gently remove from heat and add in cream. Whisk until well incorporated. Mixture will bubble profusely the moment you add the cream so be careful, but it should settle down right away. If you have any hardened bits in the pan, just put it over the warm burner again and let it melt back into the mixture. Store in a small glass jar with a tight fitting lid in the fridge.
SOURCE: Adapted from Minimalist Baker
Now these are not your every day pancakes. They ARE named after a candy bar, so I wouldn't go eating them every day. But they are much better than a candy bar and not incredibly bad for you either. With whole wheat flour and oats and just a pinch of added sugar and light on the add-ins, it's only slightly more indulgent than your every day pancakes and syrup. You're going to love this easy caramel sauce too!!! Divine.
Snickers Pancakes
2 cups buttermilk
2 eggs
splash of vanilla (optional)
1/4 cup butter, melted
1 cup whole wheat flour
1/3 cup all-purpose flour
2/3 cup oats
2 Tbsp. sugar
2 tsp. baking powder
1 tsp. baking soda
3/4 tsp. salt
1/4 cup mini semi-sweet chocolate chips (plus more for garnish, if desired)
1/4 cup salted, roasted peanuts, roughly chopped (plus more for garnish, if desired)
Simple caramel sauce (recipe below)
In a mixing bowl, mix buttermilk, eggs, butter and vanilla. Whisk to incorporate. Add the rest of the dry ingredients and whisk until just combined. Add chocolate chips and peanuts last and stir briefly to combine.
Let batter sit while griddle heats up. Drop batter by 1/4 cup onto griddle and cook until bubbles start to form and edges start looking dry; about 2-3 minutes. Flip and cook another minute or two. Repeat with remaining batter.
Serve warm and garnish as desired.
Simple caramel sauce
1 cup granulated sugar
2 Tbsp. water
1/3-1/2 cup heavy cream
In a saucepan combine sugar and water over medium heat. Swirl together rather than stir. Cook until light brown in color, about 10-15 minutes. Gently remove from heat and add in cream. Whisk until well incorporated. Mixture will bubble profusely the moment you add the cream so be careful, but it should settle down right away. If you have any hardened bits in the pan, just put it over the warm burner again and let it melt back into the mixture. Store in a small glass jar with a tight fitting lid in the fridge.
SOURCE: Adapted from Minimalist Baker
Friday, October 12, 2012
Book Review: The Healthy Happy Family
I was given the opportunity by my good friend Emily to review her new e-book, The Healthy Happy Family: A Family Guide to a Healthier Home on a Budget. Of course I accepted because she is my friend but I also think it has some wonderful information for those looking to "clean" up their diet.
In their book, Emily and her husband, Derek, discuss how to incorporate whole and natural foods into your diet, tips to getting kids to eat healthy foods, and how to eat a whole foods diet without breaking the bank! If that sounds like what you need, go check it out! You can find Emily at her blog Eat Yourself Healthy and Happy, and you can find her Ebook on Amazon here.
Wednesday, October 10, 2012
Vegan Broccoli Soup
I love finding dairy-free options for creamy soups that don't taste....well, weird. Some dishes can be "vega-fied" by using soy cheeses and such which I am just not a fan of, and it's not just because of their taste. Remember how I said we've been switching our diet to more whole and plant-based foods and taking out the processed? Well, although those soy products do not contain dairy, they are still processed, thus not being a whole food and contain...SOY (one of the most genetically modified foods). So, I try to steer clear of those products.
This delicious soup gets it's creaminess from pureed cashews, which works amazingly well! And it's even more healthified by tons of broccoli! This fits the bill for me in more ways than one.
I crave soup practically all the time during the cold months, I'm glad to add another delicious one to my recipe box!
Vegan Broccoli Soup
1 1/2 cups raw cashews, soaked in water for 1 hour then drained
1 small onion, diced
2 cloves garlic, minced
1 tablespoon olive oil
2 heads of broccoli, chopped into bite-size florets
1/8 teaspoon fresh ground nutmeg
1 teaspoon cumin
1 teaspoon salt
1/4 teaspoon ground mustard
fresh ground black pepper to taste
1 Tbsp fresh lemon juice
2 Tsp. Worcestershire sauce (or vegan Worcestershire)
about 4 cups of water
Soak raw cashews in water for 1 hour. Drain and puree in blender. Set aside.
Steam broccoli until fork tender. Drain and set aside.
In a large saucepan over medium heat, add
olive oil, and onions. Cook until onions are tender and translucent,
about 5 minutes. Add garlic and cook for one minute more. Add cumin,
salt, mustard seed, and black pepper and cook for about 30 seconds. Add
cooked broccoli florets, water and cashew cream reduce heat to a simmer. With an immersion blender blend soup until smooth. Alternately, you could work in batches and blend it in a blender until smooth.
Add lemon juice and Worcestershire sauce and stir to combine. Taste for seasoning and adjust as necessary.
Serve warm. Soup will last, in an airtight container in the fridge for 4 days.
SOURCE: Adapted from The Three Day Cleanse via Joy the Baker
Labels:
Quick n' Easy,
Soups,
Vegetables
Sunday, October 7, 2012
Menu Plan Monday-October 2012 (Week 2)
Here we are heading into the second week of October and it's getting CHILLY!! My heat finally kicked on about two nights ago when the temperature dropped into the 30s, so at least we're staying toasty inside.
You'll notice some more fall-inspired meals on the menu this week (soup!), as well as some that we didn't get to last week (that happens often here-does that happen to you too?). I'm also still including lots of salad! I love to eat salad all year round but I do eat more cabbage salads in the winter because they are hearty, last forever in your fridge and go so well with Asian-style dressings (which I love). Cabbage is also full of good nutrition too.
You'll also notice lots of breakfast food! If you haven't been a reader long, you'll quickly find out we are totally breakfast lovers here! I usually make mostly hot breakfasts almost every morning, including pancakes (fave!), eggs and toast, oatmeal, cream of wheat, granola and oatmeal smoothies.
If you are new this week, recipes that are already on the blog have been linked. The rest will appear within a short time, pending family approval!
October Menu (Week 2)
Monday
Creamy Caprese Pasta
steamed broccoli
Grilled Tuscan Panzanella
Tuesday
Quinoa Sliders w/ avocado
leftover Panzanella and veggies
Wednesday
Bean Curry
Thai Coconut Rice
Thursday
Thai Chicken Salad
Friday
Yellow Split Pea and Sweet Potato Soup w/ Pepitas
Saturday
Ginger-Garlic Salmon
Asian Cabbage
Sunday
Pesto Pizza with Butternut Squash (this may change, but I do have pesto to use up)
Other things we'll be having:
Cherry Almond Granola
Homemade Burger Buns (whole wheat and slider size)
Grilled Apple Pie Breakfast Stack
Banana Oat Breakfast Cookies
Orange Dark Chocolate Pancakes
Snickers Pancakes
Labels:
Menus
Friday, October 5, 2012
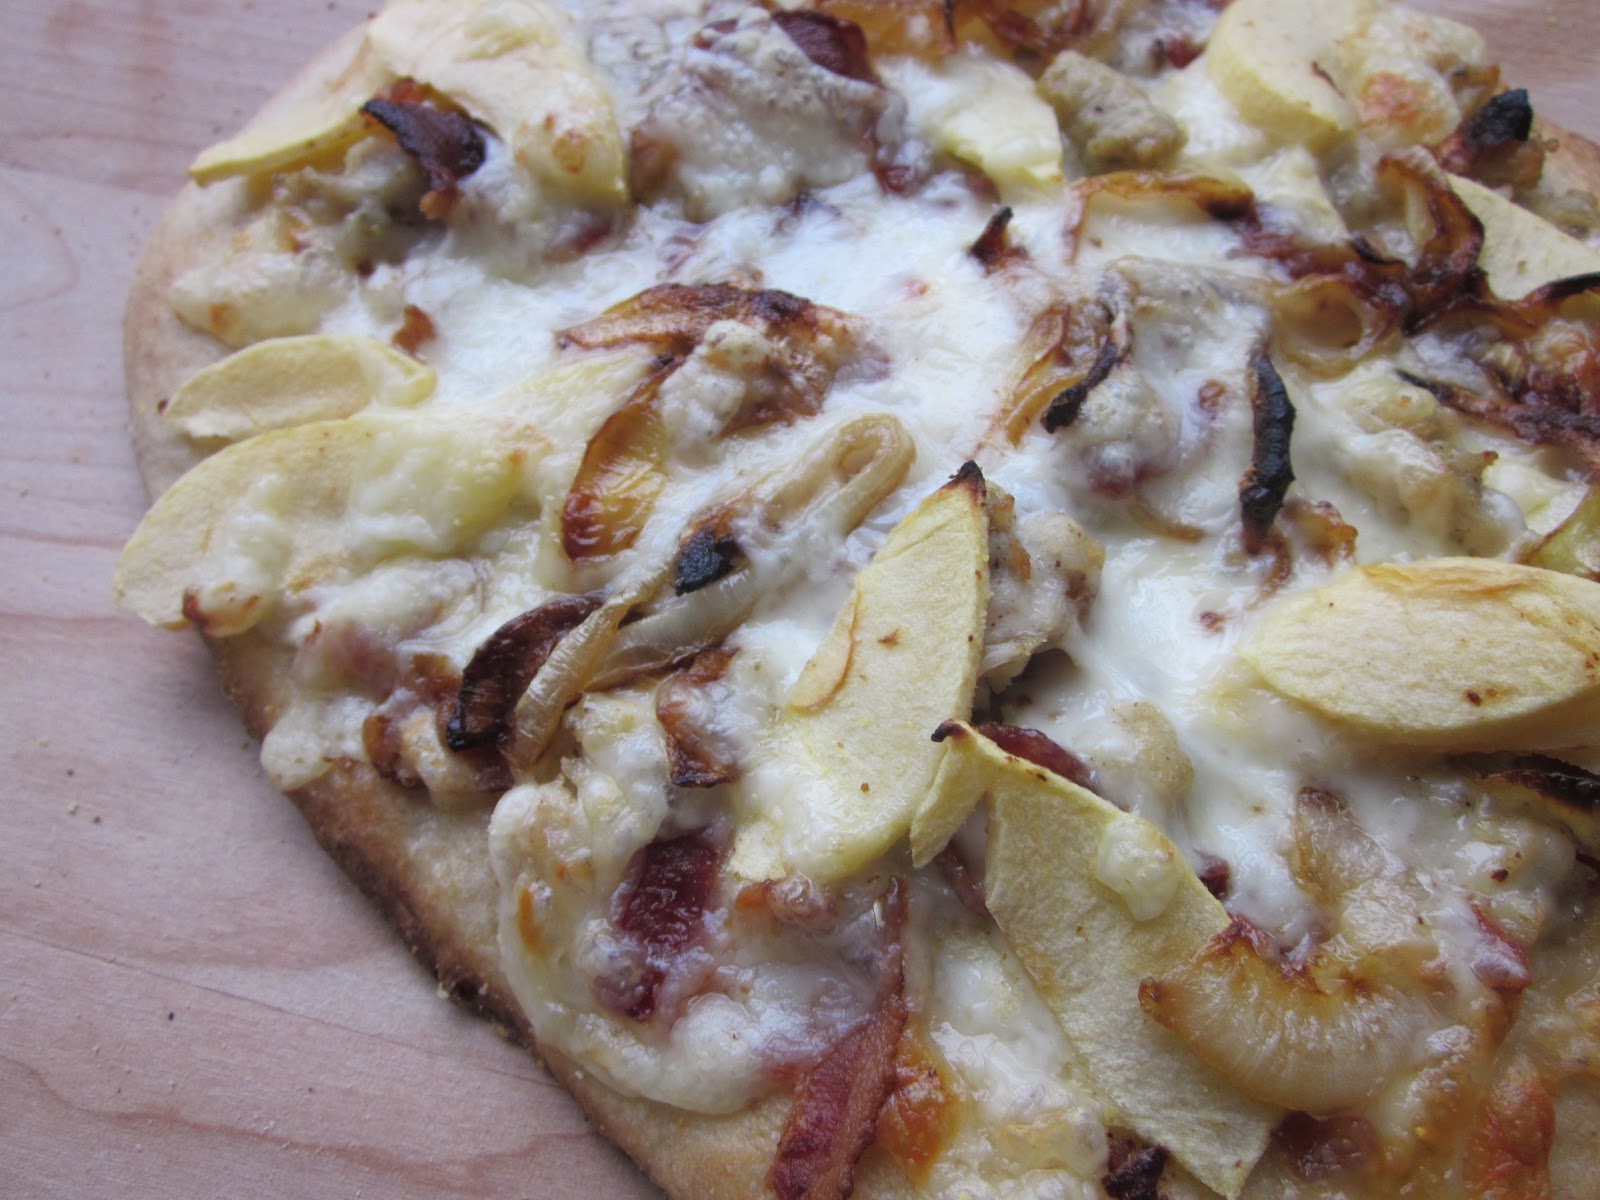
Apple-Sausage Pizza on a Whole Wheat Crust
Nothin' screams fall like apples! Apples go good with so many things, like cheddar, bacon, chicken sausage, caramelized onion, so why not just throw it all together on a pizza? Yup, that's what I did....oh so delish. The whole wheat crust is perfect for this pizza because it can stand up to all those wonderful toppings and still deliver a great taste.
We have pizza night about once a week and I'm always looking for ways to change it up for the hubs and I. My girls are not very venturesome when it comes to pizza, so I make one cheese pizza for them and a different one for the "adults."
Apple-Sausage Pizza on a Whole Wheat Crust
For the crust:
1 1/3 cups whole wheat flour
2/3 cup all-purpose flour
2 tsp. instant yeast
1/2 tsp. salt
1 tsp. sugar
2 Tbsp. olive oil
3/4 cup warm water
Place all ingredients except the water in the bowl of a stand mixer. Pulse a time or two to evenly distribute everything. Add water and mix for about 30-60 seconds. If dough seems too dry, add a little more water, one tablespoon at a time. If it is too wet, add more flour, about one tablespoon at a time. Let dough knead for about 8 minutes, or until smooth and elastic. Place dough in a greased bowl. Cover lightly with a lid or damp kitchen towel and let rise until doubled in size.
For the pizza:
cornmeal, for dusting
1 recipe whole wheat crust
1 Tbsp. Dijon or coarse-ground mustard
1/2 pound chicken sausage, cooked and crumbled
1 apple (I used Gala), thinly sliced
1/2 onion, thinly sliced and caramelized
4-5 slices bacon, cooked and crumbled
1 cup cheddar cheese, grated (I used white cheddar, but not necessary)
1/4-1/2 cup mozzarella cheese, grated
*To caramelize onion, place onion in a frying pan with a drizzle of olive oil and cook on medium to medium-low for about 8-10 minutes or until slightly browned and soft.
Preheat oven to 450 degrees F. If using a baking stone, place it in the oven as well to preheat. Dust a pizza peel or parchment paper with cornmeal and roll out pizza dough.
Drizzle olive oil over the top of the crust, and brush around the edges. Spread the mustard evenly, leaving about 1/2-inch border at the edge. Top with about 3/4 of the cheddar cheese, sausage, bacon and caramelized onions. Tuck in the apple slices, then sprinkle with the remaining cheddar cheese and mozzarella.
Slip pizza from the peel onto the hot baking stone, or if you're using parchment paper, just slide it right onto the stone. Alternately you can use and inverted cookie sheet. Bake for about 7-10 minutes, or until cheese is bubbly and starting to brown.
We have pizza night about once a week and I'm always looking for ways to change it up for the hubs and I. My girls are not very venturesome when it comes to pizza, so I make one cheese pizza for them and a different one for the "adults."
Apple-Sausage Pizza on a Whole Wheat Crust
For the crust:
1 1/3 cups whole wheat flour
2/3 cup all-purpose flour
2 tsp. instant yeast
1/2 tsp. salt
1 tsp. sugar
2 Tbsp. olive oil
3/4 cup warm water
Place all ingredients except the water in the bowl of a stand mixer. Pulse a time or two to evenly distribute everything. Add water and mix for about 30-60 seconds. If dough seems too dry, add a little more water, one tablespoon at a time. If it is too wet, add more flour, about one tablespoon at a time. Let dough knead for about 8 minutes, or until smooth and elastic. Place dough in a greased bowl. Cover lightly with a lid or damp kitchen towel and let rise until doubled in size.
For the pizza:
cornmeal, for dusting
1 recipe whole wheat crust
1 Tbsp. Dijon or coarse-ground mustard
1/2 pound chicken sausage, cooked and crumbled
1 apple (I used Gala), thinly sliced
1/2 onion, thinly sliced and caramelized
4-5 slices bacon, cooked and crumbled
1 cup cheddar cheese, grated (I used white cheddar, but not necessary)
1/4-1/2 cup mozzarella cheese, grated
*To caramelize onion, place onion in a frying pan with a drizzle of olive oil and cook on medium to medium-low for about 8-10 minutes or until slightly browned and soft.
Preheat oven to 450 degrees F. If using a baking stone, place it in the oven as well to preheat. Dust a pizza peel or parchment paper with cornmeal and roll out pizza dough.
Drizzle olive oil over the top of the crust, and brush around the edges. Spread the mustard evenly, leaving about 1/2-inch border at the edge. Top with about 3/4 of the cheddar cheese, sausage, bacon and caramelized onions. Tuck in the apple slices, then sprinkle with the remaining cheddar cheese and mozzarella.
Slip pizza from the peel onto the hot baking stone, or if you're using parchment paper, just slide it right onto the stone. Alternately you can use and inverted cookie sheet. Bake for about 7-10 minutes, or until cheese is bubbly and starting to brown.
Labels:
Chicken,
pizza,
Quick n' Easy
Tuesday, October 2, 2012
Menu Plan Monday-October 2012 (Week 1)
I've decided to bring the menu plan back to the blog! I think menu planning is an important step to feeding your family healthful, well-rounded meals, as well as keeping you on track with a budget.
When I posted my previous menus, they were monthly menus, but I'm switching to weekly menus. The main reason is that our diets have changed to include much more plant food (i.e. salads and veggies) so I shop for those more frequently than I would with once a month shopping. The other reason is that if you are new to menu planning it's easier to start small. At first even taking on a week at a time may sound daunting. Hopefully you can start getting some ideas and inspiration from the new weekly menu posts and start creating your own!
I'll list mostly our dinner menu and link recipes that are already on the blog. Meals that are not linked will show up hopefully within a week, if it is something our family loved. I'll also link other things I plan on making.
October Menu (week 1)
Monday
Whole Wheat Pasta with Cilantro-Peanut Pesto
fresh corn on the cob
salad
Tuesday
Blackened Salmon Tacos w/ corn salsa
Southwest Cabbage Slaw
Wednesday
Lemon and Oregano Roast Chicken
fresh steamed green beans
Sweet Potato Cakes
Thursday
Vegan Broccoli Soup
Sourdough baguette
Friday
Quinoa Sliders w/ avocado on homemade whole wheat dinner rolls
Italian Salad w/ Basil Vinaigrette
Saturday
Bean Curry
Thai Coconut Rice
Sunday
Homemade Pizza (toppings to be determined)
Other things I'll be making
Crunchy Oat Cereal (with almond pulp)
Apples and Cinnamon Breakfast Quinoa
Grilled Apple Pie Breakfast Stack
Cinnamon Rolls
Homemade Peanut Butter
When I posted my previous menus, they were monthly menus, but I'm switching to weekly menus. The main reason is that our diets have changed to include much more plant food (i.e. salads and veggies) so I shop for those more frequently than I would with once a month shopping. The other reason is that if you are new to menu planning it's easier to start small. At first even taking on a week at a time may sound daunting. Hopefully you can start getting some ideas and inspiration from the new weekly menu posts and start creating your own!
I'll list mostly our dinner menu and link recipes that are already on the blog. Meals that are not linked will show up hopefully within a week, if it is something our family loved. I'll also link other things I plan on making.
October Menu (week 1)
Monday
Whole Wheat Pasta with Cilantro-Peanut Pesto
fresh corn on the cob
salad
Tuesday
Blackened Salmon Tacos w/ corn salsa
Southwest Cabbage Slaw
Wednesday
Lemon and Oregano Roast Chicken
fresh steamed green beans
Sweet Potato Cakes
Thursday
Vegan Broccoli Soup
Sourdough baguette
Friday
Quinoa Sliders w/ avocado on homemade whole wheat dinner rolls
Italian Salad w/ Basil Vinaigrette
Saturday
Bean Curry
Thai Coconut Rice
Sunday
Homemade Pizza (toppings to be determined)
Other things I'll be making
Crunchy Oat Cereal (with almond pulp)
Apples and Cinnamon Breakfast Quinoa
Grilled Apple Pie Breakfast Stack
Cinnamon Rolls
Homemade Peanut Butter
Labels:
Menus
Monday, October 1, 2012
Creamy White Bean and Chicken Sausage Pasta
I'm so glad it's fall! And can you believe it's already October? That mean's Halloween is just around the corner, cooler weather and lots of holiday cheer for months to come. I absolutely love this time of year. It's my favorite.
One of my most favorite things about fall is the FOOD. I love not only eating but also making warm, comforting food that makes my belly full and happy. The great thing about this dish is that it delivers all that plus it's healthy too (minus the bacon). I'm not usually a leftover person, but I ate this for the next two days after I made it, it was that delicious.
Creamy White Bean and Chicken Sausage Pasta
2 cups whole wheat pasta shells
1/2 small onion, chopped
3 garlic cloves, minced
1 roasted red pepper chopped
1 can (15 oz) cannellini beans
1 Tbsp. butter
1 tablespoon flour
1 can lite coconut milk (or 1 cup full-fat coconut milk plus 1 cup water)
1/2 cup almond milk (not vanilla flavored!)
salt and pepper to taste
1/2 lb. bacon, cooked and crumbled
1/2 lb Chicken Sausage (omit dried apples), cooked and crumbled*
4 cups fresh spinach, coarsely chopped
10-12 fresh basil leaves, chopped
2 large tomatoes, chopped
1/4 cup parmesan cheese
*This dish comes together pretty quickly, but to make even more effective use of your time, make and cook the sausage ahead of time. Keep it warm while you're making the rest of the dish.
Bring a pot of water to a boil and cook pasta according to package directions.
While pasta is cooking, heat a large skillet over medium-low heat. Drizzle a bit of olive oil in the pan and add onions, tossing to coat. Cook for 5-7 minutes, until softened and translucent. Stir in the garlic the last 30 seconds or so, then toss in the red pepper, beans and chicken sausage.
When pasta is done cooking, drain and add to the skillet with the rest of the ingredients. Keep it on low while you make the sauce.
In a small saucepan, melt butter. Whisk in flour. When it starts to bubble, cook for about a minute. Whisk in both milks, then bring the mixture to a boil; stirring constantly. Let simmer about 5 minutes, until it thickens a bit. Taste and season with salt and pepper.
Remove the bean and pasta mixture off the heat and pour in the sauce, tossing to coat. Stir in the bacon and spinach and let sit about 5 minute. The sauce will slightly thicken and get absorbed by the pasta and the spinach will begin to wilt. Toss in the tomatoes and fresh basil at the last minute, right before serving. Garnish with parmesan cheese.
SOURCE: Adapted from How Sweet It Is
One of my most favorite things about fall is the FOOD. I love not only eating but also making warm, comforting food that makes my belly full and happy. The great thing about this dish is that it delivers all that plus it's healthy too (minus the bacon). I'm not usually a leftover person, but I ate this for the next two days after I made it, it was that delicious.
Creamy White Bean and Chicken Sausage Pasta
2 cups whole wheat pasta shells
1/2 small onion, chopped
3 garlic cloves, minced
1 roasted red pepper chopped
1 can (15 oz) cannellini beans
1 Tbsp. butter
1 tablespoon flour
1 can lite coconut milk (or 1 cup full-fat coconut milk plus 1 cup water)
1/2 cup almond milk (not vanilla flavored!)
salt and pepper to taste
1/2 lb. bacon, cooked and crumbled
1/2 lb Chicken Sausage (omit dried apples), cooked and crumbled*
4 cups fresh spinach, coarsely chopped
10-12 fresh basil leaves, chopped
2 large tomatoes, chopped
1/4 cup parmesan cheese
*This dish comes together pretty quickly, but to make even more effective use of your time, make and cook the sausage ahead of time. Keep it warm while you're making the rest of the dish.
Bring a pot of water to a boil and cook pasta according to package directions.
While pasta is cooking, heat a large skillet over medium-low heat. Drizzle a bit of olive oil in the pan and add onions, tossing to coat. Cook for 5-7 minutes, until softened and translucent. Stir in the garlic the last 30 seconds or so, then toss in the red pepper, beans and chicken sausage.
When pasta is done cooking, drain and add to the skillet with the rest of the ingredients. Keep it on low while you make the sauce.
In a small saucepan, melt butter. Whisk in flour. When it starts to bubble, cook for about a minute. Whisk in both milks, then bring the mixture to a boil; stirring constantly. Let simmer about 5 minutes, until it thickens a bit. Taste and season with salt and pepper.
Remove the bean and pasta mixture off the heat and pour in the sauce, tossing to coat. Stir in the bacon and spinach and let sit about 5 minute. The sauce will slightly thicken and get absorbed by the pasta and the spinach will begin to wilt. Toss in the tomatoes and fresh basil at the last minute, right before serving. Garnish with parmesan cheese.
SOURCE: Adapted from How Sweet It Is
Labels:
Beans n' Legumes,
Chicken,
Coconut,
main dishes,
Quick n' Easy,
Tomatoes
Monday, September 24, 2012
Mug Brownie (Vegan)
You're either going to love me or hate me for this post. Love me because it's soooooo delicious, so good and so quick. Hate me because it's addicting, and not very high up there on the healthy factor. But hey, you can't be 100% all the time. A girl's gotta have her chocolate once in a while!
Brownie in a mug is the perfect treat for one (or 2) when you've got an intense craving to satisfy, or you don't want to make very much. I've tried a few "mug" recipes and I really absolutely love this one. The brownie comes out nice and moist and has a deep chocolate flavor. NO cake-like brownies here!
This is vegan only because there is no dairy or eggs, but don't let that fool you, it has one of the best flavors in a brownie that I have tasted!
Mug Brownie
2 Tbsp. coconut oil
4 Tbsp. brown sugar
pinch salt
splash of vanilla
2 Tbsp. almond milk
2 Tbsp. unsweetened cocoa powder
4 Tbsp. flour
(Optional: tiny splash rum extract OR tiny pinch cayenne pepper and cinnamon)
Melt coconut oil in mug of choice. You only need to microwave it for about 10 seconds or so, it melts pretty easily. Add sugar, salt and vanilla and stir well. Add milk; stir. (You don't want to add the milk with the coconut oil because it will harden back up since, so add it after the sugar is mixed in.) Add cocoa powder and flour and stir well. Microwave for about 45-70 seconds, or until cooked. Time will depend on your microwave and your mug. I used 2 different mugs; one was done at 45 seconds, the other, closer to 75. Check as you go, starting at about 45 seconds. Enjoy!
SOURCE: Adapted from Industrious Justice
Labels:
Brownies,
Chocolate,
Desserts,
Quick n' Easy
Monday, September 17, 2012
Split Pea Soup with Curried Brown Butter
So, just as I was hanging on to summer with my last post, I'm stepping into fall with this one! I just love soups in the fall. Not only are they a vehicle for an incredible amount of nutrition, they just warm you body and soul!
I know it's not technically fall yet and the weather is still reaching the mid 80's, so I take chose the coolest day of the week last week (85 I think) to make this soup. I was kind of holding my breath because I had no idea the kind of response I would get from my girls-it's green and kind of thick and maybe looks like something Shrek would eat (according to my kids anyway). Well, actually getting them to take the first bite was the hardest because they actually loved it! I was kind of in shock-not that it wasn't delish though, just that they ate it.
This is an absolutely delicious rendition of the simple split pea soup I ate as a child. Cooking the veggies in coconut oil really adds depth of flavor and gives it just a hint of coconut-divine! You won't be sorry about the curried brown butter either-I mean who doesn't love brown butter? And the curry is the perfect spice for the peas.
I served the soup up with a sourdough baguette, but just about any other artisan loaf would be delicious as well.
Split Pea Soup
2 Tbsp. unsalted butter, ghee, or extra-virgin coconut oil
1/2 yellow onion, chopped
1 cup carrot, peeled and chopped
3 cloves garlic, minced
1/2 teaspoon red pepper flakes (optional)
5 1/2 cups vegetable or chicken stock
1 1/2 cups green lentils or green split peas, picked over and rinsed
1/2 cup coconut milk
Curried Brown Butter
3 Tbsp. unsalted butter
1 tablespoon curry powder
Combine the 2 tablespoons coconut oil, onion, carrot, garlic, and red pepper flakes in a large soup pot over medium heat, stirring regularly, until the onions soften, a couple minutes. Add the vegetable broth and lentils and simmer, covered, until the lentils are tender. This usually takes 20 to 30 minutes, but can take as long as 50 minutes.
In the meantime, warm the 3 tablespoons butter in a small saucepan over medium heat and let it brown. When it starts to smell nutty and fragrant, stir in the curry powder and sauté until the spices are fragrant, less than a minute.
When the lentils are finished cooking, remove from the heat, stir in the coconut milk and 1/4 teaspoon of salt, and puree with an immersion blender. You can leave the soup a bit chunky if you like, or puree until it is perfectly smooth.
Stir in half of the curried butter, taste, and add more salt, if needed. Serve drizzled with the remaining curried butter.
SOURCE: Adapted from 101 Cookbooks, originally from Heidi Swanson's Super Natural Every Day.
I know it's not technically fall yet and the weather is still reaching the mid 80's, so I take chose the coolest day of the week last week (85 I think) to make this soup. I was kind of holding my breath because I had no idea the kind of response I would get from my girls-it's green and kind of thick and maybe looks like something Shrek would eat (according to my kids anyway). Well, actually getting them to take the first bite was the hardest because they actually loved it! I was kind of in shock-not that it wasn't delish though, just that they ate it.
This is an absolutely delicious rendition of the simple split pea soup I ate as a child. Cooking the veggies in coconut oil really adds depth of flavor and gives it just a hint of coconut-divine! You won't be sorry about the curried brown butter either-I mean who doesn't love brown butter? And the curry is the perfect spice for the peas.
I served the soup up with a sourdough baguette, but just about any other artisan loaf would be delicious as well.
Split Pea Soup
2 Tbsp. unsalted butter, ghee, or extra-virgin coconut oil
1/2 yellow onion, chopped
1 cup carrot, peeled and chopped
3 cloves garlic, minced
1/2 teaspoon red pepper flakes (optional)
5 1/2 cups vegetable or chicken stock
1 1/2 cups green lentils or green split peas, picked over and rinsed
1/2 cup coconut milk
Curried Brown Butter
3 Tbsp. unsalted butter
1 tablespoon curry powder
Combine the 2 tablespoons coconut oil, onion, carrot, garlic, and red pepper flakes in a large soup pot over medium heat, stirring regularly, until the onions soften, a couple minutes. Add the vegetable broth and lentils and simmer, covered, until the lentils are tender. This usually takes 20 to 30 minutes, but can take as long as 50 minutes.
In the meantime, warm the 3 tablespoons butter in a small saucepan over medium heat and let it brown. When it starts to smell nutty and fragrant, stir in the curry powder and sauté until the spices are fragrant, less than a minute.
When the lentils are finished cooking, remove from the heat, stir in the coconut milk and 1/4 teaspoon of salt, and puree with an immersion blender. You can leave the soup a bit chunky if you like, or puree until it is perfectly smooth.
Stir in half of the curried butter, taste, and add more salt, if needed. Serve drizzled with the remaining curried butter.
SOURCE: Adapted from 101 Cookbooks, originally from Heidi Swanson's Super Natural Every Day.
Labels:
Beans n' Legumes,
Figure Friendly,
main dishes,
Meatless,
Quick n' Easy,
Soups
Friday, September 14, 2012
Zucchini Bites
I know I'm totally hanging onto summer with this post, but I know there are some of you out there that still have zucchini coming out your ears and need something to do with it besides make bread....for the tenth time!
I love that each of these is one perfect little mouthful. You can pop them almost as mindlessly as chips or tater tots, but feel no regret because they are totally healthy!
These haven't quite yet made it to the dinner table because they are just do darned good to snack on, but they would make a great addition to any dinner menu!
Zucchini Bites
Yields 24
2 cups finely shredded zucchini, water squeezed out
2 eggs
1/2 cup whole grain or panko bread crumbs
1/2 cup parmesan cheese, finely shredded
1/2 red bell pepper, finely diced
1/4 cup onion, finely diced
4-6 fresh basil leaves, chopped
salt and pepper
Preheat oven to 400 degrees F. Spray a mini muffin pan with cooking spray.
Squeeze as much water out of the zucchini as you can, otherwise it will become soggy. Place everything in a mixing bowl and either stir with a spoon, or you can use your hand and give it a few good squeezes through your fingers to get it all nice and mixed up.
Using a tablespoon, or I like a small cookie scoop best, scoop mixture into prepared pan and bake for about 15-18 minutes or until slightly golden. Remove to a cooling rack and cool completely. Enjoy!
SOURCE: Adapted from The Curious Country Cook
Labels:
Figure Friendly,
Garden Recipes,
Kid-Friendly,
Meatless,
Muffins,
Quick n' Easy,
Sides,
Snacks,
Vegetables
Friday, September 7, 2012
Peaches and Cream Steel Cut Oats
My friend introduced me to steel cut oats this year and I am forever in her debt! I love them as well as my family. We eat a lot of oatmeal anyway, but since we don't really buy boxed cereal, it's nice to have a variety of hot cereals to eat, especially with fall and cooler temps just around the corner.
One thing I love about steel cut oats is that although it does take longer than rolled oats to cook, you can cook it once, then eat it the rest of the week. I love to portion it out into little bowls with lids and pull a couple out each time we want to eat it. It's pretty perfect for those school mornings when you don't have 25 minutes to make breakfast; you can just pull it out of the fridge, warm it up and you're good to go.
I love to flavor my oats with fresh fruit. It add delicious flavor and extra nutrition to an already healthful breakfast. In this recipe, I have pureed the fresh peaches because my kids have a thing about chunky-things-in-food, but you could easily just chop and mix them in.
Peaches and Cream Steel Cut Oats
1 cup steel cut oats
3 1/4 cups water
pinch of salt
2-3 Tbsp. brown sugar
1/2 tsp. cinnamon
1/4 tsp. ground ginger
1/4 cup full fat coconut milk
1/2-1 cup pureed fresh peaches
1 tsp. vanilla
Toppings (optional): diced peaches and walnuts
Bring water and salt to a boil. Stir in oats. Reduce heat to about medium and cook about 25 minutes or until desired tenderness, stirring every few minutes to prevent sticking on the bottom of the pan. After 25 minutes, remove oats from heat and add the rest of the ingredients. Return to heat for another minute or two. Serve warm or divide into smaller portions and refrigerate for later consumption.
Labels:
Breakfast,
Coconut,
Food Storage,
Quick n' Easy
Monday, September 3, 2012
End-of-Summer Smoothies
Not having my computer is totally killing me. My husband has a MacBook Air, which I have been using a little but I don't like it. I can't wait to get my own laptop back! I just couldn't wait another second to post though, I know it's been sparse the past few weeks. I've got not one but TWO wonderfully delicious end-of-summer smoothies to share with you today. Have a great holiday!!
This first smoothie was born out of necessity. Like, howmagonnauseupallthosepeaches my mom just gave me (from her tree)? I know, what a problem right? I knew I liked peaches and blueberries in my green smoothies, but had yet to try them in just an all fruit smoothie (something my girls would more likely like and finish). So, my first trial was a big score, didn't have to change a thing. It was absolutely love at first sight.
Fresh peaches at their peak are the most wonderful thing in the world to eat. I crave them every summer and am always very sad to see them go. If you can get your hands on some before they're gone, you gotta give this a try!
Blueberry Peach and Basil Smoothie
1 cup frozen blueberries
2 fresh, ripe peaches, peeled if you prefer and pitted
1/2 cup water
1/2 cup almond milk
about 4 fresh basil leaves
Put everything in your blender and whiz away!
I couldn't get this next smoothie out of my mind after I saw it. I think I made it that very day. Watermelon is another one of those quintessential fruits of summer that only lasts so long. So we gorge ourselves on it while it lasts then bid farewell until next time.
This smoothie is also paired with basil. I know you're thinking really??? c'mon here! Not more basil. But, seriously, don't underestimate the basil. It adds flavor and life to so many things. It's a subtle flavor that just knocks your socks off. If you're really not a fan, fresh mint would actually be a great substitution.
This is a super refreshing smoothie with the watermelon and cool cucumber. No need to add any extra liquid because the fruit is already full of it.
Watermelon Strawberry and Basil Smoothie
2 heaping cups watermelon
1/2 cup cucumber
1 cup frozen strawberries
3-4 fresh basil leaves
Put it all in your blender and whiz to you liking. Slurp away.
Enjoy!
SOURCE: Watermelon smoothie from My Green Diet
This first smoothie was born out of necessity. Like, howmagonnauseupallthosepeaches my mom just gave me (from her tree)? I know, what a problem right? I knew I liked peaches and blueberries in my green smoothies, but had yet to try them in just an all fruit smoothie (something my girls would more likely like and finish). So, my first trial was a big score, didn't have to change a thing. It was absolutely love at first sight.
Fresh peaches at their peak are the most wonderful thing in the world to eat. I crave them every summer and am always very sad to see them go. If you can get your hands on some before they're gone, you gotta give this a try!
Blueberry Peach and Basil Smoothie
1 cup frozen blueberries
2 fresh, ripe peaches, peeled if you prefer and pitted
1/2 cup water
1/2 cup almond milk
about 4 fresh basil leaves
Put everything in your blender and whiz away!
I couldn't get this next smoothie out of my mind after I saw it. I think I made it that very day. Watermelon is another one of those quintessential fruits of summer that only lasts so long. So we gorge ourselves on it while it lasts then bid farewell until next time.
This smoothie is also paired with basil. I know you're thinking really??? c'mon here! Not more basil. But, seriously, don't underestimate the basil. It adds flavor and life to so many things. It's a subtle flavor that just knocks your socks off. If you're really not a fan, fresh mint would actually be a great substitution.
This is a super refreshing smoothie with the watermelon and cool cucumber. No need to add any extra liquid because the fruit is already full of it.
Watermelon Strawberry and Basil Smoothie
2 heaping cups watermelon
1/2 cup cucumber
1 cup frozen strawberries
3-4 fresh basil leaves
Put it all in your blender and whiz to you liking. Slurp away.
Enjoy!
SOURCE: Watermelon smoothie from My Green Diet
Labels:
Fruit,
Garden Recipes,
Kid-Friendly,
Quick n' Easy,
Raw,
Smoothies
Subscribe to:
Posts (Atom)