Thursday, October 21, 2010

Caramel Apple Cinnamon Rolls


Holy Hannah! I don't think I have ever heard my husband mmmm and ahhh over food like he did when he ate these. He absolutely loved them and also thought the caramel frosting was the best frosting ever. I have to say that I thought they were great too and that it was a fun way to change up regular old cinnamon rolls. I really loved how the dough turned out once it was cooked. It was very light and airy, not heavy and dense, and had a great flavor.

Seriously, you should add these to your fall menu sometime soon. Even if you have to give some away, like I did, so you don't eat them all yourself. I like to bake my rolls in round cake or pie pans and drizzle on the frosting while they are still a little warm so it seeps down into every crack and crevice. You could also bake these in 1 or 2 large baking pans as well.

Caramel Apple Cinnamon Rolls
Yield: About 18-20 rolls

For the cinnamon rolls:
3 1/2 cups bread flour
2 tsp. instant (rapid rise) yeast
6 tbsp. sugar
1 tsp. salt
1 tsp. ground cinnamon
Pinch ground nutmeg
5 1/2 Tbsp. unsalted butter, at room temperature
1 large egg, slightly beaten
1 cup plus 2-4 tbsp. whole milk or buttermilk, at room temperature

For the filling:
1-2 Tbsp. unsalted butter
3 Granny Smith apples, peeled, cored and cut into 1/2-inch pieces
1/4 cup sugar
1/2 tsp. cornstarch
1 tsp. ground cinnamon
Pinch ground nutmeg
Pinch salt
1 tsp. vanilla extract

brown sugar
cinnamon

For the frosting:
8 oz. cream cheese
2 Tbsp. unsalted butter
1/3 cup caramel sauce
2 tbsp. milk
1 tsp. vanilla extract
2 cups powdered sugar

In the bowl of a stand mixer, fitted with a dough hook, add the dry ingredients: flour, sugar, yeast, salt, cinnamon and nutmeg. Pulse a few seconds to incorporate. Add the butter, egg and warm buttermilk. Mix on low speed for about 5 minutes; the dough should be silky and supple but not sticky.

Lightly oil a large bowl and transfer the dough to the bowl, turning once to coat. Cover with plastic wrap and let rise at room temperature until doubled in size.

Meanwhile, make the filling. To make the caramelized apples, melt the butter in a skillet over medium-high heat. Add the apple slices, sugar, cornstarch, cinnamon, nutmeg and salt. Mix until the apples are evenly coated. Cook about 10-15 minutes, stirring occasionally. Remove from the heat and stir in the vanilla. Set aside to cool.

Mist a work surface with spray oil. Divide dough in half and set one half aside. Roll the other half out into a rectangle with a rolling pin; if the rolling pin gets sticky, spray with cooking spray, do not dust with flour.

Sprinkle the brown sugar and cinnamon over the surface of the dough, smoothing it out with your hand. Quantities here will vary as I like more than just a dusting of cinnamon and sugar but others like it a little more sparse. Evenly distribute the caramelized apples over the top of the dough.

Starting with the wide edge, roll up the dough into a log. Pinch the seam shut. With the seam side down, slice about 1 to 1-1/2 inch pieces off with a piece of dental floss and transfer them to either a round baking dish, cake pan or baking sheet, sprayed with cooking spray. Place the rolls about 1/2-1 inch apart. Repeat with remaining ball of dough. (I filled 2 round cake pans and 1 pie tin). (For a step by step visual aid, see my orange roll recipe.)

Cover loosely with plastic wrap and let rise at room temperature, until the rolls have grown into each other and have nearly doubled in size.

Preheat the oven to 350˚ F. Bake for 20-30 minutes, or until golden brown. Let cool in the baking about 10 minutes, then transfer to a wire rack.

To make the glaze, combine the cream cheese and butter in a small heatproof bowl and microwave in 15-20 second intervals until it is warm enough to whisk together. Whisk in the caramel sauce, milk and vanilla extract until smooth. Whisk in the confectioners’ sugar until smooth. Swirl the glaze over the top of the cinnamon rolls. Let cool before serving.

SOURCE:Adapted from Annie's Eats


This post is linked to Recipe Swap Thursday @ Prarie Story.

Tuesday, October 19, 2010

Baked Manicotti


Oh, I'm behind again. I've got several things to post and want to share all of them with you! I'll start with this manicotti though since I've posted a lot of sweets lately. My sister gave me this recipe that she got from the America's Test Kitchens cook book. It's yummy and easy.

Stuffing manicotti can be kind of time consuming and a little messy. Using pre-soaked, no-boil noodles and rolling the filling up inside makes for a quick meal and easy clean up. Feel free to use whatever sauce you have on hand but I really liked the simplicity of this tomato sauce; simple ingredients but lots of flavor. I also added some zucchini in the cheese filling and decreased the amount of ricotta to make up for it. Shred up whatever veggies you like or add in some spinach, or if you'd prefer, stick that extra cup of ricotta back in and leave out the veg.

The recipe makes 16 manicotti. You can bake it all at once in a 9x13 pan or use 2 smaller pans and freeze half of it for another time.

Baked Manicotti
Tomato Sauce
1 28-ounce can diced tomatoes, with juice
1 28-ounce can crushed tomatoes
2 T extra-virgin olive oil
3-4 medium cloves garlic, finely minced
1/2 t red pepper flakes, optional
1/2 t salt
2 t dried basil

Cheese Filling and Pasta
15 oz. conainter ricotta cheese
4 oz. grated Parmesan cheese (about 2 cups)
8 oz. shredded mozzarella cheese (about 2 cups)
1 cup finely shredded zucchini, well-drained (or other veggie; some chopped spinach would be good too)
2 large eggs , lightly beaten
1 tsp. salt
1/2 tsp. ground black pepper
2 Tbsp. chopped fresh parsley leaves
2 tsp. chopped fresh basil

16 no-boil lasagna noodles (like Barilla)


Adjust oven rack to middle position and heat oven to 375°F.

Heat oil, garlic, and pepper flakes (if using) in large saucepan over medium heat until fragrant but not brown, 1 to 2 minutes. Stir in tomatoes, basil and 1/2 teaspoon salt and simmer until thickened slightly, about 15 minutes.

In a medium bowl, combine ricotta, 1 cup Parmesan cheese, mozzarella cheese, eggs, salt, pepper, and herbs; set aside.

To assemble, pour 1 inch boiling water into 13 by 9-inch baking dish, then add noodles one at a time. Let noodles soak until pliable, about 5 minutes, separating noodles with tip of sharp knife to prevent sticking. Remove noodles from water and place in single layer on clean kitchen towels; discard water in baking dish and dry baking dish.

Spread bottom of baking dish evenly with 1 1/2 cups sauce. Using a soup spoon, spread 1/4 cup cheese mixture evenly onto bottom three-quarters of each noodle (with short side facing you), leaving top quarter of noodle exposed. Roll into tube shape and arrange in baking dish seam side down. (You should be able to fit 8 manicotti in each row, allowing all 16 to fit in the dish). Top evenly with remaining sauce, making certain that pasta is completely covered.

Cover manicotti with aluminum foil. Bake until bubbling, about 40 minutes, then remove foil. Sprinkle manicotti evenly with remaining 1 cup Parmesan. Bake until cheese is browned and bubbly, about 6-7 minutes. Remove from oven and let sit for 15 minutes before serving.

The manicotti can be prepared right up until the baking step then covered with a sheet of parchment paper, wrapped in aluminum foil, and refrigerated for up to 3 days or frozen for up to 1 month. (If frozen, thaw the manicotti in the refrigerator for 1 to 2 days.) To bake, remove the parchment, replace the aluminum foil, and increase baking time to 1 to 1 1/4 hours.

SOURCE:America's Test Kitchen via Our Family Kitchen Table

Saturday, October 16, 2010

Whole Wheat Pumpkin Apple Butter Muffins


Yummy, healthy, pumpkin; what more could a girl ask for? The first time I made these muffins my girls devoured them within days. I've been itching to make these again for a while but I turned a few too many zucchini into muffins at the end of the summer and I had to deplete my supply in the freezer before I could make more.

I'm not sure how many of these will get into the freezer, but I'm sure glad I got to make them again. I got this recipe from my friend Jamie. The original recipe was a whole wheat pumpkin muffin but I changed it a bit to add the apple butter. I used my own apple butter, it's pretty simple to make. If you don't have apple butter, you could use applesauce or all pumpkin and no applesauce.

These muffins are great warm out of the oven or probably any other way you could imagine. Spread it with some more apple butter or even this pumpkin butter that I'm dying to try but haven't yet.

Whole Wheat Pumpkin Apple Butter Muffins
1 1/2 cups sugar
1/4 cup oil
1/4 cup yogurt (I used homemade that I strained to make Greek-style yogurt, but any vanilla or plain yogurt will work fine.)
1 1/2 cups water
1 cup pumpkin
1 cup apple butter
3 eggs
3 cups whole wheat flour
1 1/2 tsp. baking powder
1 tsp. baking soda
1 tsp. salt
1 tsp. nutmeg
1/2 tsp. cloves
1 tsp. cinnamon

Mix the wet ingredients together in a mixing bowl. In a separate bowl, combine the dry ingredients. Add the dry ingredients to the wet and mix only until just combined. Let batter sit for 1 hour.

Preheat oven to 400° F. Line 2 muffin pans with liners or spray with cooking spray. Divide batter evenly among the muffin cavities. Bake for about 15-17 minutes or until toothpick inserted in center comes out clean.

This recipe linked to Recipe Swap Thursday @ Prarie Story and Make Ahead Meals For Busy Moms.

Tuesday, October 12, 2010

Lemon Ice Cream


I almost forgot to post this ice cream. How could I? it's sweet and dreamy and oh, so creamy. I made this ice cream to go with the lemon sugar cookies I made a few weeks ago (made ice cream sandwiches). Then, I had some leftover lemon curd (love that stuff) that I swirled into the ice cream as well so it's just a whole bunch of lemon on top of lemon on top of lemon. But hey, I'm a lemon lover so it was right up my alley.

Lemon pairs great with most fruit and this ice cream would go perfect along side of some berry cobbler, a blueberry pound cake, strawberry shortcake or with some fresh berries. Or just eat it by itself and it is still a great treat.

Lemon Ice Cream
Finely grated zest of 3 lemons
1/2 cup fresh lemon juice
3/4 cup sugar
4 egg yolks
pinch of salt
1 cup milk
2 cups heavy cream

In a non-reactive bowl, mix the lemon zest, juice and sugar. Refrigerate one to two hours to blend flavors.

In a large bowl, slightly beat the egg yolks to break them up. Heat milk to barely boiling in a large heavy saucepan. Whisk 1/4 of the milk into the egg yolks to temper them and then whisk in the rest of the milk. Return the combined mixture to the saucepan and gently heat (do not boil) until the mixture coats the back of a spoon.

Refrigerate for at least 2 hours. Combine milk mixture with heavy cream and lemon mixture. Churn in your ice cream maker according to the manufacturer's directions.


SOURCE:Meet Me In The Kitchen, originally from Tartlette

Saturday, October 9, 2010

Squash Ravioli


I'm just going to cut to the chase and say that these were good; really good. First of all, I love winter squash, even if nobody else in my family does, and I love using rosemary when I cook savory dishes. The parmesan cheese on top was perfect. I tried a bite without it and it wasn't as complete for me. The saltiness of the cheese just makes it great and balances out the flavors. Oh, and lets not forget the rosemary brown butter; ya just need a tiny bit, but oh so good.

By itself, this ravioli would be a great vegetarian main dish. You can substitute the cream in the puree with veggie broth or coconut milk and omitt the parmesan. It would also be great along side some grilled chicken.

I also have to put a plug in for these four cheese ravioli. I found the recipe earlier this year and we just love them.

Squash Ravioli
1 1-lb. butternut squash; about 2 cups puree (or other winter squash or a combination)
Salt and pepper
5 Tbsp. butter
1/2 small onion, finely diced
1 tsp finely chopped rosemary, plus 1 Tbsp.
2-4 Tbsp. milk or cream
1/4 cup plus Parmesan more for garnish
Pinch of nutmeg
48 wonton wrappers

Preheat oven to 450°F. Halve squash and remove seeds. Season with salt and pepper and place, flesh side down, on a baking sheet. Bake until tender and a knife comes out easily, about 40 minutes. Use a spoon to scoop out flesh; puree in a food processor or blender until smooth.

Melt 1 tablespoon of butter in a skillet. Add onion and cook until tender, about 3 minutes. Add chopped rosemary, squash puree, cream and 1/4 cup Parmesan. Season with salt, pepper and nutmeg, and cook for 1 minute. Remove from heat and allow to cool completely.

Place one wonton wrapper on work surface, keeping the rest covered with a damp cloth. Place about 1-2 teaspoons of filling in the middle of each won ton wrapper, leaving a clear edge around the perimeter. Dip a finger in water and lightly brush around the edges. Fold opposite edges together, making sure to press out any excess air and sealing the edges compeltely. Repeat with the remaining wrappers. Let dry on a lightly floured surface for about 1-2 hours. (If they are not sufficiently dry, they will open up when you boil them.)

Bring a large pot of salted water to a boil. Melt remaining butter in skillet over very low heat, then add 1 Tbsp. rosemary. Cook butter and rosemary until butter turns light golden brown, about 5 minutes; remove from heat. While butter is browning, add ravioli to boiling water, stirring gently so they don't stick together. Cook 3-4 minutes, then carefully drain.

Place 3 ravioli on each plate, top each with 1 Tbsp. browned butter and garnish with 1/2 Tbsp. Parmesan. Serve hot.

Any ravioli left uncooked can go right in the freezer, just separate the layers with some wax paper. They will not keep well in the fridge because the filling is so moist; the wrappers will get sticky. There is no need to thaw the frozen ravioli when you're ready to cook them, just boil for about 6-8 minutes.

SOURCE: Adapted from All You on myrecipes.com.


Linked to...
Recipe Swap Thursday @ Prarie Story.
Seasonal Sunday @ Real Sustenance

Tuesday, October 5, 2010

Ginger Lime Salad Dressing


Is it odd that I'm just posting a recipe for a salad dressing and not a salad? This stuff is dynamite! Ever since I made this dressing weeks ago, I have been eating it like crazy! The dressing was actually part of a steak salad with it's own separate marinade for the meat, but I wasn't crazy about the rest of it, only this dressing. I decided to use it with this Asian Slaw, minus the peppers, instead and was absolutely blown away with how good it was. I've been getting a lot of cabbage in my produce co-op basket and this was a great way to use it up.

Ginger Lime Dressing
1/4 cup olive oil
1/4 cup soy sauce
1/4 cup sugar
2 Tbsp. lime juice
2 cloves garlic, minced
2 Tbsp. fresh ginger, minced (or grated using a microplane)
1 jalapeno, seeded and finely diced (or 1/2 jalapeno, depending on how spicy you like it)

Combine everything but the jalapeno in a blender and blend until emulsified. Add the jalapeno and pour into a serving container.


SOURCE: Adapted from Pioneer Woman on Tasty Kitchen.

Sunday, October 3, 2010

October Menu

Where has the time gone? Is it really October already? I'm actually very thrilled. I love the fall, the many colored leaves, the cooler weather and all the yummy food that comes with it. I have been chomping at the bit to start baking with pumpkin, one of my most favorite flavors of fall. I picked up a couple of sugar pumpkins at the store the other day to make my own puree, which I'll be using in a couple of yummy recipes.

Another thing I love about fall is making a big pot of soup and serving it with homemade bread. Last month I didn't make any new soups, but I have 2 new ones to try this month as well as a couple old favorites.

Here's a rundown of what I've planned for the month. I've linked the dishes that are repeats and that I have already posted. I'll be posting the others as I make them.

Dinners
Brown Sugar Bourbon Pork (freeze half) with Mexican Cornbread and Smashed Pinto Beans
Asian Slaw with Ginger Lime Dressing and Eggplant Penne Pasta
Squash Ravioli & Broccoli
Grilled Chicken with Lemon Basil Pasta & Peas
West African Veggie Stew

Manicotti Rolls w/ garlic bread and broccoli
Zucchini Spaghetti & Fresh Green Beans w/ Roasted Onions and Red Peppers
Pecan Apple Chicken Salad w/ brown rice
Chicken w/ Tarragon & Leeks
Mushroom Barley Soup

Fiesta Salad w/ brown rice
Butternut Squash Gnocchi w/ Sage Brown Butter & Peas
Leftover Brown Sugar Bourbon Pork, Mashed Sweet Potatoes w/ Orange Glaze & Walnuts, green beans
Honey Curry Chicken w/ Thai Coconut Rice
White Chicken Chili

Barbecue Chicken Bacon Pizza w/ Caramelized Onions, salad
Jambalaya & Broccoli
Chinese Chicken Salad & Pizza Puffs
Macaroni Grill’s Chicken Cannelloni
Split Pea Soup with Smoked Sausage and Greens

Other Goodies
Pumpkin Granola
Pumpkin Apple Butter Muffins
Pumpkin Pancakes w/ Pumpkin Maple Syrup
Caramel Apple Cinnamon Rolls
Coconut Cream Topped Brownies

Saturday, October 2, 2010

Bittersweet Chocolate Pear Cake and Buttermilk Ice Cream


I have had the recipe for this cake for probably a year or so. I have been waiting for the right occasion to make it. Since pears are in season and I picked up about a bushel of them a few weeks ago I knew now was the time. I couldn't wait to try it.

I found the recipe from Smitten Kitchen when I was looking for a cake to make for my baby's first birthday. The recipe is from a popular little Italian restaurant in New York, Al Di la, is typically served with buttermilk ice cream.

The cake was yummy, browned butter kind of yummy. The process was different that I was used to, because you beat the eggs for so long, and it didn't seem like very much batter, but I guess all that beating makes it light and fluffy. The batter ended up really thick and browned buttery tasting; finger-licking good. I think bittersweet is the perfect chocolate for this cake, it compliments it well.

Al Di La’s Torta di Pere
Courtesy of Al Di La Restaurant in Park Slope, Brooklyn

1 cup all-purpose flour
1 tablespoon baking powder
1/4 teaspoon salt
3 eggs, at room-temperature
4 ounces (1 stick) unsalted butter
3/4 cup sugar
3 pears, peeled, in a small dice
3/4 cup bittersweet chocolate chunks

Preheat the oven to 350°F. Butter a 9-inch springform pan and dust with flour; set aside. (I only had a 10-inch so it was a little flatter, but worked just as well).

Sift the flour, baking powder and salt together, set aside.

Using a mixer fitted with the whisk attachment, whip the eggs on high speed until pale and very thick. (In a professional Kitchen Aid, it takes at least five minutes; on a home machine, it will take nine minutes to get sufficient volume)

While the eggs are whipping, brown the butter. Melt the butter in a medium saucepan (because it will foam a lot) and cook it until the butter browns and smells nutty (about 6 to 8 minutes). It helps to frequently scrape the solids off the bottom of the pan in the last couple minutes to ensure even browning. Remove from the flame but keep in a warm spot.

Add the sugar to the eggs and whip a few minutes more.

Just as the egg-sugar mixture is starting to loose volume, turn the mixture down to stir, and add the flour mixture and brown butter. Add one third of the flour mixture, then half of the butter, a third of the flour, the remaining butter, and the rest of flour. Whisk until just barely combined — no more than a minute from when the flour is first added — and then use a spatula to gently fold the batter until the ingredients are combined. It is very important not to over-whisk or fold the batter or it will lose volume.

Pour into prepared pan. Sprinkle the pear and chocolate chunks over the top, and bake until the cake is golden brown and springs back to the touch, about 40 to 50 minutes or a tester comes out clean.


As for the ice cream, dee-lish as well! I'm not a fan of vanilla ice cream. I never make it and I never buy it. It just doesn't do anything for me and I wouldn't want to waste my calories on it; but that's just me. This buttermilk ice cream was a little sweet with a little tang and lots of creamy. I'd be willing to eat this solo, but it goes great along side this torte or any other, for that matter.

Buttermilk Ice Cream

2 cups heavy cream
1 1/4 cup sugar
6 large egg yolks
2 cups buttermilk
2 teaspoons vanilla
Pinch of salt

In a large, heavy saucepan, combine the heavy cream, buttermilk and one cup of sugar and bring to a simmer over medium heat.

In a large bowl, whisk egg yolks and remaining 1/4 cup of sugar.

Remove the cream mixture from the heat and drizzle a small amount into the yolks, slowly, and whisking constantly to keep the eggs from curdling. Do this a few more times to warm up the yolks before pouring the yolk mixture back into the cream, whisking constantly.

Cook over low heat until the mixture is thick enough to coat the back of a spoon. Whisk in the vanilla, and salt. Cool completely and freeze according manufacturer’s directions.


SOURCE:Smitten Kitchen

Thursday, September 30, 2010

Chipotle Lime Shrimp


Wow, is it already Thursday? My, this week has flown by. We are still having 80 degree weather here and although I am liking it, I am really anxious for fall. I have many many things lined up to bake that are fall-inspired and I can't wait to share them with you all. However, it is not quite fall and the recipe I have to share today is more summer-inspired.

We had a family barbecue the other day and kind of made this shrimp on the go. I didn't want to have to go out once to the grocery store and then again to pick up my husband from work and drive to my in-laws. So, I picked up the frozen shrimp and let them thaw on the way there, then threw them in the marinade once we got there. Everything was very easy and fast to throw together.

Almost anything on the grill is wonderful, in my opinion, and these shrimp were no exception. There's just a little heat with the chipotle and the cilantro and lime just make the flavor pop even more. Don't put your grills away quite yet, give these a try. You can eat them with a side of pasta salad or throw them in some soft tacos with some beans and corn and Spanish Rice. Your tummy will thank you!

Chipotle Lime Shrimp
1 chipotle chili in adobo; chopped
1 Tbsp. olive oil
1 tsp. cumin
1 Tbsp. brown sugar
1 lime (juice and zest)
2 Tbsp. cilantro; chopped
1 pound shrimp; peeled and deveined

Mix the chipotle, olive oil, cumin, brown sugar, lime zest, lime juice and cilantro in a bowl and and let marinate for 20 minutes. Skewer the shrimp. Oil up the grill and grill the shrimp until cooked, about 2-3 minutes per side.


SOURCE:My Baking Addiction

Monday, September 27, 2010

Chewy Lemon Sugar Cookies


Before I being raving about these cookies, I have to tell you about the comment my husband made the other day. I was walking outside to photograph something, well food, for a post. My husband just laughed and said I should change the title of my blog to Blue Plate Special because everything I photograph is on a blue plate. He's so clever; I loved it but still think I'll be sticking to this one. You're still going to see everything photographed on a blue plate because that's pretty much all we have that looks decent. Maybe one of these days I'll branch out.

Anyway, on to these cookies. Have I told you how much I love lemon anything? Lemon desserts are probably my number 1 (aside from chocolate, that is). I don't make a whole lot of cookies but these were different enough and tempting enough that I wanted to give them a try. They were the perfect balance of sweet and tart for me. They were nice and chewy but a little crisp on top from being rolled in sugar. I served them with some homemade lemon ice cream and made ice cream sandwich cookies. They were divine. Go ahead, treat yourself.

Chewy Lemon Sugar Cookies
3 cups all-purpose flour
1 teaspoon baking soda
1/2 teaspoon baking powder
1/2 teaspoon salt
1 cup butter, softened
1 1/2 cups white sugar
1 egg
1/2 teaspoon vanilla extract
Zest of one large lemon
4 tbsp fresh lemon juice (about 1 large or 2 small lemons)
1/3 cup sugar for rolling cookies

Preheat oven to 375°F. In a small bowl, sift together flour, baking soda, baking powder and salt. Set aside.

In the bowl of a stand mixer, using a paddle attachment, cream together the butter and sugar until smooth and very fluffy (3-5 minutes). Beat in egg, vanilla extract, lemon juice and lemon zest. Gradually mix in the dry ingredients.

Roll rounded teaspoonfuls of dough into balls, and roll the top side in sugar. Place on cookie sheets about 1 1/2 inches apart. Bake 8 to 10 minutes, or until lightly browned. Let stand on cookie sheet two minutes before removing to cool on wire racks.

Makes approximately 24-30 cookies.

SOURCE:Adapted from My Baking Addiction via Meet Me In The Kitchen

Wednesday, September 22, 2010

Mini Orange Chocolate Chunk Cakes


I have actually had this recipe for a while and made these little cakes last year. However, I tucked the recipe away and completely forgot about it until last weekend. My friends and I were having a girls night and I invited them over for dessert afterwards. As I was trying to decide what to make for everyone, this recipe popped into my head and I was glad to make it again.

I absolutely love the chocolate and orange combination, especially when it's dark chocolate, and knew with that I would immediately love these cakes; I was right. These cakes are very moist and I think have the perfect balance of orange and chocolate flavor. While I have made these into mini cakes, you could certainly bake them in any cake pan.


For the cakes:
8 tbsp. unsalted butter, at room temperature
1 cup sugar
2 eggs
2 Tbsp. grated orange zest (2 oranges)
1 1/2 cups all-purpose flour
1/4 tsp. baking powder
1/4 tsp. baking soda
1/4 tsp. salt
1/4 cup freshly squeezed orange juice (1 orange)
3 oz. buttermilk, at room temperature
1 tsp. vanilla extract
1 cup dark chocolate, coarsely chopped

For the syrup:
1/4 cup sugar
1/4 cup freshly squeezed orange juice (1 orange)

For the ganache:
4 oz. dark chocolate, coarsely chopped
1/4 cup heavy cream
1 Tbsp. butter


Preheat the oven to 350 degrees F. Grease and flour a 12 cavity mini bundt pan.

In the bowl of an electric mixer fitted with the paddle attachment, cream the butter and sugar until light and fluffy; 2-3 minutes. Add the eggs one at a time, scraping down the bowl between additions. Mix in the orange zest.

In a small mixing bowl, sift together the flour, baking powder, baking soda, and salt. In another bowl or large liquid measuring cup, combine the orange juice, buttermilk and vanilla. Add half of the flour mixture to the bowl of the mixer and mix on low speed until just incorporated. Add the liquid ingredients, mixing until blended. Add the remaining dry ingredients, mixing on low speed until just combined. Fold in the chocolate chunks with a rubber spatula.

Divide the batter evenly between the prepared pans. Bake for 18-22 minutes (you will have to watch carefully as ovens and altitudes are different) or until a toothpick inserted in one of the cakes comes out clean. Allow the cakes to cool in the molds for 10 minutes.

In the meantime, prepare the syrup. In a small saucepan over medium-low heat, cook the sugar with the orange juice just until the sugar dissolves. Remove the cakes from the pans, place them on a wire rack over a tray, and spoon the orange syrup over the tops of the cakes. Allow to cool completely.

To make the ganache, melt the chocolate, heavy cream and butter in the top of a double boiler over simmering water until smooth and warm, stirring occasionally. Dip the tops of the cooled cakes in the ganache and allow to set.


SOURCE:Adapted from Annie's Eats, originally from Ina Garten.

Sunday, September 19, 2010

Corn and Basil Cakes


This picture sure doesn't do these cakes justice. I think this is the first savory pancake I have ever made and I am so pleased with how they turned out. They were even well received by my family. I can't get enough of fresh basil. I love it. It is so perfect in the summer and you can throw it into a ton of things. It has such a fresh and vibrant taste. Fresh corn is another thing I love during the summertime. I think I may even like eating it raw better than cooked! Corn and basil is the perfect pairing for these pancakes, but it can really lend itself to many other flavors as well, like chives, garlic, caramelized onion, sun-dried tomato, black beans and cilantro, the possibilities are many.

I served these little cakes with a dollop of sour cream, sliced garden tomatoes and bacon (gasp!). I haven't cooked bacon in quite a while so my family was loving it. I made these my main dish and just used a little bacon on the side but you could serve these as a side with some grilled chicken or steak as well.

I know the summer is winding down, but if you find yourself with some fresh corn on your hands, give these a try.

1/2 cup whole wheat flour
1/2 cup low-fat buttermilk
2 large eggs
1 Tbsp. oil
1/2 tsp. baking powder
1/2 tsp. salt
1/4 tsp. freshly ground pepper
2 cups fresh corn kernels (about 2 large ears;) or thawed frozen corn
1/2 cup chopped fresh basil

Whisk flour, milk, eggs, oil, baking powder, salt and pepper in a medium bowl until smooth. Stir in corn and basil.

Heat griddle over medium heat until hot (but not smoking). Cook 4 cakes at a time, using about 1/4 cup batter for each, making them about 3 inches wide. Cook until the edges are dry, about 2 minutes. Flip and cook until golden brown on the other side, 1 to 3 minutes more. Repeat with the remaining batter, making about 8 cakes total. Reduce the heat as necessary to prevent burning.

SOURCE:Adapted from Eating Well via Meet Me In The Kitchen

This recipe linked to Potluck Sunday @ Mommy's Kitchen

Thursday, September 16, 2010

Cooking Class: Homemade Yogurt


A while back it wouldn't have even occurred to me to make yogurt. I know that my dad has done it for years but I just thought it was just going to be one of those things that I would get to, ya know, "later." Well, recently I have taken to making my own granola for breakfast. And where there's granola, inevitably, there's yogurt.

As I started buying yogurt to go with my deliciously fresh homemade granola, I realized how artificial it tasted. It's got added sugar and flavor and wasn't something I wanted to keep feeding my family. So, I went back to a recipe I printed and used a couple of years ago, called my dad for some extra tips and I stood armed to make yogurt again.

I couldn't believe how easy it was. It's not even really a recipe, it's basically just a method. The end result is just delicious. It tastes so clean and fresh because there's nothing artificial in it.

What you'll need:
Heavy pot
thermometer
large bowl
milk (don't use less than 2% or you'll have to add thickeners)
3 Tbsp. starter-store bought plain yogurt with live, active cultures
2 quart jars, sterilized (you could use several pint jars as well; glass or plastic work fine)
heating pad
towels


Step 1

Heat 1 quart of milk to 185° F. There isn't really a need to stir. The milk will scald a little and there will be some that gets stuck on the bottom of the pot. Just leave it, don't scrape it off.

Step 2

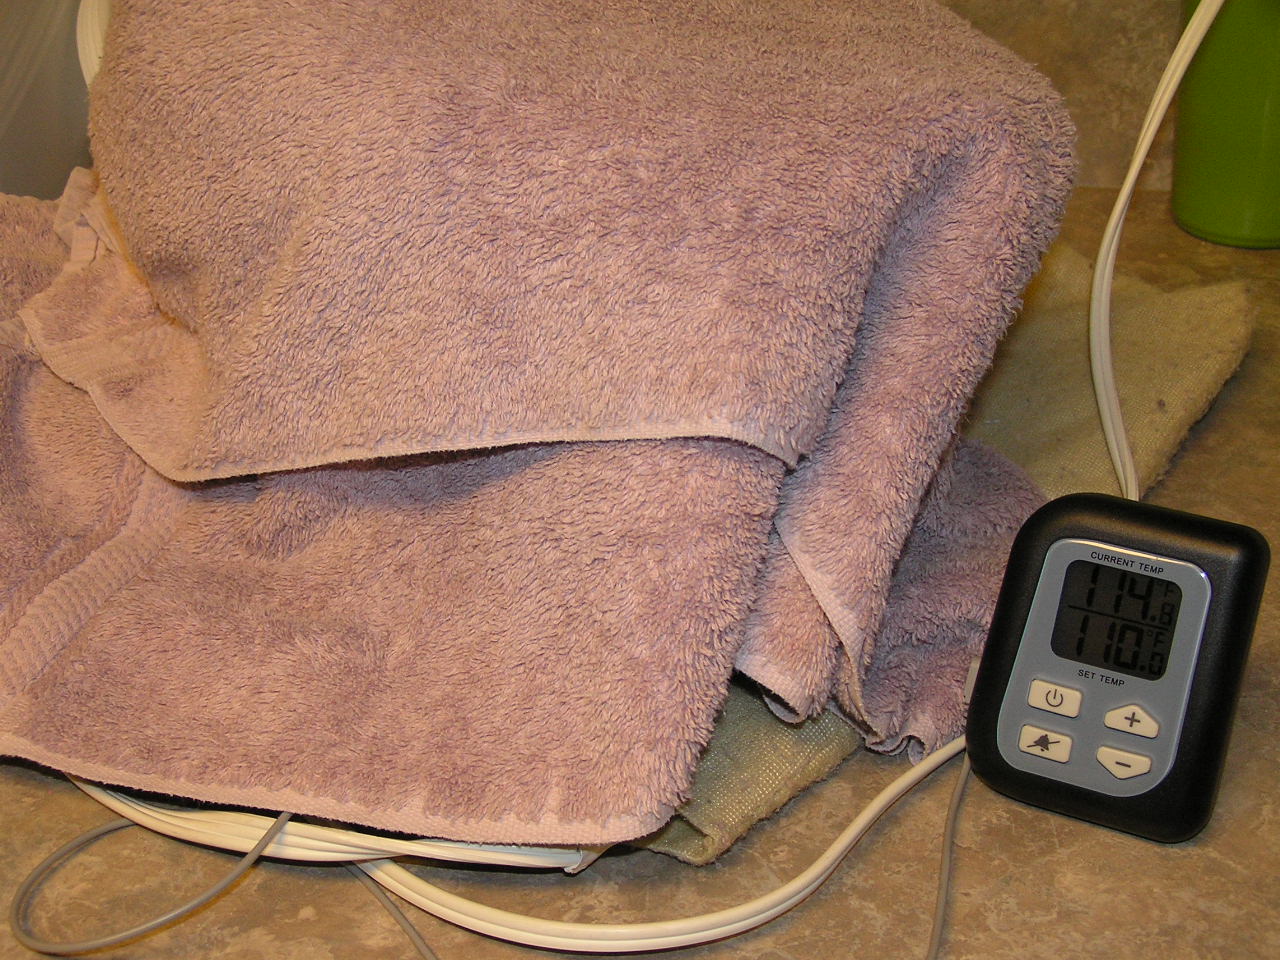
Remove from heat and allow to cool between 105° F and 115° F. I let it cool in a separate bowl, you can let it cool in the same pot you heated it in but it may take a little longer. As you can see I'm using a probe thermometer (digital) and a candy thermometer just to see the difference; I'm sure whatever you have will work fine.

Step 3
Once it's between 105° F and 115° F, add your yogurt starter and stir it in until it's incorporated. Then, pour the mixture into your sterilized quart jars (I kept mine in the same bowl, but it's probably better if you put it into smaller containers). Cover the containers with lids, place them over a heating pad and cover tightly with some towels. You can either stick the thermometer just right inside under the towel or, if you have a probe, you can stick it in the yogurt. Monitor the temperature to make sure the heat stays at about 110° F, and adjust, if necessary. If you don't have a heating pad, you stick the yogurt in a picnic cooler and wrap it in a towel.


Step 4
The yogurt will take several hours to incubate. Check it after 3-4 hours to see if it's thickened yet. Note: Your yogurt will not be as thick as what you get at the store, don't expect it to be solid.


When the yogurt curd has formed, you will notice that the whey will have pooled a little on the top. You can stir some or all of it in, as it is very healthy for you. Store your yogurt in the fridge.

Enjoy your yogurt with fresh fruit, a little sweetener, applesauce and cinnamon or more savory like a tzatziki sauce.

If you want thick yogurt, like Greek-style, you can let it sit in some cheesecloth over a colander for several hours. Don't throw the whey out! Here are some cool uses for it.

Tuesday, September 14, 2010

Gingersnap Nectarine Tart


I spied this recipe a while ago and have been wanting to make it ever since. I almost made it on several occasions but never ended up finding the mascarpone cheese it calls for. I know I live a little off the beaten path, but I didn't think it was THAT far off! Anyway, I eventually found out my local grocery indeed carried it, they were just out the times I was looking for it before. Mascarpone cheese is Italian cream cheese. It's thick and very creamy but not tangy like cream cheese. This was my the first recipe I have used it in and I was really excited to try it.

We shared this dessert with our friends and we all thought it was great. I liked using the gingersnap cookies for the crust because it's different than a typical graham crust and I also really like ginger. I think the stronger taste of the ginger also contrasts nicely with the creaminess of the filling and the sweetness of the nectarines.

This recipe calls for crystallized ginger, which I happen to have on hand because I make these muffins. I know it's not a very common ingredient and I'm sure if you leave it out you will still have good results. If the candied ginger is not your thing, you could try shaving a little fresh ginger into the filling (not sure if I would try ground ginger though).

You'll want to make this several hours ahead of time so the crust and the filling have time to chill and all the flavors have a chance to get comfy with each other. It's best to let it chill overnight.

For the crust:
34 gingersnap cookies, coarsely broken (about 9 ounces; about 3 1/4 cups)
6 Tbsp. unsalted butter, melted

For the filling:
1 8-ounce container *mascarpone cheese, at room temperature
6 ounces cream cheese, at room temperature
1/4 cup sour cream
1/4 cup sugar
1 tablespoon grated lemon peel
1/4 teaspoon vanilla extract
1 tablespoon finely chopped crystallized ginger

For the topping:
4 to 5 small nectarines, halved, pitted, cut into thin slices
1/4 cup peach jam, warmed
gingersnap cookie crumbles


Crust:
Preheat oven to 350°F. Finely grind gingersnaps in a food processor. Add butter and blend until crumbs are evenly moistened. Press mixture over bottom and up sides of 9-inch-diameter tart pan with removable bottom. Place tart pan on a cookie sheet. Bake crust until color darkens, pressing sides with back of spoon if beginning to slide, about 8 minutes. Cool completely.

Filling:
Beat first 6 ingredients in medium bowl until smooth. Beat in crystallized ginger. Spread filling in prepared crust. Cover loosely and refrigerate at least 2 hours and up to 1 day.

Topping:
Overlap nectarine slices atop filling in concentric circles. Brush with jam. Sprinkle with gingersnap cookie crumbles. Serve, or refrigerate up to 6 hours.


*Look here for a mascarpone cheese substitute.

SOURCE:Smitten Kitchen, originally from Bon Appetit

This recipe linked to And Baby Makes Five.

Friday, September 10, 2010

Pumpkin Pancakes with Pumpkin Maple Syrup


Some of you may know that I'm a breakfast-a-holic and a pancake fiend. I have at least 3-4 pancake recipes that I rotate through on a regular basis. I'm all about a good (and healthy) breakfast any day of the week, not just on the weekends. We hardly ever eat cold cereal anymore, much to my husband's chagrin I'm sure. My kids don't complain though. I think they love pancakes almost as much as I do.

A while back I found a can of pumpkin in my pantry. I had bought it last year sometime and still hadn't used it. Seeing it reminded me of fall. I love fall, it's my favorite season. I also love just about anything pumpkin. I have made pumpkin pancakes before and they always turned out gooey and a little unappetizing because of the texture. I wasn't sure you could even make a pumpkin pancake that wasn't gooey. That's until I got this recipe from my sister. The pancakes turn out nice and fluffy and, most importantly, they are not soggy or gooey. The pumpkin maple syrup is wonderful with it as well and just intensifies that pumpkin pie flavor.

I know I'm jumping the gun a little on fall, but when the weather turns, make room for these pancakes in your breakfast rotation. You won't be sorry.


2 cups whole wheat flour
1/4 cup brown sugar
2 tsp. baking powder
1 tsp. baking soda
1 tsp. ground allspice
1 tsp. ground cinnamon
1/4 tsp. ground ginger
1/2 tsp. salt
1 1/2 cups buttermilk
1 cup pumpkin puree
2 eggs
2 T vegetable oil
2 T vinegar

In a medium bowl, mix together the buttermilk, pumpkin, egg, oil and vinegar. In a separate bow combine the flour, brown sugar, baking powder, baking soda, allspice, cinnamon, ginger and salt. Stir dry ingredients into the pumpkin mixture just enough to combine. Let batter rest for a few minutes while griddle warms up!

Pour or scoop the batter onto the griddle, using a 1/4 cup measuring cup. Brown on both sides and serve hot with Pumpkin Maple Syrup.


Pumpkin Maple Syrup
1/2 cup canned pumpkin
1/2 cup maple syrup
cinnamon, to taste


Here's some links to my favorite pancakes:
Whole Wheat Apple Pancakes
Oatmeal Cookie Pancakes
"Favorite" Pancakes
Lemon Poppy Seed Pancakes

This recipe linked to Potluck Sunday @ Mommy's Kitchen and This Week's Cravings @ Mom's Crazy Cooking.

If you have a favorite pancake recipe, please share! You can either link up below or add it in the comments.

Tuesday, September 7, 2010

Berry Cheesecake Ice Cream


Wow, this ice cream is amazing! This summer I have made ice cream more times than I ever have and it's been fun experimenting. Some have been good, others didn't really float my boat or anything. Until this ice cream, the chocolate coconut ice cream I made a while back totally blew my mind. While I still think that one will continue to be my favorite, mainly because it's chocolate, this one totally blows my mind as well. It tastes just like cheesecake and is so rich and creamy, not icy like some others I've made. I love that it has the cheesecake layers instead of just mixing it all in together. I made this for a family gathering so we all got just a taste. We'll for sure make this again, but I might have to share or I may end up eating the whole thing!

For the berry layer:
1/2 cup sugar
1 TBSP cornstarch
1/2 cup water
1 1/4 cups mixed berries (I used blueberries and raspberries)
1 Tbsp lemon juice

For the graham cracker layer:
2 1/4 cups graham cracker crumbs
2 TBSP sugar
1/2 cup butter, melted

For the ice cream base:
2 cups heavy cream
2 cups sour cream
12 oz cream cheese (1 1/2 bars)
1/3 fresh lemon juice (about 1-2 lemons, depending on the size)
1 1/2 cups granulated sugar
1/2 teaspoon almond extract

Combine berry mixture in saucepan and bring to a boil. Reduce heat and simmer until slightly thickened. Refrigerate until chilled. (I did this step the night before so everything would be chilled and ready to put into the ice cream maker.)

Combine graham cracker mixture and pat onto a cookie sheet. Bake at 350 for 10-15 minutes or until lightly browned; cool completely. Crumble and set aside.

For ice cream, beat cream cheese until smooth. Slowly add the sugar and then beat in the sour cream followed by the cream.

Add the vanilla extract and lemon juice and mix until thick and smooth. Cover and chill in the refrigerator for 2-3 hours.

Freeze in ice cream machine according to machine directions.
In a freezer safe container, layer ice cream, blueberry mixture, and graham cracker mixture 3 times then swirl with a knife. Cover and freeze until firm.

SOURCE:Adapted from Cooking with Christine

Linked to...
Sweets For A Saturday @ Sweet As Sugar Cookies
Sweet Indulgences Sunday @ A Well-Seasoned Life

Sunday, September 5, 2010

White Corn Soup with Poblano Cream

Sunday Soup


So simple, but absolutely divine! Although summer is winding down, we are still getting corn from our local farmer's stands. We just love fresh corn. It's not summer without it! I picked up a huge bag of corn the other day at a farmer's stand and couldn't wait to try this soup. If you like corn on the cob, you will love this. It's topped with some spicy poblano cream for some depth of flavor and a little kick, as well as a little cilantro to give your taste buds a whirl! Wow, I couldn't get enough of it. You can eat this soup hot, warm or cold.

1 Poblano Pepper
4 cups chicken broth
3 Tbsp heavy cream
1 Tbsp butter
1 Tbsp oil
1 small onion, chopped
6 cups fresh white corn kernels (from about 10 ears, reserve 2 or 3 cobs)
1 teaspoon sugar
Salt and Black Pepper
Cilantro Leaves, for serving

Heat broiler. On a broiler proof baking sheet, broil the pepper, turning occasionally, until charred, 8 to 12 minutes. Wrap in a paper towel or place in a paper bag with top closed. Allow to cool for 10 minutes. Use a paper towel to remove the skin. Remove the seeds. (You may want to use gloves here. I didn't and my hands were burning for several hours.)

In a blender, puree the pepper with 2 tablespoons of the chicken broth and heavy cream; transfer to a bowl.

Meanwhile, melt the butter in a extra large sauce pan or soup pot over medium-low heat. Add the onion and cook until tender 8 to 10 minutes. Stir occasionally and do not allow the onion to brown.

Add the corn and 2 or 3 of the cobs snapped in half, the rest of the broth, sugar, 3/4 teaspoon salt, and 1/4 teaspoon pepper and bring to a boil. Reduce heat and simmer until the corn is tender, 10 to 15 minutes.

Remove and discard the cobs. Use a handheld immersion blender puree about 2/3 of the soup leaving some of the corn for texture, if desired. Alternately, puree the soup in batches in a blender.

Serve the soup hot, lukewarm or cold with a dollop/drizzle of the poblano cream and cilantro leaves.


SOURCE:Cinnamon Spice & Everything Nice

Friday, September 3, 2010

Whole Wheat Zucchini Parm Pizza


I wish I had all these zucchini recipes last year when I actually had zucchini in my garden. Sadly to say much went to waste because we didn't eat it fast enough and got tired of it. Zucchini is so versatile, there are endless possibilities.

This is a great little pizza and super easy to throw together. I thought the taste would be mediocre at best but I was wrong. Between the parmesan and the garlic seasoning, the taste was wonderful! I loved it.

1 recipe Perfect Pizza Crust (substituting at least half of the flour for whole wheat flour)
2 small zucchini, sliced thin
oilve oil
Johnny's Garlic Bread Seasoning (Costco)
3/4 cup mozzarella cheese
1/4-1/2 cup parmesan cheese

Make pizza crust according to directions. After you spread it out on a pizza pan or stone, brush or drizzle with olive oil and sprinkle liberally with the Johnny's seasoning. Lay out zucchini on top of the dough then top with mozzarella and parmesan cheeses.

Bake at 425° F for about 10-12 minutes, or until edges are golden brown.

Wednesday, September 1, 2010

September Menu

Fall is in the air, I can feel it. We've had some teasers here and there over the past 2 weeks with some cool weather and it has totally thrown me into fall mode. It has me thinking soup and everything pumpkin! Before summer started I started doing Sunday Soup every week and I think this is the month to bring it back! I think I'll try doing a little link party so you can link up your favorite soups too. So, be thinking of something to share this month. I love seeing what other people come up with.

I'm excited about my menu this month. I still have a lot of fresh things because I will still be receiving my CSA produce and hitting up the farmer's market but I'm transitioning into some fall-friendly foods as well.

Dinners
Mango Chicken Salad
Chopped Barbecue Chicken Salad
Garlic Ranch Pizza
Orzo with Roasted Veggies
Creamless Tomato Soup w/ grilled cheese sandwiches
Bean Curry w/ Coconut Rice

Butternut Squash Mac & Cheese w/ cauliflower
Corn and Basil Cakes w/ sliced garden tomatoes
Thai Steak Salad
Roasted Red Pepper and Tomato Soup w/ breadsticks
Couscous salad with Feta and Chickpeas

Brown Sugar Bourbon pork, Mexican Cornbread & Smashed Pinto Beans
Asian Lettuce Wraps
Orzo w/ Spinach and Pine nuts, Corn on the Cob
Red Curry Coconut Noodles & peas
White Chicken Chili w/ corn tortillas

Pretzel-Crusted Chicken Strips w/ salad & Oven-Roasted Corn in Chili Coconut Milk
Garden Spaghetti w/ garlic bread
Curried Lentil & Couscous Salad
Savory Crepes (filling to be determined) & Veggie
Split Pea Soup w/ Smoked Sausage and greens

Other things I'll be making:
Homemade Yogurt
Carrot Spice Muffins
Pumpkin Pancakes w/ Pumpkin Maple Syrup
Pumpkin Apple Butter Muffins
Bittersweet Chocolate and Pear Cake w/ Buttermilk Ice Cream
Maple-Almond Granola

Sunday, August 29, 2010

Zucchini Basil Lasagna


We don't have a garden this year but we've still been able to get some zucchini and it's been great. I made this lasagna a couple of years ago and it's one of the few things with cooked zucchini that my husband actually enjoyed. I like how the zucchini in this lasagna doesn't get soggy and soupy and how the basil flavor really comes through. If you're still wondering what to do with the last bit of zucchini from your garden, give this lasagna a try!


2 cups ricotta cheese (approx., I think the container is only 15 oz.)
1 cup chopped fresh basil
1 large egg
2 cups shredded mozzarella cheese, divided
Cooking spray
4 cups chopped zucchini
1/2 cup chopped onion
2-3 cups spaghetti sauce
9 oven-ready lasagna noodles (such as Barilla)


Preheat oven to 350°F. Combine ricotta, basil, egg and 1 1/2 cups mozzarella in a food processor; process until smooth. Heat a large nonstick skillet coated with cooking spray over medium-high heat. Add zucchini and onion; sauté 5 minutes or until tender. Stir in sauce; remove from heat.

Spread 1/4 cup zucchini mixture in bottom of a 8.5x11-inch baking dish coated with cooking spray. Arrange 3 noodles over zucchini mixture; top with one-third ricotta mixture and one-third zucchini mixture. Repeat procedure with the remaining noodles, ricotta mixture, zucchini mixture, and top with remaining 1/2 cup of mozzarella.

Cover and bake at 350° for 45 minutes. Uncover and bake an additional 15 minutes or until lasagna is thoroughly heated. Cool slightly before serving so that the cheese has a chance to set a bit.

SOURCE:Adapted from Cooking Light

This post linked to Potluck Sunday @ Mommy's Kitchen.

Friday, August 27, 2010

Shrimp and Penne Pasta


I have been wanting to make this for a very long time and I'm glad I finally just did it. Ben loves shrimp and I probably make it much too little as far as he's concerned. I love the simplicity of this dish, and the few simple ingredients. Yet, it still bursts with flavor. My kids really liked it too (minus the shrimp). This is another great meal for a warm summer evening.

3/4 lb penne pasta (I used whole wheat)
1 lb Shrimp
3 Tbsp. butter
3 Tbsp olive oil
1 whole onion (small)
2 cloves garlic
1/2 cup white cooking wine
1 8-oz can tomato sauce
1 cup heavy cream
1 Tbsp. fresh parsley
1 Tbsp. fresh Basil
salt & pepper

Cook the penne pasta until al dente.

Peel, devein and rinse (under cool water) 1 pound of extra large shrimp. Heat about 1 tbsp. butter and olive oil in a skillet. Add the shrimp and cook for a couple minutes until just opaque. Do not overcook them. Remove from heat and let cool for a few minutes. Now, put the cooked shrimp on the cutting board and pull off the tails. Chop the shrimp into bite –sized pieces and set aside.

Finely dice one small onion. Mince two cloves of garlic. In a large skillet heat 2 tablespoons of butter and 2 tablespoons olive oil. Add the garlic and onion and sauté, stirring occasionally. After the garlic and onions have cooked a bit add your white wine. Let the wine evaporate for a few minutes, stirring occasionally. If you would rather not use wine, you can use low-sodium chicken broth instead (about 1/2 cup).

Now add an 8-ounce can of plain tomato sauce. Stir well until combined. Then add 1 cup of heavy cream. Continue stirring. Turn heat down to low and let simmer.

Chop the herbs. Add the chopped shrimp back into the tomato cream sauce. Give it a stir and add salt and pepper to taste. Throw in your herbs and stir until combined. Finally add the cooked penne pasta and give it a good stir.


SOURCE:The Pioneer Woman, and This Mommy Cooks

Thursday, August 26, 2010

Chocolate Zucchini Bread


I should call this disappearing chocolate zucchini bread, because that is exactly what happened! I made this twice in one week and both times it didn't even last 24 hours. I'm a lover of quick breads and I've been into them (and muffins) lately. They are so easy to throw together and you can make them very tasty and healty too. They are the perfect on the go snack too.

Anyway, back to this zucchini bread. I love that it has chocolate, obviously, but it is really moist too. I always try to use either yogurt or sour cream when making quick breads for that reason. The zucchini helps with the moistness too. I also used all whole wheat in this bread and cut back a little on the sugar, so I wouldn't call it super healthy but heading in the right direction, right?

If you have an overabundance of zucchini in your garden and need some ideas to use it up, try this, you won't be sorry. This recipe makes 2 loafs and also freezes well.

2 cups whole wheat flour
2 tsp. cinnamon
1/2 tsp. salt
1 1/2 tsp. baking soda
1/3 heaping cup unsweetened cocoa powder
1/3 cup canola oil
1/2 cup sugar
1/2 cup brown sugar
3 eggs
2 tsp. vanilla
1/2 cup sour cream (or yogurt)
3 cups grated zucchini
1 cup semi-sweet chocolate chips
Zest of one orange (optional)


Preheat oven to 350°F. Butter and flour 2 8.5-inch loaf pans and set aside.

Place flour, cinnamon, baking soda, salt, and cocoa powder in a small bowl and whisk to combine.

With a stand or hand mixer beat oil, white sugar, brown sugar, and eggs until combined and slightly fluffy, 1-2 minutes.

Add vanilla and sour cream and mix until combined.

Gently stir in the grated zucchini.

Take a spoonful of the flour mixture and stir in with the chocolate chips (that will help keep them evenly distributed.) Stir remaining flour mixture into batter and mix just until combined. Add chocolate chips and stir to combine.

Divide the batter between the two pans.

Bake in your preheated oven 50-60 minutes, checking for doneness after 45 minutes.

Remove from oven and let it cool on a rack for 5-10 minutes and then remove from pans.


SOURCE:Adapted from Our Best Bites

This recipe linked to Potluck Sunday @ Mommy's Kitchen.

Tuesday, August 24, 2010

Fresh Green Beans with Roasted Peppers and Onions


I picked these beans one morning, and made this dish the same night. Having a home garden is so amazing and wonderful. Too bad it wasn't MY garden though, it was my parent's. We stayed with them a few days last week and got to eat fresh tomatoes, raspberries, strawberries, blackberries, zucchini & squash (of course) beans and peppers. Ahh, some day.

Anyway, I loved these beans. They were very simple, and roasting the pepper and onion, made them so flavorful. I could probably eat these every couple of days while beans are on. Yum-o!


1 pound French string beans, both ends removed
Kosher salt
1 red onion, large-diced
1 red bell pepper, large-diced
Olive oil
Freshly ground black pepper

Preheat the oven to 425° F. In a large pot of boiling salted water, blanch the beans for 4 minutes. Drain immediately and immerse in a large bowl of ice water to stop the cooking. When they are cool, drain and set aside.

Meanwhile, in a large bowl, toss the onion and bell peppers with 2 tablespoons of olive oil. Sprinkle generously with salt and pepper. Place in a single layer on a baking sheet, and roast for 15 minutes, tossing with a spatula from time to time to be sure the vegetables roast evenly.

Arrange green beans on a platter. Spoon the roasted vegetables over the beans and toss to coat. Add a drizzle of olive oil and sprinkle salt and pepper if needed.

SOURCE:Ezra Pound Cake

Linked to...
Make Ahead Meals For Busy Moms

Sunday, August 22, 2010

Peanut Butter Banana Muffins


This recipe had me at the words peanut butter. Peanut butter is a staple around here and not just for my kids. I can eat it by the spoonful. I took many a peanut butter sandwich to school as a kid and still continue to eat them. I've eaten them every day at times and still never tire of them.

Banana bread is another favorite of mine (especially this banana chocolate chip bread). Put banana bread and peanut butter together and you have an amazing combination. These muffins are so perfectly balanced in both flavor and texture and they stay moist for several days. The recipe made almost 2 dozen. I was planning on freezing half of them but every time I would turn around my girls were sneaking one. I'm betting they wouldn't mind if I made them again in the future.

You could certainly eat these muffins plain, but if you wanted to dress them up a little bit, spread on a little more peanut butter and top with a banana slice.

1 1/2 cups all-purpose flour
1 cup old-fashioned oats
1 tsp. baking powder
1/2 tsp. baking soda
1/2 tsp. salt
2 Tbsp. applesauce
3/4 cup light brown sugar
2 large eggs
1 cup mashed banana (about 2 large bananas)
1/3 cup (heaping) peanut butter (creamy or crunchy)
1 cup low-fat buttermilk

Preheat the oven to 350˚ F. Line about 21 muffin cups with paper liners or spray with cooking spray. In a medium mixing bowl, combine the flour, oats, baking powder, baking soda and salt. Stir together with a fork to blend. In a large mixing bowl, whisk together the applesauce, brown sugar, eggs, banana, peanut butter and buttermilk until smooth. Pour the dry ingredients into the bowl with the wet ingredients and mix just until incorporated and fully blended. Fill the muffin cups about 2/3-3/4 full. Bake 18-20 minutes, or until a toothpick inserted in the center comes out clean. Allow to cool in the pan 5-10 minutes, then transfer to a wire rack to cool completely.

Makes about 18-21 muffins.

SOURCE:Adapted from Annie's Eats

This recipe linked to Recipe Swap Thursday @ Prarie Story

Friday, August 20, 2010

Greek Panzanella


Panzanella is Italian for bread salad, popular in the summer months when tomatoes and basil are prolific. I love the tomato-basil combination, but I also adore the Greek flavors of tomatoes, oregano and feta. This kind of salad is a staple at our house this time of year when the tomatoes are booming. It's fresh, quick to throw together and doesn't heat up the house.


Greek Panzanella
For the salad:
olive oil
1/2 loaf French bread, cut into 1-inch cubes (4-6 cups)
Kosher salt
1 cucumber, peeled, seeded, and sliced 1/4-inch thick
2 red bell peppers, large diced (you could also use yellow or orange or a combination for more color contrast)
4-6 roma tomatoes, diced
1 head romaine lettuce, chopped
1/2 red onion, sliced in half rounds
1/2 pound feta cheese, cut in 1/2-inch cubes
1/2 cup Kalamata olives, pitted

For the vinaigrette:
2 cloves garlic, minced
1 teaspoon dried oregano
1/2 teaspoon Dijon mustard
1/4 cup good red wine vinegar
1 teaspoon salt
1/2 teaspoon freshly ground black pepper
1/2 cup good olive oil

Heat 3 tablespoons olive oil in a large saute pan. Add the bread cubes and sprinkle with salt; cook over low to medium heat, tossing frequently, for 5 to 10 minutes, until nicely browned. Add more olive oil as needed.

Place the cucumber, peppers, tomatoes, lettuce and red onion in a large bowl.

For the vinaigrette: Whisk together the garlic, oregano, mustard, vinegar, 1 teaspoon salt and the pepper in a small bowl. While still whisking, add the olive oil and make an emulsion.

Pour the vinaigrette over the vegetables. Add the feta, olives and bread cubes and mix together lightly. Set aside for 30 minutes for the flavors to blend. Serve at room temperature.

SOURCE: Adapted from Ezra Pound Cake

Linked to...
Recipe Swap Thursday @ Prarie Story
This Weeks Cravings @ Mom's Crazy Cooking

Wednesday, August 18, 2010

Oatmeal Cookie Granola and Winner!!!


Somehow I deleted the picture I was going to use for this post and was left with this one. That just makes me crazy. Hope this one's good enough.

I've been hoarding granola recipes lately. We've gone through just about all of our cold cereal that we had in our food storage and I'm almost ready to not buy any more (except maybe Cheerios). I've made three different granola recipes lately and my girls just devour it. I'm thinking this is much better to put on the table than cold cereal any day, especially when I know what's going into it and can control the sugar.

I got this from my friend Tori and this is the only granola recipe so far I've made twice. It's pretty easy and very tasty. I halved the sugar & honey the original recipe called for. My family and I still liked it, so I see no reason in adding any more than that, especially if you are eating it with yogurt or a little milk, which are sweet anyway. The recipe below reflects those changes I have made.

8 cups oats
1/2-1 cup flaked coconut
1/2 cup ground flax seed (brown or golden)*
1/2 cup sucanat (you can substitute brown sugar)**
1/2 tsp nutmeg
1/2 tsp salt
1 tsp cinnamon
1/2 cup coconut oil (you can substitute butter)
1/3 cup honey
1 tsp vanilla

Preheat oven to 300°F. Combine oats, coconut, flax, sucanat/sugar, salt, nutmeg, and cinnamon in a large bowl. Melt coconut oil/butter, honey and vanilla in a saucepan over medium heat. Mix well once all is melted and pour over the dry ingredients. Mix thoroughly and coat well. Place on two large, greased cookie sheets and bake for 20 min or so, stirring once.

Let it cool. Add raisins or other dried fruit, if desired. Keep in an airtight container.


*There are 2 types of flax seed: brown and golden. When I was at Good Earth I asked what the difference in the two were. The employee told me that brown flax is higher in nutrition than the golden but the golden has a better taste. I also found out from another source that to access most of the nutrition of the flax that you have to eat it ground. Ground flax seed will only last about a week before going rancid, even in the fridge, so only mill as much as you will need in the short term. I tried grinding my flax seed in a small hand-held blender and it didn't do a thing to it. You will most-likely need a spice or coffee grinder to grind it up. I just threw my flax seed in whole in this recipe 'cause that's what I had.

**Sucanat is non-refined cane sugar.


....I used random.org and the winner of the apron is #7 Stephanie. Congrats! I have emailed you to let you know. Thanks to all for participating. It was really fun to see your answers. Please keep the comments coming, it gives me a feeler for what you like to see here on my blog.

Sunday, August 15, 2010

Just Because

I know my blog is very small and inconsequential to the rest of the blogging world. I don't have sponsors and advertisements either, so I don't make any money off of it, but I love it. I love to share food with people, whether it be bringing a meal to a new mother, teaching a friend how to make something, or just sharing recipes that I love. Thanks for sharing my blog with me!

To show my thanks, I made this cute little half apron to giveaway.


I'm not going to get technical, I just want to keep it simple, so there will only be ONE entry possible per person. First, make sure you're a follower of this blog. Then, in the comments section answer these two questions:

1-How did you find my blog?
2-What is your favorite recipe here to date? (one you've tried or one you want to try)

Make sure you include a valid email I can reach you at in your comment. You have until Wednesday @ 5pm (MST), August 18, to enter. I will then choose and announce the winner.

Good Luck!

Saturday, August 14, 2010

1st Giveaway!

So, I’m thinking about doing a giveaway since I’ve reached 50 followers (and beyond)! What do you think? Details to come.

Friday, August 13, 2010

Crispy Parmesan Ranch Chicken Tenders


Chicken tenders are becoming a favorite around here with my kids. Lately I've been making these pecan-crusted chicken tenders with honey mustard sauce that everyone really loves, but these sounded good when I saw them and wanted to see if they would be as well-received. I mean, who doesn't like ranch? My girls are crazy about parmesan cheese too--I know, wierd.

These were very easy to throw together. While they were cooking, I steamed some broccoli and hardly had any clean-up. My kind of meal. The verdict: delicious and very moist. My husband even said they were so good they didn't even need a dipping sauce. I'd say I'll be making these again.

1 1/2 pounds chicken tenders
2 cups lowfat buttermilk
1 packet ranch seasoning mix
2 cups fresh bread crumbs*
1/4 cup whole wheat flour
1/2 cup parmesan cheese

Combine buttermilk and 1/2 packet of ranch mix in a baking dish. Add chicken tenders to buttermilk. Marinate for 2 hours or overnight.

Preheat oven to 400°F. Line a baking sheet with a silpat or spray with cooking spray.

Combine bread crumbs, parmesan, remaining ranch seasoning and flour in a large bowl. Coat chicken pieces in crumb mixture, then lay on prepared baking sheet. Continue with remaining chicken pieces. Spray each piece with cooking spray or olive oil.

Bake for 10 minutes, flip, coat with cooking spray, and bake for another 10-15 minutes.

*For fresh bread crumbs, I just toasted up about 3 slices of wheat bread then put them in a small food processor to process them until crumbly.

Wednesday, August 11, 2010

Spinach and Basil Pesto Pasta


This is a very easy dish, great for summer! The pesto is a cinch to throw together and if you grow your own basil, very economical. Most pestos call for pine nuts, but you can easily substitute walnuts if you can't find them or if they are too expensive. Pesto lasts a long time in the fridge and it can even be kept in the freezer for a long time as well, so if you have extra ingredients, make more and store for later.

Spinach-Basil Pesto
1 cup spinach, rinsed
1 cup fresh basil leaves
1/4 cup pine nuts
2-3 cloves garlic
3/4 cup parmesan cheese
1/2-3/4 cup olive oil

Place all ingredients in a food processor and blend until smooth. Toss with about 1/2 lb. cooked pasta and top with additional parmesan cheese, if desired.
Related Posts Plugin for WordPress, Blogger...