Thursday, September 30, 2010

Chipotle Lime Shrimp


Wow, is it already Thursday? My, this week has flown by. We are still having 80 degree weather here and although I am liking it, I am really anxious for fall. I have many many things lined up to bake that are fall-inspired and I can't wait to share them with you all. However, it is not quite fall and the recipe I have to share today is more summer-inspired.

We had a family barbecue the other day and kind of made this shrimp on the go. I didn't want to have to go out once to the grocery store and then again to pick up my husband from work and drive to my in-laws. So, I picked up the frozen shrimp and let them thaw on the way there, then threw them in the marinade once we got there. Everything was very easy and fast to throw together.

Almost anything on the grill is wonderful, in my opinion, and these shrimp were no exception. There's just a little heat with the chipotle and the cilantro and lime just make the flavor pop even more. Don't put your grills away quite yet, give these a try. You can eat them with a side of pasta salad or throw them in some soft tacos with some beans and corn and Spanish Rice. Your tummy will thank you!

Chipotle Lime Shrimp
1 chipotle chili in adobo; chopped
1 Tbsp. olive oil
1 tsp. cumin
1 Tbsp. brown sugar
1 lime (juice and zest)
2 Tbsp. cilantro; chopped
1 pound shrimp; peeled and deveined

Mix the chipotle, olive oil, cumin, brown sugar, lime zest, lime juice and cilantro in a bowl and and let marinate for 20 minutes. Skewer the shrimp. Oil up the grill and grill the shrimp until cooked, about 2-3 minutes per side.


SOURCE:My Baking Addiction

Monday, September 27, 2010

Chewy Lemon Sugar Cookies


Before I being raving about these cookies, I have to tell you about the comment my husband made the other day. I was walking outside to photograph something, well food, for a post. My husband just laughed and said I should change the title of my blog to Blue Plate Special because everything I photograph is on a blue plate. He's so clever; I loved it but still think I'll be sticking to this one. You're still going to see everything photographed on a blue plate because that's pretty much all we have that looks decent. Maybe one of these days I'll branch out.

Anyway, on to these cookies. Have I told you how much I love lemon anything? Lemon desserts are probably my number 1 (aside from chocolate, that is). I don't make a whole lot of cookies but these were different enough and tempting enough that I wanted to give them a try. They were the perfect balance of sweet and tart for me. They were nice and chewy but a little crisp on top from being rolled in sugar. I served them with some homemade lemon ice cream and made ice cream sandwich cookies. They were divine. Go ahead, treat yourself.

Chewy Lemon Sugar Cookies
3 cups all-purpose flour
1 teaspoon baking soda
1/2 teaspoon baking powder
1/2 teaspoon salt
1 cup butter, softened
1 1/2 cups white sugar
1 egg
1/2 teaspoon vanilla extract
Zest of one large lemon
4 tbsp fresh lemon juice (about 1 large or 2 small lemons)
1/3 cup sugar for rolling cookies

Preheat oven to 375°F. In a small bowl, sift together flour, baking soda, baking powder and salt. Set aside.

In the bowl of a stand mixer, using a paddle attachment, cream together the butter and sugar until smooth and very fluffy (3-5 minutes). Beat in egg, vanilla extract, lemon juice and lemon zest. Gradually mix in the dry ingredients.

Roll rounded teaspoonfuls of dough into balls, and roll the top side in sugar. Place on cookie sheets about 1 1/2 inches apart. Bake 8 to 10 minutes, or until lightly browned. Let stand on cookie sheet two minutes before removing to cool on wire racks.

Makes approximately 24-30 cookies.

SOURCE:Adapted from My Baking Addiction via Meet Me In The Kitchen

Wednesday, September 22, 2010

Mini Orange Chocolate Chunk Cakes


I have actually had this recipe for a while and made these little cakes last year. However, I tucked the recipe away and completely forgot about it until last weekend. My friends and I were having a girls night and I invited them over for dessert afterwards. As I was trying to decide what to make for everyone, this recipe popped into my head and I was glad to make it again.

I absolutely love the chocolate and orange combination, especially when it's dark chocolate, and knew with that I would immediately love these cakes; I was right. These cakes are very moist and I think have the perfect balance of orange and chocolate flavor. While I have made these into mini cakes, you could certainly bake them in any cake pan.


For the cakes:
8 tbsp. unsalted butter, at room temperature
1 cup sugar
2 eggs
2 Tbsp. grated orange zest (2 oranges)
1 1/2 cups all-purpose flour
1/4 tsp. baking powder
1/4 tsp. baking soda
1/4 tsp. salt
1/4 cup freshly squeezed orange juice (1 orange)
3 oz. buttermilk, at room temperature
1 tsp. vanilla extract
1 cup dark chocolate, coarsely chopped

For the syrup:
1/4 cup sugar
1/4 cup freshly squeezed orange juice (1 orange)

For the ganache:
4 oz. dark chocolate, coarsely chopped
1/4 cup heavy cream
1 Tbsp. butter


Preheat the oven to 350 degrees F. Grease and flour a 12 cavity mini bundt pan.

In the bowl of an electric mixer fitted with the paddle attachment, cream the butter and sugar until light and fluffy; 2-3 minutes. Add the eggs one at a time, scraping down the bowl between additions. Mix in the orange zest.

In a small mixing bowl, sift together the flour, baking powder, baking soda, and salt. In another bowl or large liquid measuring cup, combine the orange juice, buttermilk and vanilla. Add half of the flour mixture to the bowl of the mixer and mix on low speed until just incorporated. Add the liquid ingredients, mixing until blended. Add the remaining dry ingredients, mixing on low speed until just combined. Fold in the chocolate chunks with a rubber spatula.

Divide the batter evenly between the prepared pans. Bake for 18-22 minutes (you will have to watch carefully as ovens and altitudes are different) or until a toothpick inserted in one of the cakes comes out clean. Allow the cakes to cool in the molds for 10 minutes.

In the meantime, prepare the syrup. In a small saucepan over medium-low heat, cook the sugar with the orange juice just until the sugar dissolves. Remove the cakes from the pans, place them on a wire rack over a tray, and spoon the orange syrup over the tops of the cakes. Allow to cool completely.

To make the ganache, melt the chocolate, heavy cream and butter in the top of a double boiler over simmering water until smooth and warm, stirring occasionally. Dip the tops of the cooled cakes in the ganache and allow to set.


SOURCE:Adapted from Annie's Eats, originally from Ina Garten.

Sunday, September 19, 2010

Corn and Basil Cakes


This picture sure doesn't do these cakes justice. I think this is the first savory pancake I have ever made and I am so pleased with how they turned out. They were even well received by my family. I can't get enough of fresh basil. I love it. It is so perfect in the summer and you can throw it into a ton of things. It has such a fresh and vibrant taste. Fresh corn is another thing I love during the summertime. I think I may even like eating it raw better than cooked! Corn and basil is the perfect pairing for these pancakes, but it can really lend itself to many other flavors as well, like chives, garlic, caramelized onion, sun-dried tomato, black beans and cilantro, the possibilities are many.

I served these little cakes with a dollop of sour cream, sliced garden tomatoes and bacon (gasp!). I haven't cooked bacon in quite a while so my family was loving it. I made these my main dish and just used a little bacon on the side but you could serve these as a side with some grilled chicken or steak as well.

I know the summer is winding down, but if you find yourself with some fresh corn on your hands, give these a try.

1/2 cup whole wheat flour
1/2 cup low-fat buttermilk
2 large eggs
1 Tbsp. oil
1/2 tsp. baking powder
1/2 tsp. salt
1/4 tsp. freshly ground pepper
2 cups fresh corn kernels (about 2 large ears;) or thawed frozen corn
1/2 cup chopped fresh basil

Whisk flour, milk, eggs, oil, baking powder, salt and pepper in a medium bowl until smooth. Stir in corn and basil.

Heat griddle over medium heat until hot (but not smoking). Cook 4 cakes at a time, using about 1/4 cup batter for each, making them about 3 inches wide. Cook until the edges are dry, about 2 minutes. Flip and cook until golden brown on the other side, 1 to 3 minutes more. Repeat with the remaining batter, making about 8 cakes total. Reduce the heat as necessary to prevent burning.

SOURCE:Adapted from Eating Well via Meet Me In The Kitchen

This recipe linked to Potluck Sunday @ Mommy's Kitchen

Thursday, September 16, 2010

Cooking Class: Homemade Yogurt


A while back it wouldn't have even occurred to me to make yogurt. I know that my dad has done it for years but I just thought it was just going to be one of those things that I would get to, ya know, "later." Well, recently I have taken to making my own granola for breakfast. And where there's granola, inevitably, there's yogurt.

As I started buying yogurt to go with my deliciously fresh homemade granola, I realized how artificial it tasted. It's got added sugar and flavor and wasn't something I wanted to keep feeding my family. So, I went back to a recipe I printed and used a couple of years ago, called my dad for some extra tips and I stood armed to make yogurt again.

I couldn't believe how easy it was. It's not even really a recipe, it's basically just a method. The end result is just delicious. It tastes so clean and fresh because there's nothing artificial in it.

What you'll need:
Heavy pot
thermometer
large bowl
milk (don't use less than 2% or you'll have to add thickeners)
3 Tbsp. starter-store bought plain yogurt with live, active cultures
2 quart jars, sterilized (you could use several pint jars as well; glass or plastic work fine)
heating pad
towels


Step 1

Heat 1 quart of milk to 185° F. There isn't really a need to stir. The milk will scald a little and there will be some that gets stuck on the bottom of the pot. Just leave it, don't scrape it off.

Step 2

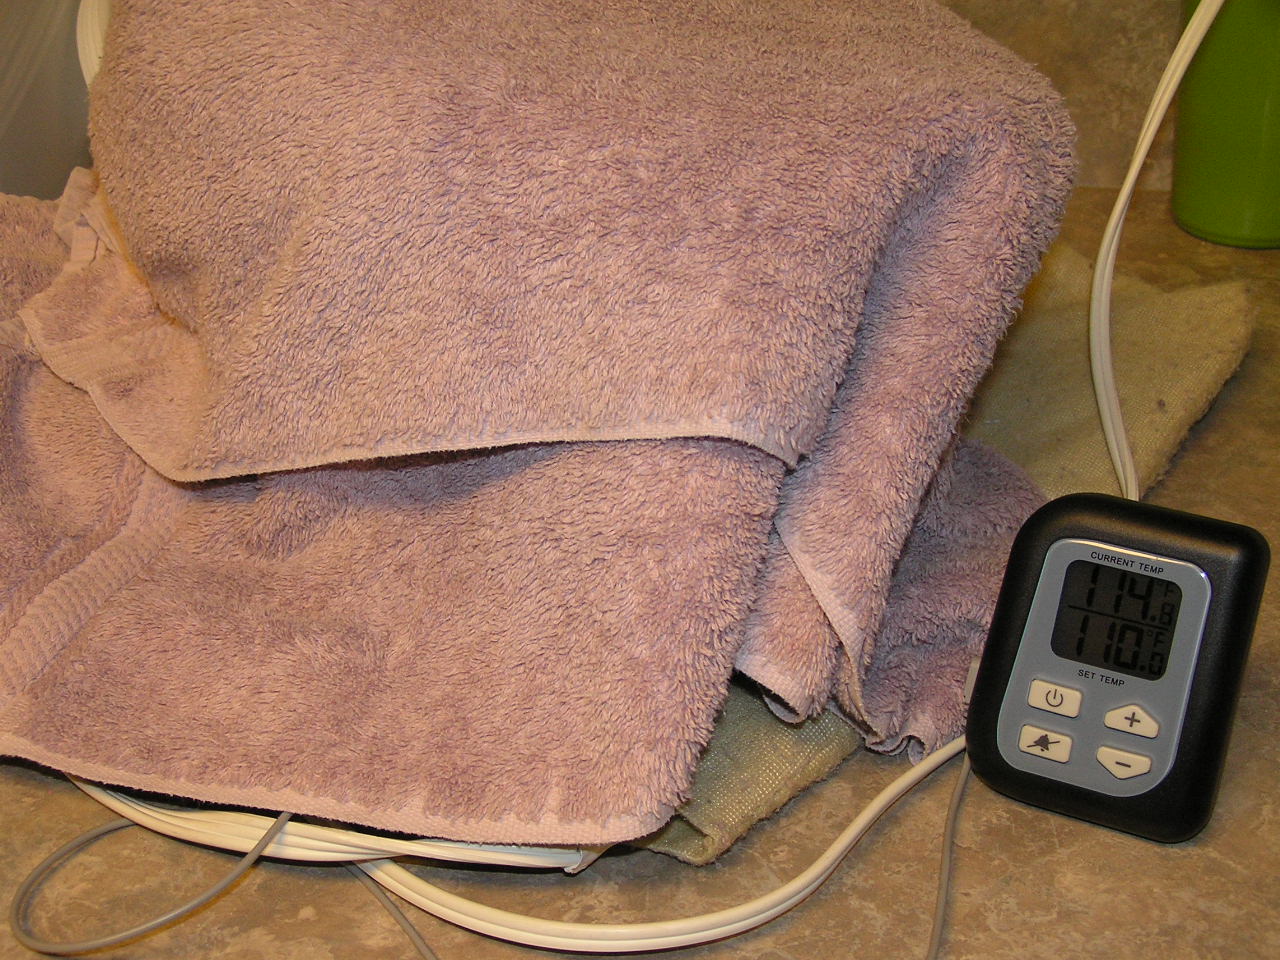
Remove from heat and allow to cool between 105° F and 115° F. I let it cool in a separate bowl, you can let it cool in the same pot you heated it in but it may take a little longer. As you can see I'm using a probe thermometer (digital) and a candy thermometer just to see the difference; I'm sure whatever you have will work fine.

Step 3
Once it's between 105° F and 115° F, add your yogurt starter and stir it in until it's incorporated. Then, pour the mixture into your sterilized quart jars (I kept mine in the same bowl, but it's probably better if you put it into smaller containers). Cover the containers with lids, place them over a heating pad and cover tightly with some towels. You can either stick the thermometer just right inside under the towel or, if you have a probe, you can stick it in the yogurt. Monitor the temperature to make sure the heat stays at about 110° F, and adjust, if necessary. If you don't have a heating pad, you stick the yogurt in a picnic cooler and wrap it in a towel.


Step 4
The yogurt will take several hours to incubate. Check it after 3-4 hours to see if it's thickened yet. Note: Your yogurt will not be as thick as what you get at the store, don't expect it to be solid.


When the yogurt curd has formed, you will notice that the whey will have pooled a little on the top. You can stir some or all of it in, as it is very healthy for you. Store your yogurt in the fridge.

Enjoy your yogurt with fresh fruit, a little sweetener, applesauce and cinnamon or more savory like a tzatziki sauce.

If you want thick yogurt, like Greek-style, you can let it sit in some cheesecloth over a colander for several hours. Don't throw the whey out! Here are some cool uses for it.

Tuesday, September 14, 2010

Gingersnap Nectarine Tart


I spied this recipe a while ago and have been wanting to make it ever since. I almost made it on several occasions but never ended up finding the mascarpone cheese it calls for. I know I live a little off the beaten path, but I didn't think it was THAT far off! Anyway, I eventually found out my local grocery indeed carried it, they were just out the times I was looking for it before. Mascarpone cheese is Italian cream cheese. It's thick and very creamy but not tangy like cream cheese. This was my the first recipe I have used it in and I was really excited to try it.

We shared this dessert with our friends and we all thought it was great. I liked using the gingersnap cookies for the crust because it's different than a typical graham crust and I also really like ginger. I think the stronger taste of the ginger also contrasts nicely with the creaminess of the filling and the sweetness of the nectarines.

This recipe calls for crystallized ginger, which I happen to have on hand because I make these muffins. I know it's not a very common ingredient and I'm sure if you leave it out you will still have good results. If the candied ginger is not your thing, you could try shaving a little fresh ginger into the filling (not sure if I would try ground ginger though).

You'll want to make this several hours ahead of time so the crust and the filling have time to chill and all the flavors have a chance to get comfy with each other. It's best to let it chill overnight.

For the crust:
34 gingersnap cookies, coarsely broken (about 9 ounces; about 3 1/4 cups)
6 Tbsp. unsalted butter, melted

For the filling:
1 8-ounce container *mascarpone cheese, at room temperature
6 ounces cream cheese, at room temperature
1/4 cup sour cream
1/4 cup sugar
1 tablespoon grated lemon peel
1/4 teaspoon vanilla extract
1 tablespoon finely chopped crystallized ginger

For the topping:
4 to 5 small nectarines, halved, pitted, cut into thin slices
1/4 cup peach jam, warmed
gingersnap cookie crumbles


Crust:
Preheat oven to 350°F. Finely grind gingersnaps in a food processor. Add butter and blend until crumbs are evenly moistened. Press mixture over bottom and up sides of 9-inch-diameter tart pan with removable bottom. Place tart pan on a cookie sheet. Bake crust until color darkens, pressing sides with back of spoon if beginning to slide, about 8 minutes. Cool completely.

Filling:
Beat first 6 ingredients in medium bowl until smooth. Beat in crystallized ginger. Spread filling in prepared crust. Cover loosely and refrigerate at least 2 hours and up to 1 day.

Topping:
Overlap nectarine slices atop filling in concentric circles. Brush with jam. Sprinkle with gingersnap cookie crumbles. Serve, or refrigerate up to 6 hours.


*Look here for a mascarpone cheese substitute.

SOURCE:Smitten Kitchen, originally from Bon Appetit

This recipe linked to And Baby Makes Five.

Friday, September 10, 2010

Pumpkin Pancakes with Pumpkin Maple Syrup


Some of you may know that I'm a breakfast-a-holic and a pancake fiend. I have at least 3-4 pancake recipes that I rotate through on a regular basis. I'm all about a good (and healthy) breakfast any day of the week, not just on the weekends. We hardly ever eat cold cereal anymore, much to my husband's chagrin I'm sure. My kids don't complain though. I think they love pancakes almost as much as I do.

A while back I found a can of pumpkin in my pantry. I had bought it last year sometime and still hadn't used it. Seeing it reminded me of fall. I love fall, it's my favorite season. I also love just about anything pumpkin. I have made pumpkin pancakes before and they always turned out gooey and a little unappetizing because of the texture. I wasn't sure you could even make a pumpkin pancake that wasn't gooey. That's until I got this recipe from my sister. The pancakes turn out nice and fluffy and, most importantly, they are not soggy or gooey. The pumpkin maple syrup is wonderful with it as well and just intensifies that pumpkin pie flavor.

I know I'm jumping the gun a little on fall, but when the weather turns, make room for these pancakes in your breakfast rotation. You won't be sorry.


2 cups whole wheat flour
1/4 cup brown sugar
2 tsp. baking powder
1 tsp. baking soda
1 tsp. ground allspice
1 tsp. ground cinnamon
1/4 tsp. ground ginger
1/2 tsp. salt
1 1/2 cups buttermilk
1 cup pumpkin puree
2 eggs
2 T vegetable oil
2 T vinegar

In a medium bowl, mix together the buttermilk, pumpkin, egg, oil and vinegar. In a separate bow combine the flour, brown sugar, baking powder, baking soda, allspice, cinnamon, ginger and salt. Stir dry ingredients into the pumpkin mixture just enough to combine. Let batter rest for a few minutes while griddle warms up!

Pour or scoop the batter onto the griddle, using a 1/4 cup measuring cup. Brown on both sides and serve hot with Pumpkin Maple Syrup.


Pumpkin Maple Syrup
1/2 cup canned pumpkin
1/2 cup maple syrup
cinnamon, to taste


Here's some links to my favorite pancakes:
Whole Wheat Apple Pancakes
Oatmeal Cookie Pancakes
"Favorite" Pancakes
Lemon Poppy Seed Pancakes

This recipe linked to Potluck Sunday @ Mommy's Kitchen and This Week's Cravings @ Mom's Crazy Cooking.

If you have a favorite pancake recipe, please share! You can either link up below or add it in the comments.

Tuesday, September 7, 2010

Berry Cheesecake Ice Cream


Wow, this ice cream is amazing! This summer I have made ice cream more times than I ever have and it's been fun experimenting. Some have been good, others didn't really float my boat or anything. Until this ice cream, the chocolate coconut ice cream I made a while back totally blew my mind. While I still think that one will continue to be my favorite, mainly because it's chocolate, this one totally blows my mind as well. It tastes just like cheesecake and is so rich and creamy, not icy like some others I've made. I love that it has the cheesecake layers instead of just mixing it all in together. I made this for a family gathering so we all got just a taste. We'll for sure make this again, but I might have to share or I may end up eating the whole thing!

For the berry layer:
1/2 cup sugar
1 TBSP cornstarch
1/2 cup water
1 1/4 cups mixed berries (I used blueberries and raspberries)
1 Tbsp lemon juice

For the graham cracker layer:
2 1/4 cups graham cracker crumbs
2 TBSP sugar
1/2 cup butter, melted

For the ice cream base:
2 cups heavy cream
2 cups sour cream
12 oz cream cheese (1 1/2 bars)
1/3 fresh lemon juice (about 1-2 lemons, depending on the size)
1 1/2 cups granulated sugar
1/2 teaspoon almond extract

Combine berry mixture in saucepan and bring to a boil. Reduce heat and simmer until slightly thickened. Refrigerate until chilled. (I did this step the night before so everything would be chilled and ready to put into the ice cream maker.)

Combine graham cracker mixture and pat onto a cookie sheet. Bake at 350 for 10-15 minutes or until lightly browned; cool completely. Crumble and set aside.

For ice cream, beat cream cheese until smooth. Slowly add the sugar and then beat in the sour cream followed by the cream.

Add the vanilla extract and lemon juice and mix until thick and smooth. Cover and chill in the refrigerator for 2-3 hours.

Freeze in ice cream machine according to machine directions.
In a freezer safe container, layer ice cream, blueberry mixture, and graham cracker mixture 3 times then swirl with a knife. Cover and freeze until firm.

SOURCE:Adapted from Cooking with Christine

Linked to...
Sweets For A Saturday @ Sweet As Sugar Cookies
Sweet Indulgences Sunday @ A Well-Seasoned Life

Sunday, September 5, 2010

White Corn Soup with Poblano Cream

Sunday Soup


So simple, but absolutely divine! Although summer is winding down, we are still getting corn from our local farmer's stands. We just love fresh corn. It's not summer without it! I picked up a huge bag of corn the other day at a farmer's stand and couldn't wait to try this soup. If you like corn on the cob, you will love this. It's topped with some spicy poblano cream for some depth of flavor and a little kick, as well as a little cilantro to give your taste buds a whirl! Wow, I couldn't get enough of it. You can eat this soup hot, warm or cold.

1 Poblano Pepper
4 cups chicken broth
3 Tbsp heavy cream
1 Tbsp butter
1 Tbsp oil
1 small onion, chopped
6 cups fresh white corn kernels (from about 10 ears, reserve 2 or 3 cobs)
1 teaspoon sugar
Salt and Black Pepper
Cilantro Leaves, for serving

Heat broiler. On a broiler proof baking sheet, broil the pepper, turning occasionally, until charred, 8 to 12 minutes. Wrap in a paper towel or place in a paper bag with top closed. Allow to cool for 10 minutes. Use a paper towel to remove the skin. Remove the seeds. (You may want to use gloves here. I didn't and my hands were burning for several hours.)

In a blender, puree the pepper with 2 tablespoons of the chicken broth and heavy cream; transfer to a bowl.

Meanwhile, melt the butter in a extra large sauce pan or soup pot over medium-low heat. Add the onion and cook until tender 8 to 10 minutes. Stir occasionally and do not allow the onion to brown.

Add the corn and 2 or 3 of the cobs snapped in half, the rest of the broth, sugar, 3/4 teaspoon salt, and 1/4 teaspoon pepper and bring to a boil. Reduce heat and simmer until the corn is tender, 10 to 15 minutes.

Remove and discard the cobs. Use a handheld immersion blender puree about 2/3 of the soup leaving some of the corn for texture, if desired. Alternately, puree the soup in batches in a blender.

Serve the soup hot, lukewarm or cold with a dollop/drizzle of the poblano cream and cilantro leaves.


SOURCE:Cinnamon Spice & Everything Nice

Friday, September 3, 2010

Whole Wheat Zucchini Parm Pizza


I wish I had all these zucchini recipes last year when I actually had zucchini in my garden. Sadly to say much went to waste because we didn't eat it fast enough and got tired of it. Zucchini is so versatile, there are endless possibilities.

This is a great little pizza and super easy to throw together. I thought the taste would be mediocre at best but I was wrong. Between the parmesan and the garlic seasoning, the taste was wonderful! I loved it.

1 recipe Perfect Pizza Crust (substituting at least half of the flour for whole wheat flour)
2 small zucchini, sliced thin
oilve oil
Johnny's Garlic Bread Seasoning (Costco)
3/4 cup mozzarella cheese
1/4-1/2 cup parmesan cheese

Make pizza crust according to directions. After you spread it out on a pizza pan or stone, brush or drizzle with olive oil and sprinkle liberally with the Johnny's seasoning. Lay out zucchini on top of the dough then top with mozzarella and parmesan cheeses.

Bake at 425° F for about 10-12 minutes, or until edges are golden brown.

Wednesday, September 1, 2010

September Menu

Fall is in the air, I can feel it. We've had some teasers here and there over the past 2 weeks with some cool weather and it has totally thrown me into fall mode. It has me thinking soup and everything pumpkin! Before summer started I started doing Sunday Soup every week and I think this is the month to bring it back! I think I'll try doing a little link party so you can link up your favorite soups too. So, be thinking of something to share this month. I love seeing what other people come up with.

I'm excited about my menu this month. I still have a lot of fresh things because I will still be receiving my CSA produce and hitting up the farmer's market but I'm transitioning into some fall-friendly foods as well.

Dinners
Mango Chicken Salad
Chopped Barbecue Chicken Salad
Garlic Ranch Pizza
Orzo with Roasted Veggies
Creamless Tomato Soup w/ grilled cheese sandwiches
Bean Curry w/ Coconut Rice

Butternut Squash Mac & Cheese w/ cauliflower
Corn and Basil Cakes w/ sliced garden tomatoes
Thai Steak Salad
Roasted Red Pepper and Tomato Soup w/ breadsticks
Couscous salad with Feta and Chickpeas

Brown Sugar Bourbon pork, Mexican Cornbread & Smashed Pinto Beans
Asian Lettuce Wraps
Orzo w/ Spinach and Pine nuts, Corn on the Cob
Red Curry Coconut Noodles & peas
White Chicken Chili w/ corn tortillas

Pretzel-Crusted Chicken Strips w/ salad & Oven-Roasted Corn in Chili Coconut Milk
Garden Spaghetti w/ garlic bread
Curried Lentil & Couscous Salad
Savory Crepes (filling to be determined) & Veggie
Split Pea Soup w/ Smoked Sausage and greens

Other things I'll be making:
Homemade Yogurt
Carrot Spice Muffins
Pumpkin Pancakes w/ Pumpkin Maple Syrup
Pumpkin Apple Butter Muffins
Bittersweet Chocolate and Pear Cake w/ Buttermilk Ice Cream
Maple-Almond Granola

Sunday, August 29, 2010

Zucchini Basil Lasagna


We don't have a garden this year but we've still been able to get some zucchini and it's been great. I made this lasagna a couple of years ago and it's one of the few things with cooked zucchini that my husband actually enjoyed. I like how the zucchini in this lasagna doesn't get soggy and soupy and how the basil flavor really comes through. If you're still wondering what to do with the last bit of zucchini from your garden, give this lasagna a try!


2 cups ricotta cheese (approx., I think the container is only 15 oz.)
1 cup chopped fresh basil
1 large egg
2 cups shredded mozzarella cheese, divided
Cooking spray
4 cups chopped zucchini
1/2 cup chopped onion
2-3 cups spaghetti sauce
9 oven-ready lasagna noodles (such as Barilla)


Preheat oven to 350°F. Combine ricotta, basil, egg and 1 1/2 cups mozzarella in a food processor; process until smooth. Heat a large nonstick skillet coated with cooking spray over medium-high heat. Add zucchini and onion; sautĆ© 5 minutes or until tender. Stir in sauce; remove from heat.

Spread 1/4 cup zucchini mixture in bottom of a 8.5x11-inch baking dish coated with cooking spray. Arrange 3 noodles over zucchini mixture; top with one-third ricotta mixture and one-third zucchini mixture. Repeat procedure with the remaining noodles, ricotta mixture, zucchini mixture, and top with remaining 1/2 cup of mozzarella.

Cover and bake at 350° for 45 minutes. Uncover and bake an additional 15 minutes or until lasagna is thoroughly heated. Cool slightly before serving so that the cheese has a chance to set a bit.

SOURCE:Adapted from Cooking Light

This post linked to Potluck Sunday @ Mommy's Kitchen.

Friday, August 27, 2010

Shrimp and Penne Pasta


I have been wanting to make this for a very long time and I'm glad I finally just did it. Ben loves shrimp and I probably make it much too little as far as he's concerned. I love the simplicity of this dish, and the few simple ingredients. Yet, it still bursts with flavor. My kids really liked it too (minus the shrimp). This is another great meal for a warm summer evening.

3/4 lb penne pasta (I used whole wheat)
1 lb Shrimp
3 Tbsp. butter
3 Tbsp olive oil
1 whole onion (small)
2 cloves garlic
1/2 cup white cooking wine
1 8-oz can tomato sauce
1 cup heavy cream
1 Tbsp. fresh parsley
1 Tbsp. fresh Basil
salt & pepper

Cook the penne pasta until al dente.

Peel, devein and rinse (under cool water) 1 pound of extra large shrimp. Heat about 1 tbsp. butter and olive oil in a skillet. Add the shrimp and cook for a couple minutes until just opaque. Do not overcook them. Remove from heat and let cool for a few minutes. Now, put the cooked shrimp on the cutting board and pull off the tails. Chop the shrimp into bite –sized pieces and set aside.

Finely dice one small onion. Mince two cloves of garlic. In a large skillet heat 2 tablespoons of butter and 2 tablespoons olive oil. Add the garlic and onion and sautƩ, stirring occasionally. After the garlic and onions have cooked a bit add your white wine. Let the wine evaporate for a few minutes, stirring occasionally. If you would rather not use wine, you can use low-sodium chicken broth instead (about 1/2 cup).

Now add an 8-ounce can of plain tomato sauce. Stir well until combined. Then add 1 cup of heavy cream. Continue stirring. Turn heat down to low and let simmer.

Chop the herbs. Add the chopped shrimp back into the tomato cream sauce. Give it a stir and add salt and pepper to taste. Throw in your herbs and stir until combined. Finally add the cooked penne pasta and give it a good stir.


SOURCE:The Pioneer Woman, and This Mommy Cooks

Thursday, August 26, 2010

Chocolate Zucchini Bread


I should call this disappearing chocolate zucchini bread, because that is exactly what happened! I made this twice in one week and both times it didn't even last 24 hours. I'm a lover of quick breads and I've been into them (and muffins) lately. They are so easy to throw together and you can make them very tasty and healty too. They are the perfect on the go snack too.

Anyway, back to this zucchini bread. I love that it has chocolate, obviously, but it is really moist too. I always try to use either yogurt or sour cream when making quick breads for that reason. The zucchini helps with the moistness too. I also used all whole wheat in this bread and cut back a little on the sugar, so I wouldn't call it super healthy but heading in the right direction, right?

If you have an overabundance of zucchini in your garden and need some ideas to use it up, try this, you won't be sorry. This recipe makes 2 loafs and also freezes well.

2 cups whole wheat flour
2 tsp. cinnamon
1/2 tsp. salt
1 1/2 tsp. baking soda
1/3 heaping cup unsweetened cocoa powder
1/3 cup canola oil
1/2 cup sugar
1/2 cup brown sugar
3 eggs
2 tsp. vanilla
1/2 cup sour cream (or yogurt)
3 cups grated zucchini
1 cup semi-sweet chocolate chips
Zest of one orange (optional)


Preheat oven to 350°F. Butter and flour 2 8.5-inch loaf pans and set aside.

Place flour, cinnamon, baking soda, salt, and cocoa powder in a small bowl and whisk to combine.

With a stand or hand mixer beat oil, white sugar, brown sugar, and eggs until combined and slightly fluffy, 1-2 minutes.

Add vanilla and sour cream and mix until combined.

Gently stir in the grated zucchini.

Take a spoonful of the flour mixture and stir in with the chocolate chips (that will help keep them evenly distributed.) Stir remaining flour mixture into batter and mix just until combined. Add chocolate chips and stir to combine.

Divide the batter between the two pans.

Bake in your preheated oven 50-60 minutes, checking for doneness after 45 minutes.

Remove from oven and let it cool on a rack for 5-10 minutes and then remove from pans.


SOURCE:Adapted from Our Best Bites

This recipe linked to Potluck Sunday @ Mommy's Kitchen.

Tuesday, August 24, 2010

Fresh Green Beans with Roasted Peppers and Onions


I picked these beans one morning, and made this dish the same night. Having a home garden is so amazing and wonderful. Too bad it wasn't MY garden though, it was my parent's. We stayed with them a few days last week and got to eat fresh tomatoes, raspberries, strawberries, blackberries, zucchini & squash (of course) beans and peppers. Ahh, some day.

Anyway, I loved these beans. They were very simple, and roasting the pepper and onion, made them so flavorful. I could probably eat these every couple of days while beans are on. Yum-o!


1 pound French string beans, both ends removed
Kosher salt
1 red onion, large-diced
1 red bell pepper, large-diced
Olive oil
Freshly ground black pepper

Preheat the oven to 425° F. In a large pot of boiling salted water, blanch the beans for 4 minutes. Drain immediately and immerse in a large bowl of ice water to stop the cooking. When they are cool, drain and set aside.

Meanwhile, in a large bowl, toss the onion and bell peppers with 2 tablespoons of olive oil. Sprinkle generously with salt and pepper. Place in a single layer on a baking sheet, and roast for 15 minutes, tossing with a spatula from time to time to be sure the vegetables roast evenly.

Arrange green beans on a platter. Spoon the roasted vegetables over the beans and toss to coat. Add a drizzle of olive oil and sprinkle salt and pepper if needed.

SOURCE:Ezra Pound Cake

Linked to...
Make Ahead Meals For Busy Moms

Sunday, August 22, 2010

Peanut Butter Banana Muffins


This recipe had me at the words peanut butter. Peanut butter is a staple around here and not just for my kids. I can eat it by the spoonful. I took many a peanut butter sandwich to school as a kid and still continue to eat them. I've eaten them every day at times and still never tire of them.

Banana bread is another favorite of mine (especially this banana chocolate chip bread). Put banana bread and peanut butter together and you have an amazing combination. These muffins are so perfectly balanced in both flavor and texture and they stay moist for several days. The recipe made almost 2 dozen. I was planning on freezing half of them but every time I would turn around my girls were sneaking one. I'm betting they wouldn't mind if I made them again in the future.

You could certainly eat these muffins plain, but if you wanted to dress them up a little bit, spread on a little more peanut butter and top with a banana slice.

1 1/2 cups all-purpose flour
1 cup old-fashioned oats
1 tsp. baking powder
1/2 tsp. baking soda
1/2 tsp. salt
2 Tbsp. applesauce
3/4 cup light brown sugar
2 large eggs
1 cup mashed banana (about 2 large bananas)
1/3 cup (heaping) peanut butter (creamy or crunchy)
1 cup low-fat buttermilk

Preheat the oven to 350˚ F. Line about 21 muffin cups with paper liners or spray with cooking spray. In a medium mixing bowl, combine the flour, oats, baking powder, baking soda and salt. Stir together with a fork to blend. In a large mixing bowl, whisk together the applesauce, brown sugar, eggs, banana, peanut butter and buttermilk until smooth. Pour the dry ingredients into the bowl with the wet ingredients and mix just until incorporated and fully blended. Fill the muffin cups about 2/3-3/4 full. Bake 18-20 minutes, or until a toothpick inserted in the center comes out clean. Allow to cool in the pan 5-10 minutes, then transfer to a wire rack to cool completely.

Makes about 18-21 muffins.

SOURCE:Adapted from Annie's Eats

This recipe linked to Recipe Swap Thursday @ Prarie Story

Friday, August 20, 2010

Greek Panzanella


Panzanella is Italian for bread salad, popular in the summer months when tomatoes and basil are prolific. I love the tomato-basil combination, but I also adore the Greek flavors of tomatoes, oregano and feta. This kind of salad is a staple at our house this time of year when the tomatoes are booming. It's fresh, quick to throw together and doesn't heat up the house.


Greek Panzanella
For the salad:
olive oil
1/2 loaf French bread, cut into 1-inch cubes (4-6 cups)
Kosher salt
1 cucumber, peeled, seeded, and sliced 1/4-inch thick
2 red bell peppers, large diced (you could also use yellow or orange or a combination for more color contrast)
4-6 roma tomatoes, diced
1 head romaine lettuce, chopped
1/2 red onion, sliced in half rounds
1/2 pound feta cheese, cut in 1/2-inch cubes
1/2 cup Kalamata olives, pitted

For the vinaigrette:
2 cloves garlic, minced
1 teaspoon dried oregano
1/2 teaspoon Dijon mustard
1/4 cup good red wine vinegar
1 teaspoon salt
1/2 teaspoon freshly ground black pepper
1/2 cup good olive oil

Heat 3 tablespoons olive oil in a large saute pan. Add the bread cubes and sprinkle with salt; cook over low to medium heat, tossing frequently, for 5 to 10 minutes, until nicely browned. Add more olive oil as needed.

Place the cucumber, peppers, tomatoes, lettuce and red onion in a large bowl.

For the vinaigrette: Whisk together the garlic, oregano, mustard, vinegar, 1 teaspoon salt and the pepper in a small bowl. While still whisking, add the olive oil and make an emulsion.

Pour the vinaigrette over the vegetables. Add the feta, olives and bread cubes and mix together lightly. Set aside for 30 minutes for the flavors to blend. Serve at room temperature.

SOURCE: Adapted from Ezra Pound Cake

Linked to...
Recipe Swap Thursday @ Prarie Story
This Weeks Cravings @ Mom's Crazy Cooking

Wednesday, August 18, 2010

Oatmeal Cookie Granola and Winner!!!


Somehow I deleted the picture I was going to use for this post and was left with this one. That just makes me crazy. Hope this one's good enough.

I've been hoarding granola recipes lately. We've gone through just about all of our cold cereal that we had in our food storage and I'm almost ready to not buy any more (except maybe Cheerios). I've made three different granola recipes lately and my girls just devour it. I'm thinking this is much better to put on the table than cold cereal any day, especially when I know what's going into it and can control the sugar.

I got this from my friend Tori and this is the only granola recipe so far I've made twice. It's pretty easy and very tasty. I halved the sugar & honey the original recipe called for. My family and I still liked it, so I see no reason in adding any more than that, especially if you are eating it with yogurt or a little milk, which are sweet anyway. The recipe below reflects those changes I have made.

8 cups oats
1/2-1 cup flaked coconut
1/2 cup ground flax seed (brown or golden)*
1/2 cup sucanat (you can substitute brown sugar)**
1/2 tsp nutmeg
1/2 tsp salt
1 tsp cinnamon
1/2 cup coconut oil (you can substitute butter)
1/3 cup honey
1 tsp vanilla

Preheat oven to 300°F. Combine oats, coconut, flax, sucanat/sugar, salt, nutmeg, and cinnamon in a large bowl. Melt coconut oil/butter, honey and vanilla in a saucepan over medium heat. Mix well once all is melted and pour over the dry ingredients. Mix thoroughly and coat well. Place on two large, greased cookie sheets and bake for 20 min or so, stirring once.

Let it cool. Add raisins or other dried fruit, if desired. Keep in an airtight container.


*There are 2 types of flax seed: brown and golden. When I was at Good Earth I asked what the difference in the two were. The employee told me that brown flax is higher in nutrition than the golden but the golden has a better taste. I also found out from another source that to access most of the nutrition of the flax that you have to eat it ground. Ground flax seed will only last about a week before going rancid, even in the fridge, so only mill as much as you will need in the short term. I tried grinding my flax seed in a small hand-held blender and it didn't do a thing to it. You will most-likely need a spice or coffee grinder to grind it up. I just threw my flax seed in whole in this recipe 'cause that's what I had.

**Sucanat is non-refined cane sugar.


....I used random.org and the winner of the apron is #7 Stephanie. Congrats! I have emailed you to let you know. Thanks to all for participating. It was really fun to see your answers. Please keep the comments coming, it gives me a feeler for what you like to see here on my blog.

Sunday, August 15, 2010

Just Because

I know my blog is very small and inconsequential to the rest of the blogging world. I don't have sponsors and advertisements either, so I don't make any money off of it, but I love it. I love to share food with people, whether it be bringing a meal to a new mother, teaching a friend how to make something, or just sharing recipes that I love. Thanks for sharing my blog with me!

To show my thanks, I made this cute little half apron to giveaway.


I'm not going to get technical, I just want to keep it simple, so there will only be ONE entry possible per person. First, make sure you're a follower of this blog. Then, in the comments section answer these two questions:

1-How did you find my blog?
2-What is your favorite recipe here to date? (one you've tried or one you want to try)

Make sure you include a valid email I can reach you at in your comment. You have until Wednesday @ 5pm (MST), August 18, to enter. I will then choose and announce the winner.

Good Luck!

Saturday, August 14, 2010

1st Giveaway!

So, I’m thinking about doing a giveaway since I’ve reached 50 followers (and beyond)! What do you think? Details to come.

Friday, August 13, 2010

Crispy Parmesan Ranch Chicken Tenders


Chicken tenders are becoming a favorite around here with my kids. Lately I've been making these pecan-crusted chicken tenders with honey mustard sauce that everyone really loves, but these sounded good when I saw them and wanted to see if they would be as well-received. I mean, who doesn't like ranch? My girls are crazy about parmesan cheese too--I know, wierd.

These were very easy to throw together. While they were cooking, I steamed some broccoli and hardly had any clean-up. My kind of meal. The verdict: delicious and very moist. My husband even said they were so good they didn't even need a dipping sauce. I'd say I'll be making these again.

1 1/2 pounds chicken tenders
2 cups lowfat buttermilk
1 packet ranch seasoning mix
2 cups fresh bread crumbs*
1/4 cup whole wheat flour
1/2 cup parmesan cheese

Combine buttermilk and 1/2 packet of ranch mix in a baking dish. Add chicken tenders to buttermilk. Marinate for 2 hours or overnight.

Preheat oven to 400°F. Line a baking sheet with a silpat or spray with cooking spray.

Combine bread crumbs, parmesan, remaining ranch seasoning and flour in a large bowl. Coat chicken pieces in crumb mixture, then lay on prepared baking sheet. Continue with remaining chicken pieces. Spray each piece with cooking spray or olive oil.

Bake for 10 minutes, flip, coat with cooking spray, and bake for another 10-15 minutes.

*For fresh bread crumbs, I just toasted up about 3 slices of wheat bread then put them in a small food processor to process them until crumbly.

Wednesday, August 11, 2010

Spinach and Basil Pesto Pasta


This is a very easy dish, great for summer! The pesto is a cinch to throw together and if you grow your own basil, very economical. Most pestos call for pine nuts, but you can easily substitute walnuts if you can't find them or if they are too expensive. Pesto lasts a long time in the fridge and it can even be kept in the freezer for a long time as well, so if you have extra ingredients, make more and store for later.

Spinach-Basil Pesto
1 cup spinach, rinsed
1 cup fresh basil leaves
1/4 cup pine nuts
2-3 cloves garlic
3/4 cup parmesan cheese
1/2-3/4 cup olive oil

Place all ingredients in a food processor and blend until smooth. Toss with about 1/2 lb. cooked pasta and top with additional parmesan cheese, if desired.

Tuesday, August 10, 2010

Chocolate Coconut Ice Cream


This could possibly be the best homemade ice cream. EVER. And it has nothing to do with the fact that it's chocolate. And coconut. Ok, well maybe it has a little to do with the fact that it's chocolate. I got this recipe from my friend Carolyn and I could not wait to try it. I had some peach ice cream I was hurrying to try and finish so there would be room in my freezer for this.

Most, if not all, of the ice cream I have made in the past has used a custard base. I'm finding that I'm not such a fan. Maybe I'm doing it wrong. This does not use a custard base, no heating, no eggs, and there was a world of difference. It came out so incredibly creamy and so chocolaty! You should really make this. Even if you don't think you like coconut, using the coconut adds to the creaminess and it has a very subtle flavor.

Please, go make room in your freezer for this!

1 cup unsweetened cocoa powder
2/3 cup granulated sugar
1/2 cup brown sugar
1 cup whole milk
1 cup coconut milk
3 cups heavy cream
1/2-1 cup flaked coconut

Stir together the cocoa powder and sugars. Add the milk and whisk until the cocoa and sugars dissolve, about 1 to 2 minutes. Add the heavy cream, coconut milk and flaked coconut and whisk until incorporated. If not freezing immediately, cover and refrigerate until ready to use.

Pour into ice cream maker and mix until the ice cream has a soft creamy texture. Top with additional coconut flakes and chopped almonds, if desired.

SOURCE: Adapted from Many Phat Sisters

Sunday, August 8, 2010

(non) Cooking Class:How to make a green smoothie


I've been drinking green smoothies for a while now. It's been part of my effort to get more whole and raw foods in my diet and a great way to achieve fantastic health and energy. I try to drink between 2-4 cups a day.

My smoothies have evolved over the months as I have experimented with different greens and fruits, even the way I make them has changed. My husband used to complain that my smoothies were way too thick and he'd always have to add a lot of water to his when I'd share. Now, I think I've found a good method that makes a great smoothie that tastes good and is easy to get down. I know that there are many ways to do it, but I thought I would share what works for me.

What you'll need:
a blender (preferable high power)
1 banana
1-2 cups frozen fruit (mixed berries are the best)
any other fruit to taste
filtered water
*greens (see below)

First, gather all your ingredients. I have a small 1 quart blender which is the perfect size for what I drink.

Fill the blender with 1 cup water then fill it up to the top (or quart line) with spinach. I pack my spinach a little to get more in, but not too much. It's usually about 2 very large handfuls.


Blend the greens and water until all the greens are chopped up. It should reach about to the 2 cup line at this point.


Add your banana and frozen fruit. I think my blender is in the middle between a regular and high powered blender so I microwave my (frozen) fruit for about 20-30 seconds so I don't burn out the motor. I would suggest doing that if you don't have one. In this smoothie I put in a small handful of blueberries a banana, blackberries and mango. Power it up and blend until smooth. Add any other fruit you want to taste and do a final blend for about 60 seconds. Add more water if it's too thick.


You should have between 3-4 cups when it's all done.


Pour into a mason jar or a cup with a lid. Keep the lid on when you are not drinking to prevent oxidation. The smoothie will keep about 48 hours, just shake it up before you drinking.


NOTE: When using other greens in addition to spinach I have found that over time the smoothie gets a little sludgy. If you don't drink it all right away and it's too thick next time you go to drink it, just add a little water and shake it up.

Here are some of my favorite smoothies:
*spinach, banana, strawberries, whole orange (peeled)
*spinach, banana, blueberries, peaches
*spinach, banana, strawberries, pineapple

*Here's a tip: I try to buy fruit when it is in season and on sale. When I find a killer deal, I stock up and freeze it for smoothies later on. Plan ahead and you'll always have what you need to make your smoothie.


*(If you're a beginner, you will only want to use spinach as it is very mild. If you're a long-timer, try experimenting by adding chard, collards, beet greens and kale. My favorite to add is kale, it's kind of peppery and wonderful for your digestion. I've also used chard, which is kind of earthy and beet greens which aren't too bad. When adding other greens use both the leaf and stem and add only 1-2 at a time and taste before you add more.)

Friday, August 6, 2010

Brown Sugar Bourbon Pork Tenderloin


I have been making my Sweet & Spicy Shredded Pork for quite a while and I can't tell you how much I love it. I have made it lots for just our family and several times for pretty large gatherings. I never thought that I would find something to top that. I haven't decided if this pork tops it yet, but it certainly is it's equal. It was so delicious and super easy to make since I just threw it in the crock pot. This recipe uses a spice mix, which I don't usually do,but I love McCormick's Grill Mates marinades, especially the chipotle one, and this one is fairly new, I think. It sounded too good to pass up.

1 2-lb. pork tenderloin (or other pork roast)
1 packet (1-oz) McCormick Brown Sugar Bourbon Marinade
Juice of 1 orange
1/4 cup oil
2-4 Tbsp. water

Trim all the fat off of the pork and cut it into large chunks. Put the pork into a crockpot. Mix the rest of the ingredients and pour over the pork. Stir it around a little bit so that the pieces get coated with the marinade. Put the lid on and cook on high for about 2-3 hours, or until it falls apart.

After it's done cooking, shred it, either in the crock pot or on a plate. Turn the crock pot on low and let it cook another 30-60 minutes.

Serve it as you would any other pulled pork. We love to eat our with fresh tortillas with black beans and rice or like a salad with lettuce, beans and rice.

Linked to...
Potluck Sunday @ Mommy's Kitchen
Recipe Swap Thursday @ Prairie Story
This Week's Cravings @ Mom's Crazy Cooking

Sunday, August 1, 2010

August Monthly Menu

Oops! I mean to get this up a couple of days ago but then we went on a little overnight up the canyon and I forgot. I don't know why, but planning August's menu took me a little bit longer than usual. If I'm really efficient, I can whip up a menu in a day or 2 (that's with normal interruptions from every day life with kids), but this time it took me twice that.

Since the local produce stands are going to be booming here pretty soon, I wanted to take advantage of all the fresh fruits and vegetables I'm sure I will be hoarding. I tried to find recipes with a lot of fresh ingredients, or ones that would also help me clean some things out of the freezer. I'm expecting my menu may change near the end of the month, depending on my farmer's market finds, but I have some swap-outs that I've also tentatively planned just in case.

If you're new here, I have linked the recipes that I have made before and posted. The other recipes I will post throughout the month as I make them. If you see something that catches your eye, don't forget to stop back and check out the recipe later on.

Dinners:
Brown Sugar Bourbon Pork with Tomatillo Brown Rice and steamed broccoli
Zucchini Parmesan with Pesto Pasta
Tacos & fresh salsa
Parmesan Ranch Crispy Fingers & Fresh Mozzarella & Tomato Salad w/ Marinated Raisins

Greek Panzanella and corn on the cob
Penne Pasta w/ Smoked Ham and Pepper Cream Sauce & veggie
Hamburgers w/ steak fries and Spinach salad
Pineapple Chicken Fajitas and fresh fruit

Asian Slaw with Roasted Peanuts and Crispy Honey-Ginger Chicken
Pizza Rolls and fresh fruit
Quesadillas, Stuffed Poblanos and fresh salsa
Quick Chicken Jambalaya & Salad

Chicken Parm Meatball Subs w/ steamed green beans
Shrimp and Penne Pasta w/ steamed broccoli
Zucchini basil lasagna
White corn soup w/ Poblano cream sauce and quesadillas


Other things I'll be making:
Whole Wheat Cinnamon Roll Pancakes
Peanut Butter Oatmeal Muffins
Browned Butter Blueberry Muffins
Whole Wheat Blueberry Banana Muffins
Oatmeal Cookie Granola
David Lebovitz's Top Granola
Peanut Butter Granola
Homemade Burger Buns
Nectarine and Gingersnap Tart
Chocolate Coconut Ice Cream

Asian Slaw with Roasted Peanuts


I've always enjoyed eating salads but hardly ever took the time to make them at home. However, since embarking on a whole and raw foods quest, I find myself making them quite often and eating them as a main dish, rather than the side dish.

This salad is absolutely delicious. I didn't think I was a slaw person, I never really liked coleslaw, but I've had raw cabbage and brussel sprouts lately and have really enjoyed them. When I saw this salad on Ezra Pound Cake, I was immediately drawn because of the vibrant colors of the purple and green. I just knew it had to be delicious even before tasting it. This salad did not disappoint! Both my husband and I really liked it and will most-likely be having it again in the near future.

Update 4/26/12:Ever since stumbling upon this recipe, it has been my most favorite salad ever and my go-to in a pinch or to take to a family dinner. Even if you don't think you like cabbage you might just be surprised, so try it! I have also started using a different dressing than the original one I posted. Although the original is good, this Ginger Lime Dressing is absolutely amazing and pairs perfectly with this salad. It's sure to be your new favorite too.

For the salad:
1/4 green cabbage, shredded
1/4 red cabbage, shredded
2 large handfuls baby spinach, chopped
1/2 bunch cilantro, chopped
1 bell pepper, julienned
1 cup frozen peas (thawed, not cooked)
1 carrot, shredded
2-3 green onions, sliced
Fresh ground black pepper
1/4 cup unsalted roasted peanuts, chopped

For the dressing:
1/4 cup vegetable or peanut oil
3 tablespoons rice wine vinegar (or white wine vinegar)
Juice of 1 lime
2 tablespoons sesame oil
1 tablespoon fresh ginger, finely grated
1-2 tablespoons brown sugar
1/2 tablespoon soy sauce

In a large salad bowl, toss together cabbage, spinach, cilantro, pepper, peas, carrots and onions. In a smaller bowl, whisk together dressing ingredients. Pour over salad and toss to coat. Add roasted peanuts and black pepper. Serve immediately. (If you plan on having this for more than one meal, you may want to have the dressing on the side so that it doesn't wilt the salad.

SOURCE:Adapted from Ezra Pound Cake

This recipe linked to Potluck Sunday at Mommy's Kitchen.

Saturday, July 31, 2010

Cherry Coconut Muffins


The other day I stumbled across a couple of blogs and, for some reason, all of these muffin recipes just kept calling out my name. I saw so many I wanted to try that I had to bookmark them for later.

I thought of my friend Carolyn when I decided on these muffins because we share an affinity towards all things coconut. Also, learning lately about how healthy and healing coconut is made me want to make them even more.

I think these muffins turned out great! They stayed moist and were very flavorful. I made them a little smaller so they would be easy to grab as a snack or have a couple for breakfast.

2 cups whole wheat flour
2 tsp. baking powder
1/4 teaspoon Salt
1 heaping cup cherries, pitted, coarsely chopped
1/3 cup coconut oil, softened (or butter)
1/2 cup sugar
2 eggs
1 teaspoon almond extract
2/3 cup milk; half coconut milk, half cow's milk (or whatever combination you want)
1/2 cup sour cream (yogurt works well here too)
1/2 cup shredded coconut, plus more for topping

Preheat oven to 400 degrees. Grease or paper line about 1 1/2 muffin tins.

In a small bowl combine flour, baking powder and salt. In a large bowl beat coconut oil and sugar until light and fluffy (2-3 mins). Add eggs and almond extract and mix to incorporate. Alternately mix in by hand the flour mixture and the milk. Fold in sour cream, cherries and shredded coconut.

Spoon batter into muffin caps 1/2 to 2/3 full. Sprinkle coconut over tops. Bake 18-22 minutes or until a toothpick comes out clean. Let cool in pan for 5 minutes and remove to wire racks.


Linked to...
This Week's Cravings @ Mom's Crazy Cooking

Monday, July 26, 2010

Mango Chicken Salad


I've been dying to post this salad for you all. I've made it a couple times now and just love it. The mangoes this summer have been amazing and I've found some pretty great deals so I've stockpiled a little bit. I've used some for fresh eating and in this salad and the rest I've just cut up and frozen for my green smoothies.

I love the different flavors of this salad that all seem to work so well together and compliment each other. I especially love the dressing, it's like the icing on the cake!

For the salad:
1 head romaine or leaf lettuce, shredded
3 tomatoes, diced
2 mangoes, diced
2-3 chicken breasts, grilled and diced (I seasoned my chicken with Johnny's Garlic Butter seasoning)
Feta cheese, crumbled
sesame seeds

For the dressing:
1/4 cup Dijon mustard
2 Tbsp lime juice
1/2 cup olive oil
1/4 cup sugar
1/4 cup soy sauce
1/2 cup white vinegar
1 clove garlic, minced
1-2 tsp. freshly grated ginger

In a small bowl, whisk together dressing ingredients until combined.

For the salad, mix together the lettuce, tomatoes, mango and chicken. Serve on salad plates and top with crumbled Feta cheese and sesame seeds. Drizzle with dressing.


SOURCE:Adapted from Jamie Cooks It Up!

Thursday, July 22, 2010

S'mores Bars


It seems like all I've been making lately is sweets. But, with summer come the outdoor parties and potlucks and we've had our fair share the past month or so. I don't complain because I love to be in the kitchen making anything delicious. These s'mores bars are a perfect summer treat because they are reminiscent of camping even when we can't go. I'm usually a dark chocolate kind of girl, except when it comes to Hershey's milk chocolate on a s'more. There's almost nothing better!


1 stick of butter, softened
1/4 cup brown sugar
1/2 cup sugar
6 regular-sized Hershey's milk chocolate bars
1 large egg
1 7-oz jar marshmallow creme
1 tsp vanilla extract
1 1/3 cups all purpose flour
1 package graham crackers, processed to a fine crumb(I think there's 9 full sheets in a package) or about 1 cup graham cracker crumbs
1 tsp baking powder
1/4 tsp salt

Preheat the oven to 350 degrees. Grease a medium-sized baking pan (8 or 9-inch square or 8 x 11.5-inch). Using an electric mixer, cream together butter and sugar until light and fluffy. Beat in egg and vanilla. Set aside. Meanwhile,whisk together flour, graham cracker crumbs, baking powder and salt. Slowly add flour mixture to the creamed butter mixture until combined. Divide dough in half and press half of dough into an even layer on the bottom of the prepared pan.

Place chocolate bars over dough, breaking it as needed to fit. Microwave the marshmallow creme for about 10 seconds and it should easily come out of the jar. Spread it over the chocolate bars. Crumble the remaining dough over the top of the marshmallow creme and press down slightly, to flatten, with your hand. Bake for 30 to 35 minutes, until lightly browned. Be sure to cool completely before cutting into bars. Makes 16 squares.

SOURCE:Adapted from Real Mom Kitchen
Related Posts Plugin for WordPress, Blogger...