Monday, June 25, 2012

Chunky Monkey Pancakes


These pancakes are the bomb! And I can say that because we make and eat pancakes around here like they are going out of style. So we've been around the block when it comes to pancakes.

Bananas, chocolate chips and peanut butter is my absolute favorite combination in a pancake....EVER! I will typically add a banana to this pancake mix but adding chocolate chips and peanut butter syrup is an extra special treat that we don't do that often.

Whether you are a morning person or not, whip these up the next time you have an extra minute or two when you wake up (a lot to ask, I know...cause who the heck would get up earlier than they have to???).

Chunky Monkey Pancakes
1 egg
2 Tbsp. oil
1 cup buttermilk
1 large banana, mashed
1 cup flour
1 tsp. baking powder
1/2 tsp. baking soda
1/2 tsp. salt
1 Tbsp. sugar

In a medium sized mixing bowl, combine egg, oil and buttermilk. Whisk to combine. Add mashed banana and whisk again. Add dry ingredients and whisk until just incorporated, making sure not to over-stir. Let batter sit while griddle heats up.

Pour batter by 1/4 cup onto preheated griddle. Cook pancakes until they start to bubble and the sides start looking dry. Flip and cook another minute or two. Serve warm with peanut butter syrup.

Peanut Butter Syrup
1 Tbsp. peanut butter
1/4 cup maple syrup

Put peanut butter and syrup in a small bowl. Warm 10-20 seconds in the microwave. Whisk together until smooth and creamy. Multiply syrup as needed.

Tuesday, June 19, 2012

Summer Berry Sweet Pizza


I think WinCo is my absolute favorite place to grocery shop!
1-because I can always find fresh basil there,
2-because their bulk section is a granola-maker's heaven,
3-chocolate covered cinnamon bears (need I say more???)
4-they have awesome deals on produce.

A couple of weeks ago they had amazing deals on their blueberries and strawberries and I found myself going back for more and more!!! I bought them mainly to support my green smoothie habit, so I froze most of them, but I couldn't help using some of them fresh; like on this pizza.

Pizza night is pretty much a weekly occurrence around here and we've finally upgraded to 2 pizzas instead of 1 for our little family. I usually make my girls a cheese pizza, per their request, and make something a little more fancy shmancy for my hubby and I. This time, I decided to divide the dough for the second pizza into 3 and make 2 individual pizzas plus a dessert pizza. Let me tell you , BEST DAY EVER!

This is the perfect summer pizza. Right now all the berries are in season, so they not only taste yummy but don't cost ya an arm and a leg to buy them either. And, how can you go wrong with chocolate and more chocolate?

This recipe is equivalent to one large pizza, divided into three smaller pizzas. I would only make as much dessert pizza as you will eat, as it does not keep well. Divide the topping ingredients accordingly for each pizza you make.

Summer Berry Sweet Pizza
1 recipe Perfect Pizza Crust (add additional 2 Tbsp. sugar with dry ingredients)
9 Tbsp. nutella
2-2 1/2 cups mixed fresh berries, cut into smaller pieces if necessary (blackberries, blueberries, strawberries, raspberries, etc.)
1 cup white chocolate chips
2 Tbsp. melted butter, for brushing the edges
3 Tbsp. turbinado sugar, for sprinkling the edges

Make pizza dough according to directions, making sure to add 2 tablespoons sugar when mixing. Allow dough to rise once. While dough is rising, preheat oven and pizza stone to 450 degrees F.

After the dough has risen, punch down and divide into 3 smaller dough balls. Let it rest for about 5 minutes. I highly recommend using parchment paper for this pizza because it may be too heavy to slide off onto the stone (or inverted baking sheet). Roll one dough ball out on a piece of parchment. Brush edges with melted butter. Spread with 3 tablespoons of the nutella, then evenly distribute 1/3 of the berries, topping with 1/3 of the white chocolate chips. Sprinkle about 1 tablespoon of turbinado sugar around the edge of the pizza. Open oven quickly and slide parchment onto baking stone. Bake 8-10 minutes.

Repeat with remaining dough and ingredients. Feel free to bake more than one pizza at a time, if you have sufficient room.

SOURCE: Adapted form Donal Skehan

Friday, June 8, 2012

Apricot-Strawberry Smoothie

At our previous house we had apricot trees and I canned and froze those apricots until I had no room left! I'm a little ashamed to say that I still have some left in the far dark corners of my freezer and pantry. I made it my goal to finish them up in the next few months. It has led me on an apricot-smoothie-making journey. As I went down my list of combinations, I crossed them off as I went, knowing that I was not going to make THAT one again-blech! However, I when I threw this combination together, I knew it was a keeper...FINALLY! I've made this over and over the past month or so and we've all loved it.

Apricots are just about in season and strawberries are already here, so it's the perfect time to make this refreshing smoothie. Treat yourself, and your health.

Apricot-Strawberry Smoothie
1 cup apricots, pitted and halved
1 cup strawberries, hulled
1 banana
2 big handfuls spinach, rinsed
1 cup fresh orange juice
handful of ice
water as needed

Put all ingredients in blender, adding juice first, and blend well. Add water as needed for desired consistency. Pour into jar or container with tight fitting lid. Will last up to 48 hours, just shake well before drinking.

Wednesday, June 6, 2012

Homemade Honey Roasted Peanut Butter


Make my own peanut butter???? I think I can die a happy woman now! Next to chocolate, peanut butter is probably my second favorite food. Ever! I could eat it every day. I used to when I was a kid going to school and I still do more often than not.

With a bunch of kids running around here peanut butter is pretty much a staple in our house. We could not live without it. Although I'm usually not a food label snob, when it comes to peanut butter, I subscribe to the school of thought that "choosy mom's choose JIF." I have very rarely bought another brand. I'm oh so loyal.

So, why make homemade peanut butter if I love JIF so much? I have this thing for making everything from scratch that I possible can. Over the past few years we have been trying to get away from processed foods as much as we can. It is much healthier, gives the consumer more control over what goes in the food and it's down right satisfying knowing that you can provide for your family like that.

I've made peanut butter once or twice before and haven't been overly thrilled with the results, so I stuck with the brand name stuff. But, I was pumped about it again when I read about making honey roasted peanut butter, which I have tried before and practically fell flat on my face it was so good. I think I'm ready now to replace that jar of JIF in my cupboard for good with the homemade stuff...and that's saying a lot!

This is a super simple recipe and you don't even need a high-powered blender to make it. You can use a regular blender or a food processor with a chopper blade as well.

Homemade Honey Roasted Peanut Butter
1 lb. raw peanuts* (a scant 3 cups)
1-2 Tbsp. honey
1/2 tsp. salt
2-3 Tbsp. coconut oil

Preheat oven to 350 degrees F.

In a medium bowl, combine peanuts, honey and salt. Spread out on a cookie sheet and bake for about 15-20 minutes, stirring half-way through. Remove from oven and cool slightly.


Place peanuts in a blender or food processor with a chopping blade and blend for about a minute. Scrape sides down and blend for another minute or so.


Scrape sides again and add coconut oil, 1 tablespoon at at time and blend until desired consistency is reached. Check flavor and adjust honey and salt as necessary.


Store in an airtight container for about 2 months in the fridge.

*According to Alton Brown, Spanish peanuts are good for making peanut butter because they have a higher oil content, so that is what I've used. You can choose to leave the skins on or off. I've left them on.

SOURCE: A Sweet Pea Chef

Monday, June 4, 2012

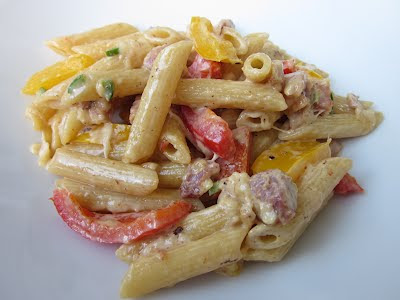
Penne Pasta with Smoked Ham and Pepper Cream Sauce

I thought I would pull this out of the archives and give it a face lift. This is one of our family's most beloved pasta dishes and we have been eating it for I don't know how many years. If I'm remembering correctly, this recipe came from a pasta book my mom gave my older brother in college YEARS ago and all three of our families continue to make, eat and LOVE it.

Spring is the perfect time of year to pull out this pasta. Ham is usually on sale often and sweet bell peppers are in season. It's also quick and easy and although it does have cream it's not a heavy dish, but definitely satisfying!

Penne Pasta with Smoked Ham and Pepper Cream Sauce
1 1/2 cups ham, cubed
1 Tbsp. olive oil
1 red bell pepper, seeded and chopped
1 yellow bell pepper, seeded and chopped
1-2 fresh jalapeno or ancho chili peppers, seeded and finely minced
salt and pepper to taste
1/4 cup white cooking wine
2 cups chicken broth
1 1/2 cups heavy cream
1 lb. Penne pasta
1/2 cup parmesan cheese, grated

In a large frying pan over medium heat, saute the ham until slightly golden.  Remove ham and add red and yellow peppers and spicy peppers.  Saute until crisp tender; 3-4 minutes. Remove peppers from pan and deglaze with the wine.

Add chicken broth and reduce to 1/3 cup over high heat.  Add heavy cream and reduce over high heat about another 5 minutes, or until desired consistency. (Keep a careful watch so it doesn't boil over.) Taste and season with salt and pepper.  Add the ham and peppers back in and reheat.

Meanwhile heat a large stock pot full of water to a boil.  Add pasta and cook to al dente, according to package directions.  Drain.

Place hot pasta into a large serving bowl and pour sauce over it.  Toss well.  Sprinkle with parmesan cheese.  Let sit about 5 minutes to allow sauce to thicken up a bit.  Sauce will continue to thicken as it cools.


Friday, June 1, 2012

S'mores Brownies (Take Two)

Man, we haven't even hit the first day of summer and I'm already craving s'mores. S'mores are one of my most favorite summer treats and I love eating them all summer long. I love that you can throw them in the microwave if you want to do it quick, put them over the grill when you don't have a camp fire around or even use a kitchen torch (which I have done more often than I care to admit!).

Last summer I made s'mores all sorts of ways to curb that craving: s'mores pancakes, s'mores cake in a jar, s'mores pops, and s'mores ice cream. Even before that I made these delectable s'mores bars, as well as s'mores cookies and a different s'mores brownie. Oh, and the s'mores addiction doesn't end there. Thanks to pinterest, I have yet to try the s'mores truffles, turnovers, rice crispie treats, pudding, cupcakes... and oh my gosh, does it ever end? I don't think I'll ever get tired of those things.

The other day I was going to make s'mores with my girls and it ended up not happening, but I still wanted them! I opened my pantry to find a box of brownies, some mini marshmallows, some milk chocolate chips and graham crackers and the wheels in my head started turning. Luckily, thanks to google, I didn't have to reinvent the wheel and found a recipe rather quickly that embodied what I had envisioned.

These brownies were exactly what I had in mind and they were absolutely perfect. I love the crumbly buttery graham cracker crust on the bottom, and the milk chocolate on top of the brownies. When it comes to me and chocolate, it's usually the darker the better. But, when it comes to s'mores, you HAVE to use milk chocolate to get the right taste. You just have to ok?


S'mores Brownies
For the crust:
7 Tablespoons unsalted butter, melted
1 1/2 cups graham cracker crumbs (8 or 9 whole graham crackers)
2 Tbsp. granulated sugar
pinch of salt

For the brownies:
Your favorite recipe or box mix to fit an 8x8 or 9x9-inch pan

For the topping:
1 cup milk chocolate chips
2 cups mini marshmallows
about 1/4 cup of graham cracker crumbs (1 whole cracker, crumbled)


Preheat oven to 350 degrees F. Line 8x8-inch pan with foil so it hangs over the edges a bit. Spray with nonstick spray.

Prepare crust: In a medium bowl, mix butter with crumbs, sugar and salt. Press crumb mixture into the bottom of the pan. Bake until golden; about 10 minutes.

Prepare and bake brownies according to directions.

Remove pan from oven. Turn up heat on the oven to broil. Sprinkle the chocolate chips over the brownie, then top with the marshmallows. Sprinkle graham cracker crumbs on top.

Place pan back into the oven. Toast under the broiler until golden- KEEP AN EYE ON IT- it can go from golden to burned in a matter of seconds. 1 to 2 minutes under the broiler should be plenty.

Cool for a few minutes, then use foil to remove brownies from the pan and set on a cutting board. Carefully pull the sides of the foil away from the marshmallows and brownies. Cut brownies into squares. Helpful tip: Use a large, WET & SHARP KNIFE to cut the brownies. Slice through the brownie, then clean the knife and slice through again with a clean, wet knife. Keep cleaning off the knife after each cut for the cleanest cuts.


SOURCE: Slightly adapted from RecipeGirl
Related Posts Plugin for WordPress, Blogger...