Friday, October 19, 2012

Caramel Apple Cheesecake Bars

'Tis the season to make anything apple. I'm always looking for a reason to make a yummy dessert and Sunday night family dinner is no better time. In the fall I crave anything with apple, from pancakes, to oatmeal.

This is a simple dessert with a taste that will blow the socks off of anyone! It may seem like a lot of steps but it really comes together quickly. I used the leftover caramel sauce from these pancakes but feel free to use store bought if you prefer.

Caramel Apple Cheesecake Bars
For the crust:
2 cups all-purpose flour
1/2 cup firmly packed brown sugar
1 cup (2 sticks) butter, softened

For the cheesecake filling:
3 (8-ounce) packages cream cheese, softened
3/4 cup sugar
3 large eggs
1 1/2 tsp. vanilla extract

For the apple topping:
3 Granny Smith apples, peeled, cored and finely chopped 
2 Tbsp. sugar
1 tsp. cinnamon
1/2 tsp. nutmeg 
 
For the streusel topping:
1 cup firmly packed brown sugar
1 cup all-purpose flour 
1 tsp. cinnamon 
1/2 tsp. nutmeg
1/2 cup quick cooking oats
1/2 cup (1 stick) butter, softened

1/2 cup caramel sauce

Preheat oven to 350 degrees F. 
 
In a medium bowl, combine flour and brown sugar. Cut in butter with a pastry blender (or 2 knives) until mixture is crumbly. Press evenly into a 9x13 baking pan sprayed with cooking spray.  Bake 15 minutes or until lightly browned. 
 
In a large bowl, beat cream cheese and sugar in an electric mixer at medium speed until smooth. Then add eggs, 1 at a time, and vanilla. Beat to combine. Pour over warm crust. 
 
In a small bowl, stir together chopped apples, sugar, cinnamon, and nutmeg. Spoon evenly over cream cheese mixture.

For the streusel topping,  combine all ingredients in a small mixing bowl. Cut butter until mixture is crumbly and resembles a coarse meal.

Sprinkle streusel topping over apples. Bake 40-45 minutes, or until filling is set. Filling should look a little wiggly in the center but firm everywhere else.  Cheesecake will finish setting once cooled.
 
Once cooled but still warm, cut into squares, drizzle with caramel sauce and whipped topping, if desired.

SOURCE: Adapted from The Girl Who Ate Everything

Tuesday, October 16, 2012

Crispy Quinoa Sliders


At first glance atf these, I knew I wanted to make them, but was a little apprehensive.  I wasn't sure how my all-of-a-sudden picky eater oldest daughter would handle these and it didn't seem like they would be flavorful enough. 

With my oldest daughter I thought I would pull THIS trick and just serve it to her like it was a regular hamburger and not let her on about it.  Hmm, that didn't work so much.  She looked at it, then looked at me and asked why it was that color.  Needless to say, daughter #1 didn't eat it. Daughter #2 needed a little coaxing and distraction, plus some ketchup dipping action, and she ate hers right up.  Daughter #3 eats just about anything, so we're good there.

Hubby and I actually really loved these.  As it turns out they really are flavorful!  Never underestimate the power of simple ingredients.  It is really key in this recipe to get the patties nice and golden.  It not only helps them stick together, it really adds to the flavor.  I love that these patties are so healthful.  Lots of protein from the beans and quinoa and some good, healthy (and tasty) fats from the olive oil and avocado. I opted for just the avocado rather than the mayo to top my patties, in keeping with the whole foods idea, but top yours however you desire and enjoy!!


Crispy Quinoa Sliders
2 cups quinoa, cooked in chicken or vegetable stock
1 cup cooked white beans
1/2 cup carrots, diced
1/2 small onion, finely diced
2 garlic cloves, minced
2 eggs
1/2 cup freshly grated Parmesan cheese
1/4 cup panko bread crumbs
1/2 teaspoon salt
1/4 teaspoon pepper
2 Tbsp. olive oil
12 whole wheat slider buns or dinner rolls
2 avocados, mashed
1/2-1 tsp. chipotle powder

Cook quinoa in chicken or vegetable stock, according to package directions.

Mash avocado and add chipotle powder according to your likeness.  Set aside. 


Drizzle about 1 tablespoon of olive oil in a skillet and saute onions and carrots over medium high heat until soft and onions are translucent.  Add garlic the last 30 seconds of  cooking.  Mash beans and add them to the onion mixture.  Place mixture into a large bowl, along with the cooked quinoa and allow to cool slightly.

Once mixture is cool, add eggs, cheese, bread crumbs, salt and pepper and olive oil. Either using hands or a wooden spoon, stir together until all ingredients are well-incorporated.
 
Heat a large skillet over medium-high heat and add a couple drizzles of olive oil. Once good and hot, make the patties.  I found it easiest to use a large scoop, like a muffin scoop, to make the patties and just just scoop it out right into the pan, flattening it out a little bit with the tips of your fingers.  Add 5-6 quinoa patties, or however many fit in your pan, and cook until DEEPLY golden brown and crispy, about 5 minutes. If you cook it any less, patties will be too tender and will begin to crumble. Gently flip and cook 5 minutes more. Remove and continue with remaining olive oil and patties.

Serve warm on slider or dinner rolls topped with mashed avocado.  (Feel free to embellish here.  You can add mayo if you like, or my daughter even liked them dipped in ketchup!)

Monday, October 15, 2012

Menu Plan Monday-October 2012 (Week 3)

Well, my friends, as luck would have it, we had a flood in our house mid way through the week last week and had to leave until today. Lucky for us we have family close by we were able to stay with.  But, not so lucky for my menu because I didn't get very far down the list before we had to leave.  I did, however make the quinoa sliders from last week's menu which were absolutely delicious, so keep your eyes open tomorrow for that post.

Since I already have the groceries from last week's menu, I'm keeping those meals the same.  I've thrown in a few others to fill the rest of the week.


 October Menu (Week 3)
Monday
Tortilla Soup with Southwest Cabbage Slaw

Tuesday
Bean Curry
Thai Coconut Rice

Wednesday
Pizza with Garlic Bread Crust


Thursday
Thai Chicken Salad

Friday
Ginger-Garlic Salmon
Asian Cabbage Salad

Saturday
Sesame Noodles

Sunday
Fresh Tomato-Basil Soup in homemade bread bowls (I will have an updated recipe and add a picture as well to this post-an oldie but a goodie.)

Other things we'll be having:
Baked oatmeal
Caramel Apple Cheesecake Bars
Scones
Apples and Cinnamon Breakfast Quinoa

Saturday, October 13, 2012

Snickers Pancakes

Happy Saturday!  It is high time for a new pancake recipe around here!  Believe me, we still eat plenty of pancakes but I've been mostly sticking to these for convenience. Ever since school started, my oldest just started kindergarten, I feel like a crazy busy woman.  Weird how just one little thing can cause such a dynamic change! So we have been sticking to quick and easy, but healthy too.  Well, except for maybe these this morning.

Now these are not your every day pancakes. They ARE named after a candy bar, so I wouldn't go eating them every day.  But they are much better than a candy bar and not incredibly bad for you either.  With whole wheat flour and oats and just a pinch of added sugar and light on the add-ins, it's only slightly more indulgent than your every day pancakes and syrup.  You're going to love this easy caramel sauce too!!! Divine.


Snickers Pancakes
2 cups buttermilk
2 eggs
splash of vanilla (optional)
1/4 cup butter, melted
1 cup whole wheat flour
1/3 cup all-purpose flour
2/3 cup oats
2 Tbsp. sugar
2 tsp. baking powder
1 tsp. baking soda
3/4 tsp. salt
1/4 cup mini semi-sweet chocolate chips (plus more for garnish, if desired)
1/4 cup salted, roasted peanuts, roughly chopped (plus more for garnish, if desired)

Simple caramel sauce (recipe below)

In a mixing bowl, mix buttermilk, eggs, butter and vanilla.  Whisk to incorporate.  Add the rest of the dry ingredients and whisk until just combined.  Add chocolate chips and peanuts last and stir briefly to combine.

Let batter sit while griddle heats up.  Drop batter by 1/4 cup onto griddle and cook until bubbles start to form and edges start looking dry; about 2-3 minutes.  Flip and cook another minute or two.  Repeat with remaining batter.

Serve warm and garnish as desired.


Simple caramel sauce
1 cup granulated sugar
2 Tbsp. water
1/3-1/2 cup heavy cream

In a saucepan combine sugar and water over medium heat.  Swirl together rather than stir.  Cook until light brown in color, about 10-15 minutes.  Gently remove from heat and add in cream.  Whisk until well incorporated.  Mixture will bubble profusely the moment you add the cream so be careful, but it should settle down right away. If you have any hardened bits in the pan, just put it over the warm burner again and let it melt back into the mixture.  Store in a small glass jar with a tight fitting lid in the fridge.


SOURCE: Adapted from Minimalist Baker

Friday, October 12, 2012

Book Review: The Healthy Happy Family

I was given the opportunity by my good friend Emily to review her new e-book, The Healthy Happy Family: A Family Guide to a Healthier Home on a Budget. Of course I accepted because she is my friend but I also think it has some wonderful information for those looking to "clean" up their diet.


In their book, Emily and her husband, Derek, discuss how to incorporate whole and natural foods into your diet, tips to getting kids to eat healthy foods, and how to eat a whole foods diet without breaking the bank! If that sounds like what you need, go check it out! You can find Emily at her blog Eat Yourself Healthy and  Happy, and you can find her Ebook on Amazon here. 

Wednesday, October 10, 2012

Vegan Broccoli Soup


Brrrr. This week has brought on the chill! Fall is definitely in the air.  But that makes it no better time to make some warm soup.

I love finding dairy-free options for creamy soups that don't taste....well, weird.  Some dishes can be "vega-fied" by using soy cheeses and such which I am just not a fan of, and it's not just because of their taste.  Remember how I said we've been switching our diet to more whole and plant-based foods and taking out the processed?  Well, although those soy products do not contain dairy, they are still processed, thus not being a whole food and contain...SOY (one of the most genetically modified foods).  So, I try to steer clear of those products.

This delicious soup gets it's creaminess from pureed cashews, which works amazingly well!  And it's even more healthified by tons of broccoli! This fits the bill for me in more ways than one.

 I crave soup practically all the time during the cold months, I'm glad to add another delicious one to my recipe box!

Vegan Broccoli Soup
1 1/2 cups raw cashews, soaked in water for 1 hour then drained
1 small onion, diced
2 cloves garlic, minced
1 tablespoon olive oil
2 heads of broccoli, chopped into bite-size florets
1/8 teaspoon fresh ground nutmeg
1 teaspoon cumin
1 teaspoon salt
1/4 teaspoon ground mustard
fresh ground black pepper to taste
1 Tbsp fresh lemon juice
2 Tsp. Worcestershire sauce (or vegan Worcestershire)
about 4 cups of water

Soak raw cashews in water for 1 hour.  Drain and puree in blender.  Set aside.

Steam broccoli until fork tender. Drain and set aside.

In a large saucepan over medium heat,  add olive oil, and onions.  Cook until onions are tender and translucent, about 5 minutes.  Add garlic and cook for one minute more.  Add cumin, salt, mustard seed, and black pepper and cook for about 30 seconds.  Add cooked broccoli florets, water and cashew cream reduce heat to a simmer.  With an immersion blender blend soup until smooth.  Alternately, you could work in batches and blend it in a blender until smooth.

Add lemon juice and Worcestershire sauce and stir to combine.  Taste for seasoning and adjust as necessary.

Serve warm.  Soup will last, in an airtight container in the fridge for 4 days. 

SOURCE: Adapted from The Three Day Cleanse via Joy the Baker

Sunday, October 7, 2012

Menu Plan Monday-October 2012 (Week 2)


Here we are heading into the second week of October and it's getting CHILLY!! My heat finally kicked on about two nights ago when the temperature dropped into the 30s, so at least we're staying toasty inside.

You'll notice some more fall-inspired meals on the menu this week (soup!), as well as some that we didn't get to last week (that happens often here-does that happen to you too?). I'm also still including lots of salad!  I love to eat salad all year round but I do eat more cabbage salads in the winter because they are hearty, last forever in your fridge and go so well with Asian-style dressings (which I love). Cabbage is also full of good nutrition too.

You'll also notice lots of breakfast food!  If you haven't been a reader long, you'll quickly find out we are totally breakfast lovers here!  I usually make mostly hot breakfasts almost every morning, including pancakes (fave!), eggs and toast, oatmeal, cream of wheat, granola and oatmeal smoothies.

If you are new this week, recipes that are already on the blog have been linked. The rest will appear within a short time, pending family approval!


October Menu (Week 2)
Monday 
Creamy Caprese Pasta
steamed broccoli
Grilled Tuscan Panzanella

Tuesday
Quinoa Sliders w/ avocado
leftover Panzanella and veggies
 
Wednesday
Bean Curry
Thai Coconut Rice

Thursday
Thai Chicken Salad

Friday
Yellow Split Pea and Sweet Potato Soup w/ Pepitas

Saturday
Ginger-Garlic Salmon
Asian Cabbage

Sunday
Pesto Pizza with Butternut Squash (this may change, but I do have pesto to use up)


Other things we'll be having:
Cherry Almond Granola
Homemade Burger Buns (whole wheat and slider size)
Grilled Apple Pie Breakfast Stack
Banana Oat Breakfast Cookies
Orange Dark Chocolate Pancakes
Snickers Pancakes

Friday, October 5, 2012

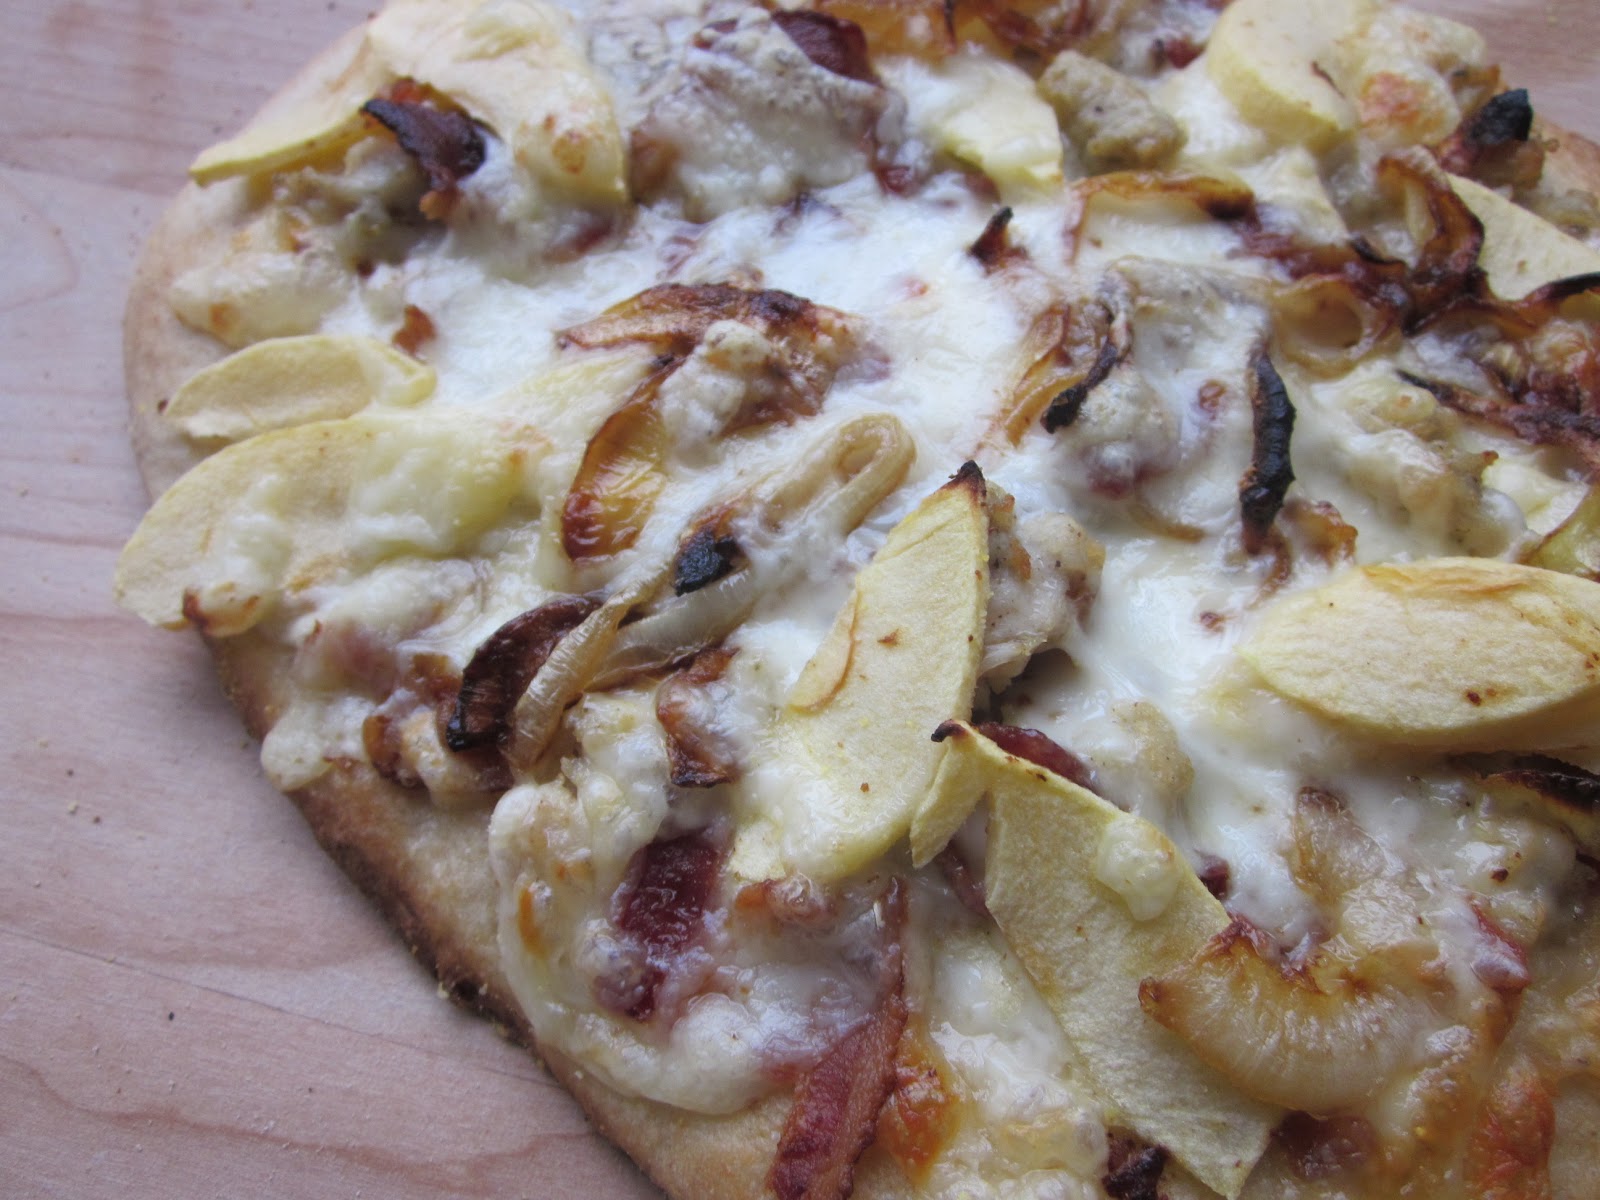
Apple-Sausage Pizza on a Whole Wheat Crust

Nothin' screams fall like apples!  Apples go good with so many things, like cheddar, bacon, chicken sausage, caramelized onion, so why not just throw it all together on a pizza?  Yup, that's what I did....oh so delish.   The whole wheat crust is perfect for this pizza because it can stand up to all those wonderful toppings and still deliver a great taste. 

We have pizza night about once a week and I'm always looking for ways to change it up for the hubs and I.  My girls are not very venturesome when it comes to pizza, so I make one cheese pizza for them and a different one for the "adults."

Apple-Sausage Pizza on a Whole Wheat Crust 
For the crust:
1 1/3 cups whole wheat flour
2/3 cup all-purpose flour
2 tsp. instant yeast
1/2 tsp. salt
1 tsp. sugar
2 Tbsp. olive oil
3/4 cup warm water

Place all ingredients except the water in the bowl of a stand mixer.  Pulse a time or two to evenly distribute everything.  Add water and mix for about 30-60 seconds.  If dough seems too dry, add a little more water, one tablespoon at a time.  If it is too wet, add more flour, about one tablespoon at a time.   Let dough knead for about 8 minutes, or until smooth and elastic.  Place dough in a greased bowl.  Cover lightly with a lid or damp kitchen towel and let rise until doubled in size.


For the pizza:
cornmeal, for dusting
1 recipe whole wheat crust
1 Tbsp. Dijon or coarse-ground mustard
1/2 pound chicken sausage, cooked and crumbled
1 apple (I used Gala), thinly sliced
1/2 onion, thinly sliced and caramelized
4-5 slices bacon, cooked and crumbled
1 cup cheddar cheese, grated (I used white cheddar, but not necessary)
1/4-1/2 cup mozzarella cheese, grated

*To caramelize onion, place onion in a frying pan with a drizzle of olive oil and cook on medium to medium-low for about 8-10 minutes or until slightly browned and soft.

Preheat oven to 450 degrees F.  If using a baking stone, place it in the oven as well to preheat.  Dust a pizza peel or parchment paper with cornmeal and roll out pizza dough.

Drizzle olive oil over the top of the crust, and brush around the edges.  Spread the mustard evenly, leaving about 1/2-inch border at the edge.   Top with about 3/4 of the cheddar cheese, sausage, bacon and caramelized onions.  Tuck in the apple slices, then sprinkle with the remaining cheddar cheese and mozzarella.

Slip pizza from the peel onto the hot baking stone, or if you're using parchment paper, just slide it right onto the stone. Alternately you can use and inverted cookie sheet. Bake for about 7-10 minutes, or until cheese is bubbly and starting to brown.

Tuesday, October 2, 2012

Menu Plan Monday-October 2012 (Week 1)

I've decided to bring the menu plan back to the blog! I think menu planning is an important step to feeding your family healthful, well-rounded meals, as well as keeping you on track with a budget.

When I posted my previous menus, they were monthly menus, but I'm switching to weekly menus.  The main reason is that our diets have changed to include much more plant food (i.e. salads and veggies) so I shop for those more frequently than I would with once a month shopping. The other reason is that if you are new to menu planning it's easier to start small.  At first even taking on a week at a time may sound daunting.  Hopefully you can start getting some ideas and inspiration from the new weekly menu posts and start creating your own!

I'll list mostly our dinner menu and link recipes that are already on the blog. Meals that are not linked will show up hopefully within a week, if it is something our family loved.  I'll also link other things I plan on making.


October Menu (week 1)
Monday
Whole Wheat Pasta with Cilantro-Peanut Pesto
fresh corn on the cob
salad

Tuesday
Blackened Salmon Tacos w/ corn salsa
Southwest Cabbage Slaw

Wednesday
Lemon and Oregano Roast Chicken
fresh steamed green beans
Sweet Potato Cakes

Thursday
Vegan Broccoli Soup
Sourdough baguette

Friday
Quinoa Sliders w/ avocado on homemade whole wheat dinner rolls
Italian Salad w/ Basil Vinaigrette

Saturday
Bean Curry
Thai Coconut Rice

Sunday
Homemade Pizza (toppings to be determined)

Other things I'll be making
Crunchy Oat Cereal (with almond pulp)
Apples and Cinnamon Breakfast Quinoa
Grilled Apple Pie Breakfast Stack
Cinnamon Rolls
Homemade Peanut Butter

Monday, October 1, 2012

Creamy White Bean and Chicken Sausage Pasta

I'm so glad it's fall!  And can you believe it's already October?  That mean's Halloween is just around the corner, cooler weather and lots of holiday cheer for months to come.  I absolutely love this time of year.  It's my favorite.

One of my most favorite things about fall is the FOOD.  I love not only eating but also making warm, comforting food that makes my belly full and happy.  The great thing about this dish is that it delivers all that plus it's healthy too (minus the bacon). I'm not usually a leftover person, but I ate this for the next two days after I made it, it was that delicious.

Creamy White Bean and Chicken Sausage Pasta
2 cups whole wheat pasta shells
1/2 small onion, chopped
3 garlic cloves, minced
1 roasted red pepper chopped
1 can (15 oz) cannellini beans
1 Tbsp. butter
1 tablespoon flour
1 can lite coconut milk (or 1 cup full-fat coconut milk plus 1 cup water)
1/2 cup almond milk (not vanilla flavored!)
salt and pepper to taste
1/2 lb. bacon, cooked and crumbled
1/2 lb Chicken Sausage (omit dried apples), cooked and crumbled*
4 cups fresh spinach, coarsely chopped
10-12 fresh basil leaves, chopped
2 large tomatoes, chopped
1/4 cup parmesan cheese

*This dish comes together pretty quickly, but to make even more effective use of your time, make and cook the sausage ahead of time.  Keep it warm while you're making the rest of the dish.

Bring a pot of water to a boil and cook pasta according to package directions.

While pasta is cooking, heat a large skillet over medium-low heat.  Drizzle a bit of olive oil in the pan  and add onions, tossing to coat. Cook for 5-7 minutes, until softened and translucent.  Stir in the garlic the last 30 seconds or so, then toss in the red pepper, beans and chicken sausage.

When pasta is done cooking, drain and add to the skillet with the rest of the ingredients.  Keep it on low while you make the sauce.

In a small saucepan, melt butter.  Whisk in flour.  When it starts to bubble, cook for about a minute.  Whisk in both milks, then bring the mixture to a boil; stirring constantly. Let simmer about 5 minutes, until it thickens a bit.  Taste and season with salt and pepper.

Remove the bean and pasta mixture off the heat and pour in the sauce, tossing to coat.  Stir in the bacon and spinach and let sit about 5 minute.  The sauce will slightly thicken and get absorbed by the pasta and the spinach will begin to wilt. Toss in the tomatoes and fresh basil at the last minute, right before serving.  Garnish with parmesan cheese.


SOURCE: Adapted from How Sweet It Is

Monday, September 24, 2012

Mug Brownie (Vegan)


You're either going to love me or hate me for this post. Love me because it's soooooo delicious, so good and so quick. Hate me because it's addicting, and not very high up there on the healthy factor.  But hey, you can't be 100% all the time.  A girl's gotta have her chocolate once in a while!

Brownie in a mug is the perfect treat for one (or 2) when you've got an intense craving to satisfy, or you don't want to make very much.   I've tried a few "mug" recipes and I really absolutely love this one.  The brownie comes out nice and moist and has a deep chocolate flavor.  NO cake-like brownies here!

This is vegan only because there is no dairy or eggs, but don't let that fool you, it has one of the best flavors in a brownie that I have tasted!

Mug Brownie
 2 Tbsp. coconut oil
4 Tbsp. brown sugar
pinch salt
splash of vanilla
2 Tbsp. almond milk
2 Tbsp. unsweetened cocoa powder
4 Tbsp. flour
(Optional: tiny splash rum extract OR tiny pinch cayenne pepper and cinnamon)

Melt coconut oil in mug of choice.  You only need to microwave it for about 10 seconds or so, it melts pretty easily. Add sugar, salt and vanilla and stir well.  Add milk; stir.  (You don't want to add the milk with the coconut oil because it will harden back up since, so add it after the sugar is mixed in.) Add cocoa powder and flour and stir well.  Microwave for about 45-70 seconds, or until cooked.  Time will depend on your microwave and your mug.  I used 2 different mugs; one was done at 45 seconds, the other, closer to 75.  Check as you go, starting at about 45 seconds. Enjoy!


SOURCE: Adapted from Industrious Justice

Monday, September 17, 2012

Split Pea Soup with Curried Brown Butter

So, just as I was hanging on to summer with my last post, I'm stepping into fall with this one!  I just love soups in the fall.  Not only are they a vehicle for an incredible amount of nutrition, they just warm you body and soul!

I know it's not technically fall yet and the weather is still reaching the mid 80's, so I take  chose the coolest day of the week last week (85 I think) to make this soup.  I was kind of holding my breath because I had no idea the kind of response I would get from my girls-it's green and kind of thick and maybe looks like something Shrek would eat (according to my kids anyway). Well, actually getting them to take the first bite was the hardest because they actually loved it! I was kind of in shock-not that it wasn't delish though, just that they ate it.

This is an absolutely delicious rendition of the simple split pea soup I ate as a child. Cooking the veggies in coconut oil really adds depth of flavor and gives it just a hint of coconut-divine!  You won't be sorry about the curried brown butter either-I mean who doesn't love brown butter? And the curry is the perfect spice for the peas.

I served the soup up with a sourdough baguette, but just about any other artisan loaf would be delicious as well.

Split Pea Soup
2 Tbsp. unsalted butter, ghee, or extra-virgin coconut oil

1/2 yellow onion, chopped
1 cup carrot, peeled and chopped

3 cloves garlic, minced
1/2 teaspoon red pepper flakes (optional)

5 1/2 cups vegetable or chicken stock
1 1/2 cups green lentils or green split peas, picked over and rinsed
 1/2 cup coconut milk

Curried Brown Butter
3 Tbsp. unsalted butter

1 tablespoon curry powder


Combine the 2 tablespoons coconut oil, onion, carrot, garlic, and red pepper flakes in a large soup pot over medium heat, stirring regularly, until the onions soften, a couple minutes. Add the vegetable broth and lentils and simmer, covered, until the lentils are tender. This usually takes 20 to 30 minutes, but can take as long as 50 minutes.


In the meantime, warm the 3 tablespoons butter in a small saucepan over medium heat and let it brown. When it starts to smell nutty and fragrant, stir in the curry powder and sauté until the spices are fragrant, less than a minute.


When the lentils are finished cooking, remove from the heat, stir in the coconut milk and 1/4 teaspoon of salt, and puree with an immersion blender. You can leave the soup a bit chunky if you like, or puree until it is perfectly smooth.

Stir in half of the curried butter, taste, and add more salt, if needed. Serve drizzled with the remaining curried butter.


SOURCE: Adapted from 101 Cookbooks, originally from Heidi Swanson's Super Natural Every Day.

Friday, September 14, 2012

Zucchini Bites


I know I'm totally hanging onto summer with this post, but I know there are some of you out there that still have zucchini coming out your ears and need something to do with it besides make bread....for the tenth time!

I love that each of these is one perfect little mouthful. You can pop them almost as mindlessly as chips or tater tots, but feel no regret because they are totally healthy!

These haven't quite yet made it to the dinner table because they are just do darned good to snack on, but they would make a great addition to any dinner menu!

Zucchini Bites
Yields 24

2 cups finely shredded zucchini, water squeezed out
2 eggs
1/2 cup whole grain or panko bread crumbs
1/2 cup parmesan cheese, finely shredded
1/2 red bell pepper, finely diced
1/4 cup onion, finely diced
4-6 fresh basil leaves, chopped
salt and pepper

Preheat oven to 400 degrees F. Spray a mini muffin pan with cooking spray.

Squeeze as much water out of the zucchini as you can, otherwise it will become soggy.  Place everything in a mixing bowl and either stir with a spoon, or you can use your hand and give it a few good squeezes through your fingers to get it all nice and mixed up.

Using a tablespoon, or I like a small cookie scoop best, scoop mixture into prepared pan and bake for about 15-18 minutes or until slightly golden. Remove to a cooling rack and cool completely.  Enjoy!


SOURCE: Adapted from The Curious Country Cook

Friday, September 7, 2012

Peaches and Cream Steel Cut Oats


My friend introduced me to steel cut oats this year and I am forever in her debt! I love them as well as my family. We eat a lot of oatmeal anyway, but since we don't really buy boxed cereal, it's nice to have a variety of hot cereals to eat, especially with fall and cooler temps just around the corner.

One thing I love about steel cut oats is that although it does take longer than rolled oats to cook, you can cook it once, then eat it the rest of the week. I love to portion it out into little bowls with lids and pull a couple out each time we want to eat it. It's pretty perfect for those school mornings when you don't have 25 minutes to make breakfast; you can just pull it out of the fridge, warm it up and you're good to go.

I love to flavor my oats with fresh fruit. It add delicious flavor and extra nutrition to an already healthful breakfast. In this recipe, I have pureed the fresh peaches because my kids have a thing about chunky-things-in-food, but you could easily just chop and mix them in.


Peaches and Cream Steel Cut Oats
1 cup steel cut oats
3 1/4 cups water
pinch of salt
2-3 Tbsp. brown sugar
1/2 tsp. cinnamon
1/4 tsp. ground ginger
1/4 cup full fat coconut milk
1/2-1 cup pureed fresh peaches
1 tsp. vanilla

Toppings (optional): diced peaches and walnuts

Bring water and salt to a boil. Stir in oats. Reduce heat to about medium and cook about 25 minutes or until desired tenderness, stirring every few minutes to prevent sticking on the bottom of the pan. After 25 minutes, remove oats from heat and add the rest of the ingredients. Return to heat for another minute or two. Serve warm or divide into smaller portions and refrigerate for later consumption.

Monday, September 3, 2012

End-of-Summer Smoothies

Not having my computer is totally killing me. My husband has a MacBook Air, which I have been using a little but I don't like it. I can't wait to get my own laptop back! I just couldn't wait another second to post though, I know it's been sparse the past few weeks. I've got not one but TWO wonderfully delicious end-of-summer smoothies to share with you today. Have a great holiday!!

This first smoothie was born out of necessity. Like, howmagonnauseupallthosepeaches my mom just gave me (from her tree)? I know, what a problem right? I knew I liked peaches and blueberries in my green smoothies, but had yet to try them in just an all fruit smoothie (something my girls would more likely like and finish). So, my first trial was a big score, didn't have to change a thing. It was absolutely love at first sight.

Fresh peaches at their peak are the most wonderful thing in the world to eat. I crave them every summer and am always very sad to see them go. If you can get your hands on some before they're gone, you gotta give this a try!

Blueberry Peach and Basil Smoothie
1 cup frozen blueberries
2 fresh, ripe peaches, peeled if you prefer and pitted
1/2 cup water
1/2 cup almond milk
about 4 fresh basil leaves

Put everything in your blender and whiz away!


I couldn't get this next smoothie out of my mind after I saw it. I think I made it that very day. Watermelon is another one of those quintessential fruits of summer that only lasts so long. So we gorge ourselves on it while it lasts then bid farewell until next time.

This smoothie is also paired with basil. I know you're thinking really??? c'mon here! Not more basil. But, seriously, don't underestimate the basil. It adds flavor and life to so many things. It's a subtle flavor that just knocks your socks off. If you're really not a fan, fresh mint would actually be a great substitution.

This is a super refreshing smoothie with the watermelon and cool cucumber. No need to add any extra liquid because the fruit is already full of it.

Watermelon Strawberry and Basil Smoothie
2 heaping cups watermelon
1/2 cup cucumber
1 cup frozen strawberries
3-4 fresh basil leaves

Put it all in your blender and whiz to you liking. Slurp away.

Enjoy!


SOURCE: Watermelon smoothie from My Green Diet

Friday, August 24, 2012

Berry-Oat Breakfast Smoothie

Oh my goodness, I know I have been MIA for the past two weeks. Things have been crazy around here with school starting. My oldest is starting kindergarten and I'm kind of freaking out about it-ahhh! Plus, my computer is being worked on so I have to steal my husband's mac when he's not looking for only tidbits of time here and there. Hopefully I'll get it back soon and I can start kicking out regular posts again! But for now, enjoy this breakfast smoothie, perfect for the start of school.


We have been rockin' these smoothies lately and my girls especially love them. The first one that I made was just strawberry though, so they probably loved it FIRST because it was pink and only SECOND because it tasted good. Regardless of why they like it, I'm glad they do and happy they drink it. At least I know they're getting good nutrition at least ONE meal a day.

This would be a perfect meal to tuck away in your breakfast arsenal for those crazy school mornings. Quick. Easy. Delicious! It only take a few minutes to throw together and is loaded with healthful ingredients that are sure to send everyone off to a great start for the day!


Berry-Oat Breakfast Smoothie
1 cup ice
1/2 cup frozen berries (single berries or a mix)
1/2 cup plain yogurt
1 banana
1/2 cup rolled oats
1 Tbsp. honey
1 cup water (or other liquid such as almond milk, coconut water, low-sugar juice)

Put everything in a blender and blend until completely smooth.


SOURCE: Martha Stewart

Monday, August 13, 2012

Chicken Bruschetta

I love seasonal food for all different reasons and summer food is no different. I love that it is fresh, bursting with flavor, you don't have to cook it most of the time and it is usually quick to prepare.

Some of my favorite hallmark flavors of summer include anything grilled, fresh herbs (mostly basil), garden fresh tomatoes, cucumbers, corn and fresh picked peaches and raspberries. I got to play farm girl for a couple of years a while back while we rented a house and it ruined me forever! Now all I want to be when I grow up is a farmer.

So, anyway, back to the topic of this delicious chicken. As you can tell from the list above, this has many of my favorite summertime flavors all wrapped up in one. My mom made something similar for me a while back when we were at her house for dinner and I couldn't wait to recreate something at home, just as delicious. I got to share this chicken with some friends a few weeks back and got thumbs up all around, even two from the chicken-haters club. So I'd say it's pretty tasty!


Chicken Bruschetta
For the chicken:
4 boneless, skinless chicken breasts, butterflied to make two thin halves
olive oil
Garlic butter seasoning (Like Johnny's)

For the bruschetta topping:
1 Tbsp. Olive Oil
5 cloves Garlic, Finely Minced
2 pints grape tomatoes, halved lengthwise
1 Tbsp. balsamic binegar
handful of fresh basil leaves, chiffonade
salt and pepper, to taste

freshly grated parmesan cheese


Prepare chicken breasts by slicing them thin. Place them in a large baking dish. Generously drizzle them with olive oil and give them a good sprinkle of the garlic butter seasoning. Using your hands, make sure all the chicken is evenly coated with the mixture. Cover and chill several hours. (Make sure you take chicken out of fridge about a half hour before you are ready to grill them.)

In a small skillet, heat 1 tablespoon og olive oil over medium-high heat. Add garlic and stir, lightly frying for about 30 seconds. Pour into a mixing bowl and allow to cool slightly.

Add tomatoes, balsamic, basil, and salt and pepper to the bowl. Toss to combine, then taste and add more basil if needed, and more salt if needed, making sure not to over-salt. Cover and refrigerate for an hour or two, if possible.

Preheat outdoor grill or indoor grill pan, then grill until done in the middle; about 4 minutes per side.

To serve, give the tomato mixture a final stir. Arrange chicken breasts on a plate then spoon a generous amount of bruschetta topping over the top. Sprinkle with fresh grated parmesan cheese.

Use extra topping on slices of grilled baguette!


SOURCE: Slightly adapted from Pioneer Woman

Thursday, August 9, 2012

Cool Cucumber-Melon Minty Smoothie


Wow, there have been several times over the past few days that I thought I was just going to melt! Don't get me wrong, I like summertime, but when we have day after day of near 100 degree weather, I just want to put on the least amount of clothes that I can get away with and sit under a fan. I get cranky, my kids get cranky and we need something to cool us off!

Did you know that peppermint essential oil is used as a cooling agent, like in reducing fevers? So, how genius is it to put mint leaves in a smoothie and cool your body from the inside out? Pair that with a cool cuke and honeydew melon and you'll be shivering in no time!

I know the combination of ingredients may seem a little odd, but I liked them a lot more than I thought I would, especially feeling that cool mint tingle down my throat and stomach, making me feel cool inside, and minty fresh.


Cool Cucumber-Melon Minty Smoothie
1/2 cucumber, peeled and cut into chunks
1 cup honeydew melon, cut into chunks and frozen (preferably)
1/4 cup fresh mint, rinsed
juice of 1 lime (about 2 Tbsp.)
1 cup pear juice (or water and sweetener, if desired)
handful of ice

Put everything in a blender and process until smooth.


SOURCE: Whole Living

Wednesday, August 8, 2012

Sweet Potato Quinoa Cakes with Blackberry Salsa

I know it's not fall and sweet potatoes are kind of a fall thing, right along with butternut squash, but burgers and things that come in patties are kind of a summer thing and I'm always on the lookout for meatless meals that pack a nutritional punch and are full of flavor.

Enter sweet potatoes and quinoa. Sweet potatoes, besides being slightly sweet and absolutely delicious are high in fiber, vitamins A, C and B6 and quinoa is high in protein, iron and calcium (nutrients found often in animal products). So, I can feel good about having a meatless meal and not having to worry about my kids not getting the right nutrients.

My husband and I both really enjoyed these "griddle cakes," if you will. I even fed some to my 8 month old and she couldn't get it in her mouth fast enough! I didn't venture to give them to my other two because that would have been all out war, but I'm ok with that for now. Baby steps. The salsa is a great accompaniment and makes for a great combination of flavors.

Sweet Potato Quinoa Cakes
1 medium sweet potato (about 6 oz), peeled and chopped
1/2 red onion, diced
1/2 tsp. salt
1/2 tsp. pepper
2 garlic cloves, minced
1/2 Tbsp. coconut oil, plus more for frying cakes
1/2 cup cooked quinoa
1/4 cup whole wheat bread crumbs
1/4 cup finely grated parmesan cheese
2 Tbsp. chopped fresh cilantro
2 Tbsp. chopped fresh basil
1 large egg, lightly beaten

Heat a large skillet over medium-low heat and add 1/2 tablespoon coconut oil. Add in sweet potato, onion, 1/4 teaspoon of salt and 1/4 teaspoon of pepper, stir, cover and cook for 10-12 minutes, or until potato is soft. Remove lid and add garlic, cooking for 30 seconds.

Transfer potato mixture to a large bowl (slightly mashing potato with a fork) and add quinoa, breadcrumbs, cheese, herbs, remaining salt and pepper and mix well. Once combined, add in egg, then mix until moistened. Using your hands to bring it together, form four equally-sized patties. Heat the same skillet over medium heat and add coconut oil. Add cakes and cook for 3-4 minutes per side, or until golden brown. Serve with blackberry salsa.


Blackberry Salsa
1 pint fresh blackberries, chopped
1/2 red onion, finely diced
1/2 jalapeno, finely diced
1/2 cup chopped cilantro
the juice of 1 lime
salt and pepper to taste

Combine all ingredients together in a bowl and mix.


SOURCE: How Sweet It Is

Tuesday, August 7, 2012

Sweet and Salty Popcorn

It is absolutely ridiculous the amounts of this popcorn I have been making and consuming lately and haven't even bothered to share it with you until now. It's been my little secret. Well, actually not, it's just that I typically make it an night for a movie or game night and by morning (when the light is good), it's mysteriously gone!

I don't have much self control when it comes to popcorn, except microwave popcorn (ewwww), so if there's some left in the bottom of the bowl, it won't be there much longer.

I don't feel too bad about eating a WHOLE bowl, ok, half a bowl, of this popcorn though because it's actually not too bad of a snack, although it tastes pretty indulgent. Since it's cooked in coconut oil, you get all those health benefits and there's just a bit of sugar and salt. SO, no, I really don't feel bad eating it.

And you shouldn't either. This should be your new favorite snack too. It takes about 93 seconds to prepare. And you can get it ready while everyone else is getting the movie set up.

Bring paper lunch sacks. And fold them down to hold the popcorn. My girls thought that was the best trick ever!


Sweet and Salty Popcorn (AKA Kettle Corn)
4 Tbsp. coconut oil
2 Tbsp. white sugar
2/3 cup popcorn kernels
salt, to taste

Put everything in a tall pot and begin cooking over medium-high heat. Once it starts to bubble, place the lid on it and swirl it around as the kernels begin to pop. You kind of want this part to go fast so the last kernels to pop don't get burned. Quickly pour the popcorn out into a very large mixing bowl and immediately sprinkle with salt and stir until evenly coated.


SOURCE:My friend Melanie

Monday, August 6, 2012

Vegan Oatmeal Banana Pancakes with (not so vegan) Chocolate Chips

I think my pancake addiction keeps getting worse and worse! I NEVER tire of eating them. They are just so versatile. You could make a different recipe every week for a year and never repeat.

So the other day I was thinking about making these pancakes that I LOVE, one of my favorites, but decided to try to make them healthier, by omitting the dairy, egg and added sugar, and using whole wheat flour.

Well, all the little tweaks paid off, because I think the pancakes are just as fabulous. I used a super ripe banana so it would add all that natural sweetness instead of adding white sugar. I replaced the chicken egg with a flax egg, definitely multiplying the health factor and supplying the fatty acids that my growing girls need. The whole wheat flour is pretty much a no-brainer for me any more, it's the norm, as well as the almond milk.


Vegan Oatmeal Banana Pancakes with Chocolate Chips
1 very ripe large banana, mashed
1 cup almond milk
1 flax egg (1 Tbsp. ground flax + 3 Tbsp. water)
2 Tbsp. oil
1 tsp vanilla
1/2 whole wheat flour
1/2 cup oats
pinch salt
1 tsp. baking powder
3 Tbsp. chocolate chips (vegan-friendly if you choose)

Preheat skillet.

In a small bowl, stir together the ground flax and water. Let sit about 5 minutes.

In a large mixing bowl, add mashed banana, milk, flax egg, oil and vanilla. Whisk until well-incorporated. Add the dry ingredients, stirring to combine, tossing in chocolate chips in last.

Pour batter by 1/4 cup onto preheated skillet. Cook until bubbles start to form and edges look a bit dry. Flip and continue cooking another minute or so.


SOURCE: Adapted from Minimalist Baker

Saturday, August 4, 2012

Coconut Lime Ice Cream

I came up with this recipe out of necessity, 'cause ice cream is a necessity, didn't you know? I LOVE anything coconut but coconut and lime are so delicious and refreshing. I had an abundance of each and they were just begging me to throw them together to make ice cream. You just can't have enough during the summer.

I came across a few recipes using a custard base and no coconut milk and I just thought that was ridiculous. Coconut ice cream NEEDS coconut milk and NO eggy aftertaste. Now, don't get me wrong, I appreciate a good custard base but they are not fit for every kind of ice cream.

This is a no-cook base, gotta love that, and it comes together super fast so you can get it freezing in no time at all. I hope you enjoy this cool and refreshing treat.


Coconut Lime Ice Cream
1 14-oz can coconut milk (full fat)
1 14-oz can sweetened condensed milk
1 cup whole milk
1 lime, zested
1/2 cup fresh squeezed lime juice (about 4 limes)
1/2 cup flaked coconut

Whisk everything together in a bowl and refrigerate it until chilled.

Pour ice cream base into ice cream maker and freeze according to manufacturer's directions. Scrape out into a freezer safe container with a tight-fitting lid. Freeze 4 hours or until firm before serving.

Friday, August 3, 2012

Melon Mozzarella Salad

This is another salad that epitomizes summer for me. Fresh cool crisp melons and grapes, heloooooo juicy slurpy peaches, scrumptious strawberries and I told you already I swoon over fresh basil. Kind of an unexpected little burst of flavor, but oh so delish! What's also fun about this salad is the little bites of salty, soft fresh mozzarella, also a little unexpected here, but I'm loving the contrast. All of this is paired with the delicious lemon poppy-seed dressing from this salad and you've got yourself a perfect little dessert for a hot summer night. Sweet and filling and won't weigh you down. You'll be luvin' it too

Melon and Mozzarella salad
3 cups peeled, coarsely chopped fresh peaches (about 1 1/2 lb.)
1 (8-oz.) tub fresh small mozzarella cheese balls, cut in half
3 Tbsp. chopped fresh basil
3/4 cup Lemon-Poppy Seed Dressing
4 cups seeded and cubed watermelon
4 cups cubed honeydew melon
3 cups sliced fresh strawberries
2 cups seedless green grapes, cut in half
Garnishes: mint leaves

Toss first 3 ingredients with 1/4 cup Lemon-Poppy Seed Dressing

Add all salad ingredients into a large glass trifle dish or tall glass bowl. Serve immediately, or cover and chill up to 8 hours. Toss with remaining 1/2 cup dressing just before serving. Garnish, if desired.


SOURCE:Southern Living

Tuesday, July 31, 2012

Double Bean Burgers with Avocado-Basil Cream


Haha, I'm so proud of myself for pulling off this meal with my kids. I hijacked their normal burger and replaced it with this delicious and flavorful double bean burger and they weren't even the wiser! My oldest daughter even told me how yummy it was and ate most of it as well.

I had to give my husband the "ojo" across the table to make sure he didn't spill the beans about the beans in the burgers. Cause I know if my girls got one wiff of the fact that there were beans on those buns instead of a "real" burger, they for sure would have turned up their noses at it and not eaten another bite. Luckily the man caught my drift and we were safe.

I have actually been wanting to make bean burgers forever. I've bookmarked many many recipes, only to delete them thinking it would be a waste of my time because no one would eat them but me. I finally got up the nerve when I saw this recipe. They looked yummy and flavorful, but to tell you the truth the basil avocado cream totally SOLD me. Anything with basil and I SWOON.

Truly this does make a delicious and light burger and it's a great addition to any repertoire of meatless meals.

Double Bean Burgers
1 (15 oz) can black beans, drained and rinsed
1 (15 oz) can cannellini beans, drained and rinsed
1 large egg
1/2 cup panko bread crumbs
3 tablespoons olive oil, divided
3 tablespoons fresh cilantro, chopped
4 garlic cloves, minced or pressed
1/2 teaspoon smoked paprika
1/2 teaspoon onion powder
1/4 teaspoon salt
1/4 teaspoon pepper
6 whole grain buns, toasted if desired

In a large bowl, mash beans with a potato masher or fork. Add in the rest of the ingredients, using only 1 tablespoon of the oil, and mix thoroughly to combine, bringing it together with your hands if needed. Separate the beans into 6 equal sections and form patties.

Heat a large skillet over medium-high heat and add 1 tablespoon olive oil (or as much as you need). Add burgers and cook on each side until golden, about 5 minutes. Remove and serve with avocado cream on whole wheat buns.

Avocado-Basil Cream
1 avocado
1/3 cup mayonnaise
10 basil leaves, chopped
pinch of salt and pepper

Mash the avocado, then mix with the mayonnaise to combine. Stir in the basil leaves and salt and pepper, to taste. Serve over bean burgers.


SOURCE: Slightly adapted from How Sweet It Is

Sunday, July 29, 2012

Backyard Mint Ice Cream

National Ice Cream Month is almost over and I've got a new flavor for you today. Mint ice cream literally from your own backyard! Does it get any better?

This recipe comes from Jeni's Splendid Ice Creams at Home and is amazing. Her method is unique in that she doesn't use eggs as a thickener, rather cornstarch and a little cream cheese. I think that worked perfectly here because it kept the ice cream nice and minty white in color and didn't give off an eggy flavor for the base. It also kept it nice and smooth, rather than icy, which often results when there's not enough fat. Another thing I love is that this ice cream is infused with fresh mint leaves, rather than an extract so there's no funky aftertaste from fake ingredients.

When my mom brought me a bunch of mint from her garden I was so excited I finally got to try this ice cream. I made a double batch and have probably eaten most of it myself!

So, whether you have to step out the back porch, run to the farmer's market, or just the regular marker, make sure you save some mint (and some room in your belly) for this delicious frozen treat!

Backyard Mint Ice Cream
1 Tbsp. plus 1 tsp cornstarch
1 1/2 ounces (3 Tbsp.) cream cheese, softened
1/8 tsp fine sea salt
2 cups whole milk
1 1/4 cups heavy cream
2/3 cups sugar
2 Tbsp. light corn syrup
large handful of fresh mint, leaves roughly torn into small pieces.

Mix about 2 tablespoons of the milk with the cornstarch in a small bowl to make a smooth slurry.

Whisk the cream cheese and salt in a medium bowl until smooth. If you have trouble whisking the cream cheese, microwave it for 5-10 seconds to soften it a bit more.

Combine the remaining milk, the cream, sugar and corn syrup in a 4-quart saucepan. Bring to a rolling boil over medium-high heat and boil for 4 minutes. Remove from the heat, and gradually whisk in the cornstarch slurry.

Bring the mixture back to a boil over medium-high heat and cook, stirring with a heatproof spatula, until slightly thickened, about 1 minute. Remove from the heat.

Gradually whisk the hot milk mixture into the cream cheese until smooth. Make sure not to pour too fast, if you add it all at once, it will be lumpy and it will be very difficult to get them out. Add the mint. Pour the mixture into a large container with tight-fitting lid, or a gallon size ziploc bag.

Refrigerate to steep for 4 to 12 hours.

Strain out the mint. Pour the ice cream base into ice cream maker and freeze according to manufacturers instructions.

Pack the ice cream into a freezer-safe storage container, and seal with an airtight lid. Freeze in the coldest park of your freezer until firm, at least 4 hours. Enjoy!


SOURCE: Jenni's Splendid Ice Creams at Home

Friday, July 27, 2012

Cherry Chocolate Scones

I think it's funny how some words have two meanings. Take scones, for instance. When I tell my husband I want to make scones, he gets all excited and asks if we can make honey butter to go with them. See, to him scones are what I've always heard referred to as fry bread, or Indian Fry bread. Not an unlikable treat, but not something I'd generally go to. I find it funny that my husband doesn't think of scones as typical English scones (like I do) because he lived near there for practically 2 years of his life! Oh well.

Anyway, back to what I call scones. These dreamy, cream scones are as good as you're going to get people! If you've ever made scones, it's weird how it all comes together. Almost seems like it won't, looking at that big floury mass. But that butter and cream work their magic.

These are the lightest and most fluffy scones I have ever eaten. They practically melt in your mouth. My girls absolutely went crazy for them, especially with the little chocolate chips; although they could have done without the cherries. They actually love cherries, but they don't do the whole chunky fruit mixed up in baked goods concept.

Now is the prime time to get you some cherries. They do make the dough a little stickier than usual, but don't be dissuaded, you won't be sorry.


Cherry Chocolate Scones
2 cups (10 ounces) all-purpose flour
1 Tbsp. baking powder
3 Tbsp. sugar
1/2 teaspoon salt
5 Tbsp. chilled, unsalted butter, cut into cubes
1 cup fresh cherries, halved and pitted
4 oz. dark chocolate, chopped (or use chips)
1 cup heavy cream
2 tsp. vanilla extract

Preheat oven to 425°F.

Place flour, baking powder, sugar and salt in large bowl or work bowl of food processor fitted with steel blade. Whisk together or pulse.

If mixing by hand, use two knives, a pastry blender or your fingertips and quickly cut in butter until mixture resembles coarse meal. If using food processor, remove cover and distribute butter evenly over dry ingredients. Cover and pulse until mixture resembles a coarse meal.

Stir in cream and vanilla, just barely combining, then gently stir in cherries and chocolate. Stir with a spoon until a dough forms, using your hands to bring it together. Turn onto a lightly floured surface and knead gently, adding a bit more flour, if needed.

Form scones by either patting the dough into an 8-inch circle and cutting it into 8 wedges or cutting pieces with a biscuit cutter.

Place rounds or wedges on un-greased baking sheet and bake until scone tops are light brown, 12 to 15 minutes. Cool on wire rack for at least 10 minutes. Serve warm or at room temperature.

**If you want to glaze the scones, whisk together 1 cup powdered sugar, 1-2 Tbsp. milk and 1/4 tsp. almond extract. Drizzle over tops of warm scones.


SOURCE: Adapted from America's Test Kitchen via. Smitten Kitchen, and How Sweet It Is

Wednesday, July 25, 2012

Strawberry Cheesecake Pancakes


So, the other week after menu planning and doing all my grocery shopping I realized mid-week that I had come home with a carton or ricotta and totally forgotten what I bought it for. I checked over my menu and didn't find anything there I was planning on using it for so I turned my thoughts toward what I could make with it.

Naturally I went with pancakes. By now, there's hardly a pancake I haven't made, but these just sounded too delicious to not make a go of it. My girls aren't fans of chunks of fruit in their pancakes, in fact the only add-ins they'll usually go for is chocolate chips-go figure! So, in favor of my daughters' no chunky things in pancakes, I opted to puree the strawberries for this one and it SO worked in my favor. The girls were over the top that these pancakes came out pink(-ish).

When I presented my oldest daughter with a short stack of these, just like in the photo, she literally thought she had died and gone to heaven! She somehow got out of that that it was her special party day and she kept telling her friends all day long about it. If that doesn't convince you to try these, I don't know what will.

I love that the ricotta in these pancakes not only gives it that hint of cheesecake flavor, but makes them really moist. You can use whatever syrup you'd like on these. In lieu of making strawberry syrup I just decided to thin out some strawberry freezer jam to pour over the top and it worked out perfectly. And, of course topping it off with sweetened whipped cream is just like the icing on the cake...but totally optional...especially if it's a weekday.


Strawberry Cheesecake Pancakes
1 cup buttermilk
1 cup ricotta cheese
3 eggs, separated
1 tsp. vanilla
1/2 cup pureed strawberries
1 1/2 cups all-purpose flour, sifted*
1 Tbsp. baking powder
1/4 tsp. salt
2 Tbsp. sugar

In a mixing bowl, combine combine buttermilk, ricotta, egg yolks, vanilla and strawberry puree. Whisk to combine well. Add in flour, baking powder, salt and sugar and stir just to combine. (*Note: I don't usually sift my flour for pancakes but I did it the first time and not the second and it made a difference.)

Beat egg whites until soft peaks form. Add 1/3 of the egg whites to batter and whisk to combine. Then add the rest of the whites and gently fold them into the batter.

Heat griddle. Drop batter by 1/4 cup onto the griddle and cook until bubbles start to form and sides are looking dry. Flip and continue cooking another 2 minutes or so.

Serve warm with syrup of your choice and whipped cream, if desired.

SOURCE: Adapted from Annie's Eats

Monday, July 23, 2012

Strawberry-Banana-Orange Green Smoothie


The other day I wanted to share this smoothie recipe with some friends so I went back through my post list and couldn't find it! I can't believe I haven't shared it with you before. This smoothie, or spinach drink as I used to call it, is the first one I had ever tried, over 10 years ago, albeit with some modifications.

I got the main idea for this smoothie, from a college roommate who had celiac and couldn't eat wheat, so she ate a lot of fruits and veggies, and this smoothie. Back then you didn't hear about celiac and gluten-free, so at first I thought it was a little weird, but then I tried it and loved it. I didn't even have a powerful blender back then and my drinks came out a little chunky and the spinach wasn't very well blended, but I didn't care, it was healthy and good.

So, here I am finally sharing what has evolved into my favorite green smoothie. If you have been reluctant to try the green drinks past, I think you will be pleasantly surprised.


Strawberry-Banana-Orange Green Smoothie
1 cup water
splash of almond milk
1 tsp. vanilla
1 whole orange, peeled*
1 cup frozen strawberries
1/2 frozen banana
2 handfuls baby spinach

*If you do not have a powerful blender, I suggest just using the juice of the orange or about 1/2 cup orange juice.

**If your strawberries are not frozen, use ice for part of the water.

Place ingredients in blender in order listed. Blend to your liking-may take a few minutes if you do not have a powerful blender. Drink immediately or store in a jar with a tight-fitting lid for up to 48 hours. Shake well before drinking.

Makes about 3-4 cups

Monday, July 16, 2012

Strawberry Fields Salad with Lemon-Poppy Seed Dressing

I thought I better throw a salad in here, it's been a while.

I love summer produce! I try to soak it up all I can while the getting is good. 'Cause you know, come those winter months and the gettin' gets pretty slim.

This is a fabulous salad. A little different, but not too unusual. The seasonal fruit is delicious, the fresh basil, to die for and the dressing is an absolute keeper! I believe salad dressing totally can totally make or break a salad. I make tons of homemade dressings, which I love, but I have never thought to substitute lemon juice for the vinegar. Totally genius, especially since I love all things lemon.

Strawberry Fields Salad
4 large nectarines, cut into 1/4-inch-thick wedges
1 head of romaine lettuce, shredded
2 cups sliced fresh strawberries
1 pint cherry tomatoes, halved
1/2 cup chopped fresh basil
1/2 cup chopped pecans
1 (4-oz.) package crumbled feta cheese

Lemon-Poppy Seed Dressing (recipe below)


Toss nectarines with 1/4 cup Lemon-Poppy Seed Dressing.

Put shredded lettuce in a large salad bowl. Layer nectarines, strawberries, tomatoes and basil on top of the lettuce.

Add feta and pecans and dressing just before serving; lightly toss.


Lemon-Poppy Seed Dressing
1/3 cup vegetable oil
3 Tbsp. sugar
1/3 cup fresh lemon juice
1 1/2 Tbsp. poppy seeds
2 tsp. finely chopped onion
1 tsp. Dijon mustard
1/2 tsp. salt

Process vegetable oil, sugar, fresh lemon juice, poppy seeds, finely chopped onion, Dijon mustard, and salt in a blender until smooth. Store in refrigerator up to 1 week; serve at room temperature.


SOURCE: Slightly adapted from Southern Living

Friday, July 13, 2012

Cherry Chocolate Ice Cream

One of the things I love most about summer is keeping my freezer well stocked with homemade ice cream. At the end of a long, hot day, I love nothing more than to sit down to a delicious chocolaty refreshing treat and this totally hits the spot.

I love the base for this ice cream. It's one of the smoothest, most chocolaty I've ever made. I think using the bittersweet chocolate is amazing here, although if you prefer a lighter, sweeter chocolate flavor, I would go with a dark or semi-sweet chocolate.

Cherries are in season right now and are on sale everywhere. I couldn't resist pairing them with the chocolate ice cream. The rum extract adds a little dimension and nicely compliments the other flavors. If you have rum on hand, feel free to swap out the water when cooking the cherries and omit the rum extract.


Cherry Chocolate Ice Cream
1 1/3 cups halved pitted cherries (about 13 ounces whole cherries)
1/2 cup plus 2 Tbsp. sugar
1/2 cup water
1/4 tsp. rum extract (or to taste)
1 1/2 cups whole milk
4 large egg yolks
4 ounces bittersweet chocolate, chopped
1 Tbsp. unsalted butter
3/4 cup heavy cream
1 1/2 tsp. vanilla

Put the cherries, 2 tablespoons sugar and the water in a medium saucepan and cook over medium-high heat until syrupy, about 20 minutes. Remove from the heat, add rum extract and let cool, then refrigerate until cold, at least 2 hours.

Meanwhile, heat the milk and the remaining 1/2 cup sugar in a saucepan over medium-low heat, whisking to dissolve the sugar. Whisk the egg yolks in a small bowl. Gradually whisk about 1/2 of the warm milk mixture into the eggs, then whisk the egg mixture back into the saucepan. Cook, stirring constantly, until the mixture coats a spoon and registers 168 degrees F on a candy thermometer, about 15 minutes. Remove from the heat; add the bittersweet chocolate and the butter and set aside until the chocolate melts, about 5 minutes.

Transfer the chocolate mixture to a blender and puree until smooth. Pour into a large bowl and stir in the heavy cream and vanilla. Refrigerate until chilled, at least 2 hours or overnight.

Churn the chilled chocolate mixture in an ice cream maker. Strain the cherry mixture, reserving the syrup. When the ice cream is very thick, add the cherries and continue churning until incorporated. Transfer to a freezer-safe container. Drizzle in the reserved cherry syrup and swirl with a spoon. Cover and freeze until firm, at least 4 hours.


SOURCE: Food Network
Related Posts Plugin for WordPress, Blogger...