Wednesday, November 30, 2011

Wild Rice and Quinoa with Turkey, Cranberries and Winter Squash


Here's another installment on using up those Thanksgiving leftovers. This casserole-type dish may not look like much, but let me tell you, it's some wonderful comfort food! It kind of tastes like a whole Thanksgiving meal wrapped up together. And since it's pretty much every course in one, I didn't have to make anything else to go with it (although you could), which made for a pretty easy weeknight meal. And my kids at it too, which is another bonus!

Wild Rice and Quinoa with Turkey, Cranberries and Winter Squash
1 cup wild rice blend, uncooked
1/2 cup quinoa, uncooked
1 bay leaf
1/2 cup diced onion
1 stalk celery, small diced
1 medium carrot, small diced
1 Tbsp. olive oil
1 Tbsp. butter
2 Tbsp. flour
1 14-oz can chicken broth
1/4 tsp. ground nutmeg
salt
fresh ground black pepper
1 cup butternut squash, peeled and shredded
1 1/2 - 2 cups cooked turkey, shredded
1/2 cup dried cranberries
1/2 cup walnuts, chopped
2 Tbsp. chopped mixed herbs (such as rosemary, sage, thyme or oregano); alternately you could use poultry seasoning, to taste

In a medium saucepot, bring to a boil 2 cups water, wild rice and bay leaf. Cover, reduce heat and simmer for about 40 minutes. In a small saucepot, bring to a boil 1 cup water and quinoa. Cover, reduce heat and simmer about 20 minutes.

Meanwhile, heat olive oil and butter in a large, high-rimmed skillet, over medium-high heat. Add onions, celery and carrots and saute about 6-8 minutes or until soft and onions are translucent. Add shredded squash about the last minute of cooking. Sprinkle with flour and let cook for about a minute, stirring constantly. Add chicken broth and stir to combine. Bring to a boil and let thicken; about a minute or two. Add turkey, cranberries and walnuts and cook until heated through; add cooked rice and quinoa and stir to combine. Season with nutmeg, salt and pepper. Add the fresh herbs last, stirring to incorporate. Check again for seasonings and adjust as necessary.


SOURCE: Adapted from Whole Foods Market

Linked to...
It's A Keeper Thursday @ It's A Keeper

Monday, November 28, 2011

Orange Cranberry Scones with White Chips


Anyone still eating leftover Thanksgiving pie for breakfast? I think one of the best parts of a huge Thanksgiving meal is eating the leftovers for days in a row. I usually eat some of the leftovers straight up, but I like to save a little bit of turkey to make some good old comfort food; Chicken Pot Pie and Chicken Noodle Soup. IF there are any sweet potato leftovers (which their usually isn't), I like to make these Ginger Sweet Potato Muffins, practically my favorite muffin ever!

Leftover cranberry sauce probably gets overlooked most of the time. I know I haven't paid much attention to it in the past. I don't like to let things go to waste though, so I decided to incorporate what I had left into a scone. I think it worked out perfect. I had been dying to make scones anyway and the combination of the cranberries, orange and white chocolate chips couldn't have been better.

These scones are more moist than your typical scone, due to the cranberry sauce, but they still turn out wonderfully light and flaky. You may need to sprinkle your hands with flour when patting them out, and remember not to work them too much.

Orange Cranberry Scones with White Chips
For the dough:
2 1/4 cups flour
2 tsp. baking powder
1/2 tsp. salt
1/3 cup sugar
1 tsp. cinnamon
1 tsp. orange zest
1/4 cup white chocolate chips
6 Tbsp. cold butter, cut into pieces
1 egg
1/2 cup cranberry sauce
3 Tbsp. freshly squeezed orange juice (about half a small orange)
1/2 cup plus 2 Tbsp. heavy cream, chilled

For the glaze:
1 cup powdered sugar
3-4 Tbsp. freshly squeezed orange juice (about half a small orange)

Preheat oven to 425 degrees F. In a large mixing bowl, combine flour, baking powder, salt, sugar, cinnamon and orange zest. With either a pastry blender or two knives, cut in the cold butter until the mixture is crumbly. Stir in white chips and set aside.

In a separate small mixing bowl, combine egg, cranberry sauce, orange juice and 1/2 cup heavy cream. Fold the wet ingredients into the dry and form the dough into a disk.

Gently and quickly pat the dough out, on a floured surface, into an 8-10 inch circle. Cut into 8 wedges and place onto baking pan. Brush tops with remaining 2 Tbsp. of heavy cream.

Bake for 13-15 minutes or until scones are slightly brown on top.

For the glaze, mix powdered sugar and orange juice and drizzle over top of the warm scones. Serve warm or allow to cool completely.


Linked to...
It's A Keeper Thursday @ It's A Keeper

Monday, November 21, 2011

Cranberry Sour Cream Crumble


Not all the recipes that I share have a story or history behind them, but I love that this one does. My mom has had this recipe in her file box since probably before I was born; let's just say a LONG time. Back then my parents were young, finishing college, with three young children, and didn't have much extra money to splurge on things like REAL butter and sour cream. My mom, she has a good eye. She knows a good thing when she sees one. She tucked this recipe away until later in life when things were a little more established.

Now my mom has been making this for years and I've always enjoyed it but I have never actually made it myself until now. This crumble is perfect for serving at a breakfast or brunch, and especially perfect now that the holiday season is upon us.


Cranberry Sour Cream Crumble
1/4 cup chopped almonds

For the topping:
1/2 cup flour
1/3 cup sugar
1/4 cup chopped almonds
1/4 cup butter, melted
1/4 tsp. vanilla extract


For the cake:
1 cup sugar
1/2 cup butter, softened
1 tsp. vanilla
2 eggs
2 cups flour
1 1/4 tsp. baking powder
1/2 tsp. baking soda
1/4 tsp. salt
1 cup sour cream
1 cup whole cranberry sauce

Heat oven to 350° F. Sprinkle 1/4 cup of almonds on the bottom of a greased 9-inch spring-form pan or 10-inch tube pan. Set aside.

In a medium bowl, stir together all the topping ingredients until crumbly and set aside. In a separate bowl, combine the flour, baking powder, soda and salt.

In large mixer bowl, fitted with a paddle attachment, beat butter and sugar until light and fluffy; about 2 minutes. Beat in eggs, one at a time, until incorporated, then vanilla. Add in dry ingredients alternately with the sour cream, beginning and ending with flour mixture. Beat until incorporated.

Spoon half of batter into prepared pan, spreading to cover the bottom. Next, spoon cranberry sauce over the batter, spreading to the edges. Spoon remaining batter over cranberry sauce, spreading to cover. Sprinkle topping over batter.

Bake for 70-85 minutes or until toothpick inserted in center comes out clean. Cool 10 minutes on wire rack. Remove sides of spring-form pan and cool completely.


SOURCE:Land O' Lakes

Monday, November 14, 2011

Whole Grain Apple Cinnamon Chip Pancakes


You can tell by the sheer number of pancakes on this blog that we LOVE to eat them around here. I haven't posted a pancake recipe in a while but that sure doesn't mean we don't eat them often. In fact, my girls only eat a bowl of cereal once or twice a week, between pancakes, hot cereal, granola and the occasional eggs and toast.

We were lucky enough to score some fresh apples right from the orchard the other day. I love getting fresh fruit in season! I knew they would taste perfect shredded up in these pancakes. I don't usually throw "chips" in my pancakes, since I try to keep them pretty healthy, but this is about the only time of year you can find the cinnamon chips at the store and I thought I'd throw in a small bit.

My girls loved theses pancakes! My husband also went to work a few minutes late the morning I made these, just so he could have some. Delish!

Feel free to serve them with whatever syrup you would like, or top them with some warm applesauce or even apple butter.

Whole grain Apple Cinnamon Chip Pancakes
1 cup oats, quick or rolled
3/4 cup whole wheat flour
1 1/2 tsp. baking powder
3/4 tsp. baking soda
3/4 tsp. salt
1 tsp. vanilla
1 egg
3 tbsp. oil
2 cups buttermilk
1 large apple, peeled and shredded
1/3 cup cinnamon chips

In a large mixing bowl, whisk together egg, oil, buttermilk and vanilla. Add in oats, flour, baking powder, soda and salt and whisk until just combined. With a rubber spatula, fold in the shredded apple and cinnamon chips. Let batter sit while griddle heats up.

Heat griddle to 250 degrees F, or about medium heat. Drop batter by 1/4 cupfuls and cook until edges start to look dry; about 2 minutes. Flip pancakes and cook on the other side until golden; about another 2 minutes. Serve warm.

Tuesday, November 8, 2011

Bacon and Wild Mushroom Risotto with Baby Spinach


Considering I don't like rice much, although I've grown to like it more over the years, I really enjoy risotto. Maybe it's the creamy, soft texture, or the magic that happens after you put the salty cheese in at the end. Hmm, I don't know, but it sure is good.

Risotto can pretty much be tailored to any season of the year by what ingredients you add to it. Fresh ingredients, in season, are the best. I love that it is so versatile and turns out wonderful each time.

This risotto is perfect for fall. I love the combination of the three mushrooms but if you can only find a couple of them, it is still sure to turn out for you. Finding dried mushrooms might be an option for those that are hard to find. I could only find dried shiitakes in the Asian section at my grocery store and just reconstituted them before adding them to the risotto.


Bacon and Wild Mushroom Risotto with Baby Spinach
4 cups chicken stock
6 bacon slices, cut into about 1-inch pieces
1 cup finely diced shallots
1 Tbsp. olive oil
1 tsp. fresh thyme, finely chopped (dried is ok too)
4 garlic cloves, minced
4 oz. cremini mushrooms, sliced
4 oz. shiitake mushrooms, stemmed and sliced
4 oz. oyster mushrooms, sliced
1 cup uncooked Arborio rice or other medium/short-grain rice
1/3 cup sherry cooking wine
4 cups baby spinach
1/2 cup (2 oz.) grated fresh Asiago cheese (can substitute Parmesan)
1/2 tsp.salt
1/4 tsp.freshly ground black pepper


Bring chicken stock to a simmer in a small saucepan, without boiling; keep warm over low heat.

Heat a large Dutch oven over medium heat. Add bacon to pan; cook 8 minutes or until crisp, stirring occasionally. Remove bacon from pan with a slotted spoon and let drain on a paper towel lined plate. Add shallots, oil, thyme, and garlic to drippings in pan; cook 6 minutes or until shallots are tender, stirring occasionally. Add mushrooms to the onions and cook about 8 minutes, stirring occasionally.

Add rice and cook 1 minute until it turns slightly opaque; stir constantly. Stir in cooking wine and cook a minute or two, or until the liquid is nearly absorbed, stirring constantly.

Stir in 1 cup stock, cooking until the liquid is nearly absorbed, stirring occasionally. Add remaining stock, 1/2 cup at a time, stirring occasionally until each portion of stock is absorbed before adding the next (about 25 minutes total). Taste for doneness of the rice near the end of cooking; it may be done before you've used all the stock. Do not add the rest or the rice will become too mushy.

Stir in spinach; cook 1 minute. Remove from heat; stir in cheese and bacon. Check for seasoning and then add salt and pepper to taste.

SOURCE: Adapted from Cooking Light

Monday, October 31, 2011

White Chocolate Macadamia Nut Cookies


White chocolate macadamia cookies were always my favorite growing up. Although nothing beats a homemade chocolate chip cookie straight out of the oven, there was just something about these cookies that beckoned me. They were like a special treat. I would choose them over any other cookie if they were offered at a party or gathering. Sometimes I would even snag one at Mrs. Fields or Subway when I was at the mall hanging out.

That having been said, I never ONCE made them all that time! People don't really make white chocolate macadamia cookies do they? I mean, I know you can get them in large quantities at your local Costco and such, but really, I don't think I've ever eaten a homemade one! Do you even see many recipes for this wonderful cookie in many cookbooks? I'm sure the recipes are actually there, even if they are few and far between.

I don't know what prompted me to make these the other night, but I'm so glad I did! Well, actually, I have this love affair with the bulk foods section at WinCo every time I go there and the last time I was there I grabbed a small bags worth of macadamia nuts. I had great intentions to use them but never did. So, I figured there's no time like the present. Sunday nights my girls and I are almost always in the kitchen together making treats; usually brownies or cookies. So, as I opened my cupboard and saw all the little bags of bulk food goodness, I spied that little bag of nuts and naturally my mind went to cookies...and the rest is history.

So, long intro, I know, but I have to say these cookies are superb (and I'm pretty picky about my cookies)! They are a little crunchy around the outside edges but nice and chewy in the middle and they have that nice contrast between slightly salty and sweet. Stick this recipe in your cookie file, you're going to want to make them. (You can probably find good deals on nuts and chocolate chips now or soon with the upcoming holiday baking season, so stock up!)

White Chocolate Macadamia Nut Cookies
Makes about 2 1/2 dozen cookies

2 cups all-purpose flour
1/2 tsp. baking soda
1/2 tsp. salt
3/4 cup unsalted butter, melted and cooled to room temperature
1 cup packed light brown sugar
1/2 cup white sugar
1 egg
1 egg yolk
1 tablespoon vanilla extract
1 cups chopped macadamia nuts
1 cup white chocolate chips

Preheat the oven to 325 degrees F.

In a medium bowl, whisk together the flour, baking soda and salt and set aside.

In a stand mixer with a paddle attachment, beat together the melted butter*, brown sugar, and white sugar. Beat in the egg, then beat in the egg yolk, then beat in the vanilla. (*Do NOT skip cooling the butter down to room temperature, you may encounter problems with your dough if it is too hot.)

Gradually add the flour mixture to the sugar mixture until just moistened. Gently mix in the macadamia nuts and white chocolate chips either by hand with a rubber spatula, or with a few pulses of your mixer.

Using a small scoop, drop dough onto baking sheets. Slightly press down on the cookies with the palm of your hand a bit to flatten. but not too much. Bake for 12-15 minutes or until the edges look golden brown and the middles don’t look quite set. Allow to finish cooling on the baking sheet. Remove cookies to a cooling rack and repeat with remaining dough, scooping dough out onto COOLED baking sheets (this will prevent them from spreading too quickly).


SOURCE:Slightly adapted from Brown Eyed Baker

Thursday, October 27, 2011

Pepita Granola and Pumpkin Butter


If you like granola, you're in for a treat for today's post! I daresay that this has become my favorite granola...ever...I think. I first discovered it last fall, when I fell in love with it. Then I waited all the way until this fall to make it again, don't ask my why. Maybe because it seems strange to eat pumpkin other than during pumpkin season.

I usually eat my granola on top of some plain yogurt, but I couldn't resist mixing it together with some pumpkin butter to take it over the top. If you've never heard of or had pumpkin butter, it's pretty similar to apple butter in that you let it cook down with some sugar and spices. It's very easy to make and very tasty, but you only need a dollop because it packs a spice-packed punch.

If you have a hard time finding the nuts and dried fruit that you want, try shopping where they have a bulk foods section. I usually buy all my ingredients to make any kind of granola from the bulk section at my local WinCo. They are also less expensive there as well and you can just buy the quantity that you want.

You can also experiment with dried fruit by drying your own, especially if you have a dehydrator. I like to buy boxes of fruit, in season, to can and dry to use throughout the rest of the year. This year I got about 40 lbs. of delicious pears; you wouldn't believe how yummy they are dried! I'll hopefully be doing apples soon as well.

Pepita Granola
3 cups old-fashioned rolled oats
1 cup crisp rice cereal
1/4 cup ground flax seed (optional)
1 cup sweetened flaked coconut
1 1/2 cups nuts and seeds (I used about 1/2 cup each of sliced almonds, chopped walnuts, and green (hulled) pumpkin seeds-not roasted)
2-3 cups mixed dried fruit (I used pears and cranberries; you could also use apricots, cherries, raisins, apples, figs, or whatever else you want.)
1/4 cup coconut oil (or other oil)
1/4 cup mild honey
1/3 cup packed brown sugar
1/4 - 1/2 cup unsweetened applesauce
1/2 - 1 tsp. cinnamon
Pinch salt
splash of vanilla

Preheat oven to 325 degrees F.

In a large mixing bowl, stir together the oats, cereal, flax meal, coconut and nuts. In a microwave safe bowl, gently melt the oil and honey; add the sugar, applesauce, cinnamon, salt and vanilla and stir until incorporated. Pour over the dry mixture and stir until it's evenly coated.

Spread granola over two cookie sheets and bake about 15-25 minutes, until lightly golden, stirring every 5 minutes. Stir in dried fruit. Let granola cool completely and store in an airtight container in the fridge or freezer.


Pumpkin Butter
1 (29 ounce) can pumpkin, or about 3 1/2 cups fresh pumpkin puree
3/4 cup apple juice
2 teaspoons ground ginger
1/2 teaspoon ground cloves
1 1/3 cups brown sugar
1 tablespoon ground cinnamon
1/2 teaspoon ground nutmeg

Juice of half a lemon

Combine pumpkin, apple juice, spices, and sugar in a large saucepan; stir well. Bring mixture to a boil. Reduce heat, and simmer for 30 minutes or until thickened. Stir frequently. Adjust spices to taste. Stir in lemon juice, or more to taste.

Once cool, pumpkin butter can be kept in an airtight container in the fridge


SOURCE: Adapted from Smitten Kitchen

Thursday, October 20, 2011

Moroccan Fall Salad

I feel like the boy who cried wolf a little bit right now. Although it's been nice not having to worry about scheduling posts (while making preparations for baby instead), I still find myself wanting to share with you the yummy things I've been making!

I like food...a lot, and I love sharing it all with you. So, here I am again; I just can't stay away.

Baby is still due in 2 weeks. This will be girl #3-heaven help us! Some say #3 is the hardest, some say #2 was hardest. I guess we will see.


This is a truly unique salad! I had it for the first time about a year ago and tried to recreate it last fall but didn't do so hot. Recently I found myself with some root veggies that had been given to me and this salad came mind again. So, I went about trying to recreate the salad. Well, it made it on the blog, so this time was definitely a success!

I just love how loaded it is with different veggies; not to mention the dried fruit and nuts. When I ate this salad before, it was topped with Moroccan-spiced chicken. I didn't want to use chicken but still wanted those authentic flavors to pull the dish together. So, I created a vinaigrette that has some of those same spices, and I think it worked great! Here's some healthy eating inspiration to use up those fall veggies!

Moroccan Fall Salad
1 head romaine lettuce, shredded
1/2 cup butternut squash, diced (boiled or roasted*)
1/2 cup beets, diced (boiled, roasted* or canned)
1 avocado, diced
1-2 small carrots, peeled and sliced (or shredded)
1/2 cup button mushrooms, sliced or diced
1/2 large bell pepper, diced
1 hard-boiled egg, diced
1/4 cup dried cranberries
1/4 cup dates, small-diced
1/3 cup sliced toasted almonds
Feta cheese, crumbled (optional)

*You can roast the squash and beets at the same time if you wish. Just wash, peel and dice them. Throw them on a cookie sheet, drizzle with olive oil and sprinkle with salt and pepper. I kept them separated on the same cookie sheet so the beets wouldn't bleed onto the squash. Roast in a 425 F oven for about 15-20 minutes, checking every 10 minutes or so and tossing them around a bit.

Prepare all the rest of the ingredients while the squash and beets are roasting, setting aside the eggs, avocado.

When beets and squash are finished cooking and cooled down, toss everything but the eggs and avocado together in a large salad bowl. Dish out salad onto individual plates and top with egg, avocado and feta cheese, if desired. Serve with Moroccan vinaigrette.


Moroccan Vinaigrette
1/4 cup red wine vinegar
1/4 cup olive oil
1-2 Tbsp. dijon mustard
2 tsp. honey
1/8 - 1/4 tsp. each cinnamon, cumin, cardamom, ginger (I actually used fresh)
1 garlic clove, minced

Put all ingredients into a small mixing bowl and whisk until combined.

Tuesday, October 11, 2011

Easy Pizza Sauce

Just taking a second to throw this up here, especially since it goes with my last post for pizza. I love this pizza sauce. If you make pizza a lot, you should try it.


For over a year now I have been using an easy pizza sauce that you just add a powder mix to a can of tomato sauce. I liked it ok, but I realized it wasn't the freshest option, nor the healthiest (since most pre-packaged spice mixes have anti-caking agents in them for a long shelf life.) I don't know about you but I'd much rather have something fresh, plus the taste is always better. This sauce is pretty close to fresh and it's super quick and easy to boot! It also tastes loads better than the stuff you can get in a pre-packaged spice mix.


Easy Pizza Sauce
1 8-oz can tomato sauce
drizzle of olive oil
1-2 cloves garlic, minced
1/2 tsp. salt
1/4 tsp. pepper
1/2 tsp. dried oregano
1/2 tsp. dried basil
1/2 tsp. dried rosemary

Add everything together in a small mixing bowl and mix well. Let sit for an hour or so before you're ready to make your pizza.

SOURCE: Adapted from Alli-n-Son

Saturday, October 1, 2011

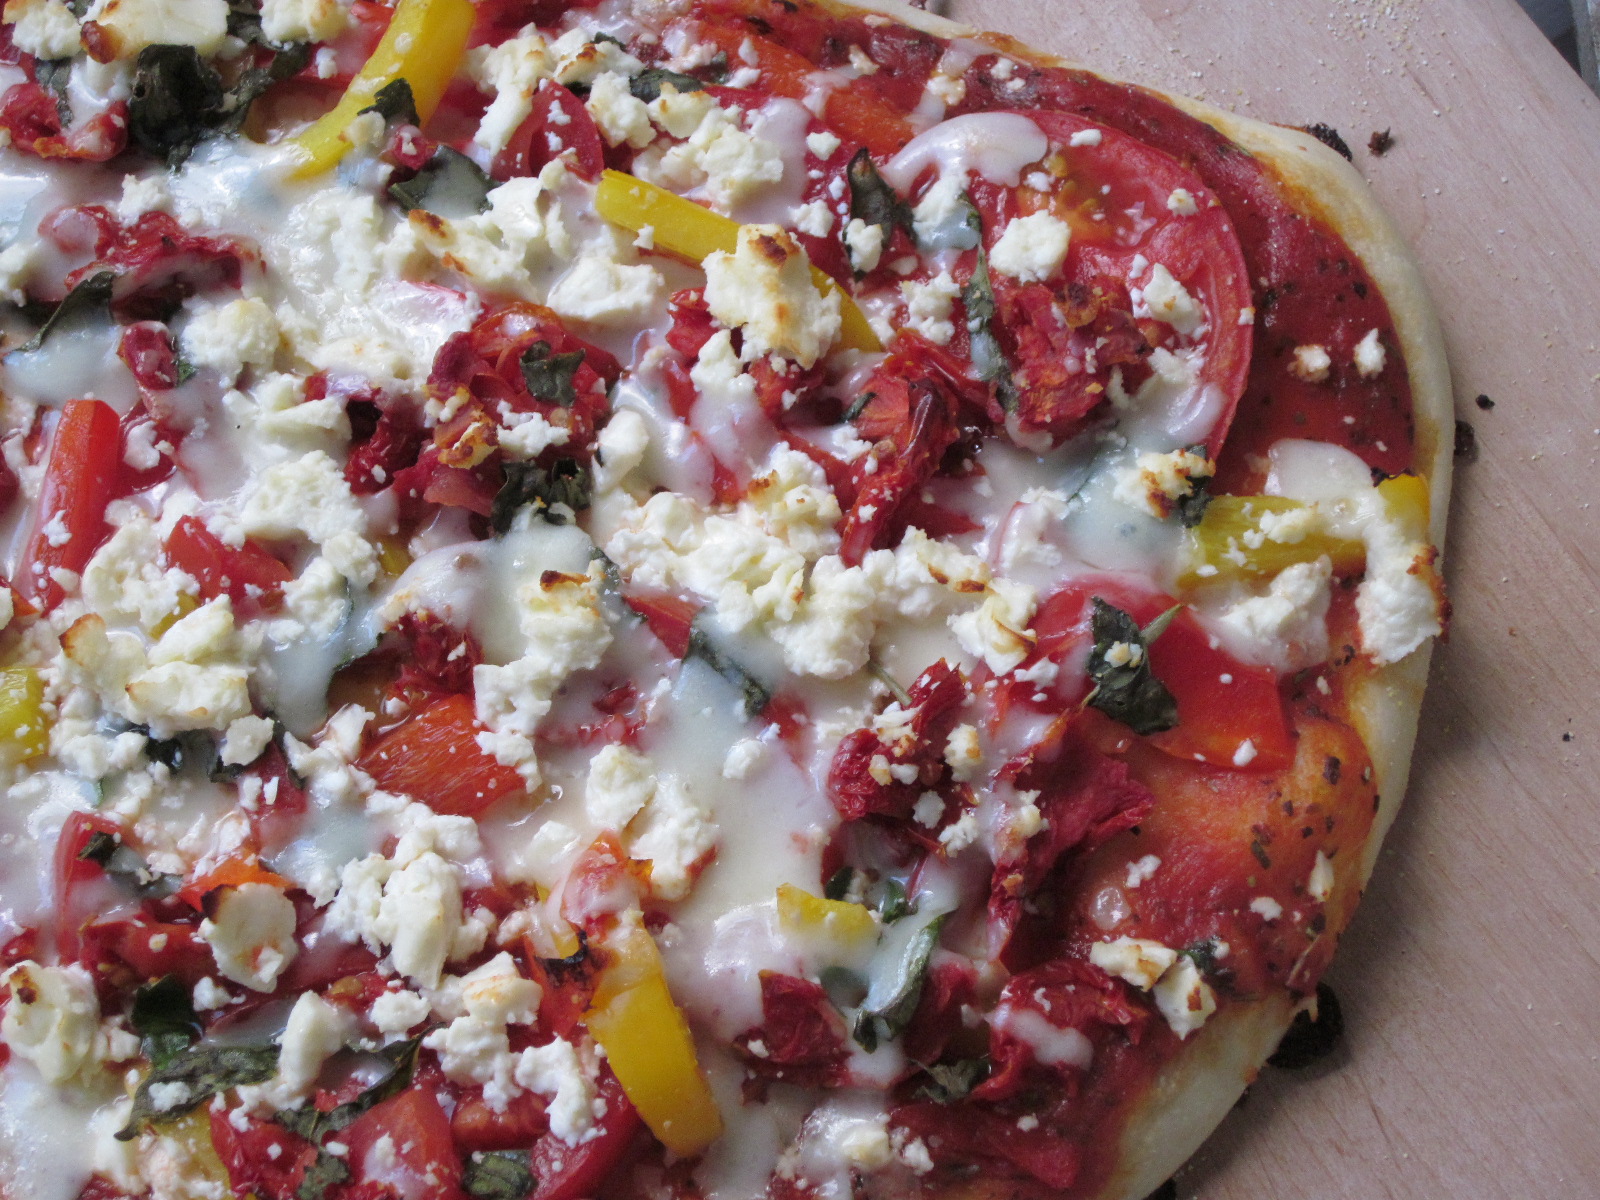
Sweet Pepper, Tomato and Feta Pizza


This has been my new favorite pizza lately. I actually made it twice within a week once and didn't even get tired of it. The flavors of all the fresh veggies and two cheeses really go together well; I especially love the pop of the fresh basil. I know it's nearing the end of the season, when you can get all this produce cheap, but if you have a chance, squeeze this into your menu before it gets too cold!

Sweet Pepper, Tomato and Feta Pizza
Makes 1 large (about 16-inch)pizza
1 recipe Perfect Pizza Crust
your favorite pizza sauce
2 Roma tomatoes
1/2 cup julienned red and yellow peppers
1/4 cup feta cheese
1/4 cup sun-dried tomatoes
1/2 cup mozzarella cheese, grated
1/4 cup fresh basil, torn or chiffonade

Make pizza crust according to directions. Preheat oven (and pizza stone) to 450 degrees F. Roll pizza dough out onto either a pizza stone or the back of a cookie sheet that's been generously sprinkled with cornmeal. Spread sauce on top.

If you're using sun-dried tomatoes that are not packed in oil, place them in a small saucepan and add water until they are just covered. Boil for about 5 minutes, until soft; drain and chop.

Layer Roma tomatoes, sun-dried tomatoes and peppers on top of pizza dough. Top with feta, mozzarella and basil. Bake for about 7-10 minutes or until cheese is bubbly and just starting to brown.


SOURCE:Adapted from the Costco Cookbook

Monday, September 26, 2011

Crispy Coconut Chicken Fingers


*I had a request over 2 weeks ago to post theses chicken fingers. Sorry it has taken me so long, hope you enjoy!

Mmmmm, crunchy on the outside, moist on the inside, these chicken fingers were pretty perfect; aside from the fact that there was coconut involved-which I love! We couldn't get enough of these, they were a big hit at our house, kids and all! I loved dipping them in the sweet chili sauce; the contrast was a great combination. To use some of the leftover coconut milk, I served the chicken with this Thai Coconut Rice, as well as some sweet peas.

Crispy Coconut Chicken Fingers
1 lb. boneless, skinless chicken breasts (about 2)
1 large egg
1/4 cup coconut milk
1/2 cup flour
1 cup panko bread crumbs
1 cup shredded coconut
1/2 tsp. salt
1/4 tsp. pepper
sweet chili sauce

Trim off fat from chicken breasts and cut them into strips. Preheat oven to 450 degrees F.

Set up your breading station on the counter, using either 3 plates or bowls, set in a row. At the end, place your baking sheet, either sprayed with cooking spray or lined with a silpat. In the first container, combine the flour, salt and pepper. In the second, whisk together the egg and coconut milk. In the last container, combine the panko with the shredded coconut.

Bring your chicken over; dredge each piece lightly in the flour, shaking off any excess. Next dip it in the egg/coconut mixture, then the coconut and bread crumbs, pressing lightly to make sure it sticks to the chicken. Lay each piece on the baking sheet. (When putting your chicken pieces through the breading station, it is helpful to use one hand for the wet and one hand for the dry. That way, your fingers don't get stuck with all the breading on them.)

Bake chicken strips for about 12-15 minutes or until no longer pink. Serve with sweet chili sauce (readily available on the Asian aisle of most markets).

SOURCE: Adapted from Budget Bytes

Friday, September 16, 2011

Tomato Basil Simmer Sauce

*I thought this was another fitting post for the end of the summer. If you're like anyone else, tomatoes are busting out of your garden about now and you're running out of ideas to use them for. Try this sauce, you'll love it. And if you've canned all you can can, you can dry your tomatoes and call them sun-dried tomatoes; they're pretty posh in the store, but cheap and easy to make at home.


I've been canning my own pasta sauce for a few years now. I've experimented with different pouch mixes, where all you have to add is basically the tomatoes, as well as doing everything from scratch, chopping an dicing every last veggie and herb. I have two favorites that I really like now and they are completely different. The first is Mrs. Wages Pasta Sauce pouch mix; I believe it is readily available in most markets near the canning supplies. I love that all I have to is add the tomatoes to the mix (well after all the work of blanching, peeling and chopping in the food processor- which is really not that bad). I like the flavor of the pouch, but my husband wasn't as fond, so I started trying actual recipes from scratch.

I came across this Tomato-Basil Simmer Sauce last summer and made a batch then. I really liked it and even got a thumbs up from my hubby; so, this has become my other favorite. Since it's a basic sauce, it's not really much more work than using a pouch; all you're really adding is herbs and spices to the tomatoes. I love the fresh, clean taste of this sauce. It's not overly seasoned, so apart from using it as-is for a light pasta dish, you can still dress it up with Italian sausage to make a more complex sauce.

The recipe only makes about 6 pints, which is probably a good-sized batch for beginners. However, if I'm going to can, I'm going to CAN! I like to can my pasta sauce in quarts and make about 12 quarts worth at a time. If you decide to multiply the batch and do more, make sure you check your measurements WELL and even then add the spices a little at a time to make sure it tastes to your liking. I made the mistake of adding WAY too much black pepper once and although the sauce tasted good, it gave you that kick in the back of the throat right after.

For more information on basic canning you can check out the Ball website or grab the Ball Blue Book of Canning at your local grocery store or Walmart. I love this book, I call it my canning bible. I've used it a ton and well-worth the $5 or $6 it costs to purchase.


Tomato-Basil Simmer Sauce
Makes about 12 cups sauce (6 pints)

12 pounds ripe tomatoes (about 25 tomatoes), blanched and peeled
3 Tbsp packed brown sugar
2 Tbsp kosher salt or 4 teaspoons salt
1 Tbsp balsamic vinegar
1 tsp. freshly ground black pepper
2 cups lightly packed fresh basil leaves, chopped
1 cup lightly packed assorted fresh herbs (such as oregano, thyme, parsley, or Italian (flat-leaf) parsley), chopped
6 Tbsp lemon juice

Cut peeled tomatoes into chunks and add some of the chunks to the food processor. Cover and process until chopped. Transfer chopped tomatoes to a 7- to 8-quart nonreactive heavy pot. Repeat chopping remaining tomatoes, in batches, in the food processor. Add all tomatoes to the pot.

Add brown sugar, salt, vinegar, and black pepper to the tomato mixture. Bring to boiling. Boil steadily, uncovered, for 70 to 80 minutes, stirring occasionally, until mixture is reduced to about 12 cups (making sure you have enough to process 6 FULL pints) and is desired sauce consistency. Remove from heat; stir in herbs.

Spoon 1 tablespoon lemon juice into each of six hot, clean pint canning jars. Ladle sauce into jars with lemon juice, leaving 1/2-inch headspace. Wipe the jar rims; adjust lids. Process filled jars in a boiling-water canner for 35 minutes (start time when water returns to a full boil). Remove jars; cool on wire racks.


SOURCE: Better Homes and Gardens

Monday, September 12, 2011

Cool Zucchini Slaw

*I know, I know, I just signed off the other day. I forgot I had this ready to post and I couldn't leave you at the end of the summer without it. I've made it a couple of time recently and just love it!


Since I don't have my own garden this year, I haven't had to deal with zucchini and summer squash coming out my ears like I have in the past. However, I was given a bunch of it all within a couple of days and needed a new idea of how to use it. My kids won't really eat it cooked and I'll just say it's not my husband's favorite vegetable. So, I thought about making a raw zucchini salad and thought a slaw would be perfect. I found this recipe right away, made my own little tweaks and came up with this wonderful, fresh, slightly crunchy and definitely tasty salad. So, if you're looking to use up what's left in your garden, look no further!

Cool Zucchini Slaw
For the slaw:
1 1/2 pounds zucchini and/or summer squash, (about 3 medium), grated
1/2 medium sweet onion, such as Vidalia or Walla Walla, very thinly sliced (I just used a small amount of a red onion)
1 large granny smith apple, peeled and grated
1 large red or green bell pepper, julienned
2-4 Tbsp. chopped fresh basil

For the vinaigrette:
1/4 cup cider vinegar
3 tablespoons frozen apple juice concentrate
drizzle of olive oil
Salt & freshly ground pepper, to taste

Shred the zucchini/squash, as well as the onion and set it in a colander for about half an hour to drain out some of the liquid. Once drained, add the zucchini and onion to a salad bowl, and add the apple pepper and fresh basil.

In a small bowl, whisk together the vinaigrette ingredients. Taste for seasoning and adjust, if necessary. Pour over slaw and toss to coat. Serve immediately.

Saturday, September 10, 2011

Panzanella


If you can't already tell (by the amount of salads I've posted lately), I love salads and I love to eat them in the summer when everything is so fresh. Last summer I discovered this Greek Panzanella which I absolutely love, but I recently re-discovered this more traditional panzanella (in my ever long list of bookmarked recipes) that is wonderful and just as delicious. If you are unfamiliar with the word panzanella, it's Italian, basically a leftover bread salad. Typically panzanellas don't sport lettuce but I like to throw it in because I'm all about getting your daily greens, and this seemed like a no-brainer to me.

This recipe comes from Ina Garten, the Barefoot Contessa, so you know it's gonna be good. I only expect the best from her and she ALWAYS delivers. I hope you enjoy this salad as much as I do.

Panzanella
For the salad:
3 Tbsp. olive oil
1 small French bread or boule, cut into 1-inch cubes (6 cups)
1 tsp. salt
2 large, ripe tomatoes, cut into 1-inch cubes
1 English cucumber, unpeeled, seeded, and sliced 1/2-inch thick
1 red bell pepper, seeded and cut into 1-inch cubes
1 yellow bell pepper, seeded and cut into 1-inch cubes
1/2 red onion, cut in 1/2 and thinly sliced
1/2 - 1 head romaine lettuce, shredded
20 large basil leaves, coarsely chopped

For the vinaigrette:
1 tsp. finely minced garlic
1/2 tsp. Dijon mustard
1/4 cup Champagne vinegar (I used red wine vinegar)
1/4 cup olive oil
1/2 tsp. salt
1/4 tsp.freshly ground black pepper

Heat the oil in a large saute pan. Add the bread and salt; cook over low to medium heat, tossing frequently, for 10 minutes, or until nicely browned. Add more oil as needed.

For the vinaigrette, whisk all the ingredients together.

In a large bowl, mix the tomatoes, cucumber, red pepper, yellow pepper, red onion and basil. Add the bread cubes and toss with the vinaigrette. Season liberally with salt and pepper. Serve, or allow the salad to sit for about half an hour for the flavors to blend.


SOURCE: Ina Garten

Monday, September 5, 2011

Crunchy Asian Salad


This was a super fun salad to make and eat! It's not difficult in any way, nor are there complex flavors or ingredients. What makes this salad extra special and tasty is the crunchy topping. What fun texture and flavor to add to a simple salad.

I've used both romaine lettuce as well as green cabbage, for a little variety, although most any lettuce or cabbage will do. I've also kept the veggies simple, but feel free to add more.

Crunchy Asian Salad
For the topping:
1 pkg. ramen noodles (flavor packet discarded)
1/4 cup butter
1/2 cup sesame seeds
1/2 cup slivered or sliced almonds

For the salad:
1/2 small head green cabbage, shredded
1/2 head romaine lettuce, shredded
2 red peppers, julienned
1 cucumber, peeled and sliced
6 green onions, thinly sliced

To prepare the topping, crush ramen noodles and add to a small frying pan pan with butter, sesame seeds and almonds. Cook until golden brown, stirring often. Remove to a small plate or dish to cool.

Add all salad ingredients to a large salad bowl and toss to evenly distribute veggies. Serve salad on individual plates, adding salad dressing and topping as desired.

Notes: I used the vinaigrette from this salad because I had leftovers. You could easily just throw together equal parts of rice vinegar and canola oil, a splash of sesame oil, sugar and soy sauce for another quick and easy dressing.

SOURCE: Adapted from Your Homebased Mom

Thursday, September 1, 2011

Souvlaki Chicken Salad Sandwich w/ Roasted Red Peppers


I haven't made chicken salad for quite a long time. In fact, I can't even remember the last time I ate it! I like it ok, but I'm not a huge fan of mayo...in anything, so I try to stray away from it. I came across this recipe a few weeks ago, I don't even know how, but it so intrigued me. Chicken salad with NO mayo and all the Greek flavors I absolutely love; I say WIN! And oh, was this a winner. My husband took it to work the next day for lunch and raved about how good it was too.

The chicken I used in the salad came from this chicken I roasted earlier the same day. I did use the pan drippings, as the recipe states, the first time I made the salad. The second time I made the salad, I pulled the leftover chicken from the freezer and just used olive oil instead and it was still yummy. Seriously, this is the best sandwich I've had in a long time. You've got to try it!

Souvlaki chicken Salad Sandwich w/ Roasted Red Peppers
2 cups cooked, shredded chicken
zest and juice of 1 lemon
1 tsp. oregano
2 cloves garlic, minced
2 Tbsp. drippings from roast chicken (optional), or a drizzle of olive oil
2 Tbsp. red onion, finely diced
1/3 cup feta, crumbled
salt and pepper to taste
2 small roasted red peppers, sliced in fourths, lengthwise
baby spinach leaves
sandwich rolls or bread

In a small bowl, mix together chicken, oregano, garlic, drippings, onion, feta, salt and pepper. Check for seasonings and add more, if necessary.

To assemble, slice sandwich rolls and put about 1/4 cup of chicken salad on the bottom half of roll. Layer a few spinach leaves on to of the chicken, then top with a fourth of the roasted red pepper and the top half of the sandwich roll. Enjoy!


SOURCE:Adapted from Closet Cooking

Saturday, August 27, 2011

Peanut Butter Pretzel Brownies


You're gonna want to unbutton your pants right now, or go slip on something with an elastic waistband. I'm telling you, these babies are RICH and slightly decadent! What a perfect combination though, chocolate, peanut butter and pretzels. It reminds me of one of my favorite Ben and Jerry's Ice Cream flavors: chubby hubby. My husband and I discovered it on our honeymoon and it became our guilty pleasure for a while.

I love the salty sweet combination and these brownies have layers of it. First, the pretzel layer on the bottom actually lends a little of both and adds a great crunchy texture. The brownie layer is obviously nice and sweet, and dense if you make your brownies like me. I love a good dense brownie. To top it off, the peanut butter frosting is OUT OF THIS WORLD! I've used it on brownies and cupcakes before and practically can't keep my fingers out of it. It's got the sweet and salty thing going on too. Just can't resist that!

You'll want to take these to a potluck or family party to keep you from eating half the pan. Maybe a few minutes on the treadmill wouldn't hurt either. Enjoy!

Peanut Butter Pretzel Brownies

For the pretzel layer:
2 cups pretzel, crushed (but not to a powder)
1/2 cup butter, melted
1 Tbsp. sugar

For the brownie layer:
1 box of your favorite brownie mix (9x13 size), or your favorite brownie recipe

For the peanut butter frosting:
1 cup powdered sugar
1/2 cup creamy peanut butter
2 1/2 Tbsp. unsalted butter, at room temperature
1/2 tsp. vanilla extract
1/4 tsp. salt
3 Tbsp. heavy cream

Preheat the oven to 350 degrees F. While oven is preheating, put the butter in a 9x13 cake pan to melt. Crush the pretzels. When butter is completely melted, stir in the sugar then add the pretzel pieces. Stir the pretzels around until they are completely coated in the butter/sugar mixture, then spread them evenly across the bottom of the pan. Put the pan back in the oven and bake 10 minutes. Remove and cool.

Prepare brownies (enough for a 9x13 pan) according to directions and pour over cooled pretzels. (I didn't wait quite long enough for the pretzels to cool, so they were still a little warm when I poured the brownies on, thus resulting in the pretzels sinking into the brownies a little more than I had wished.) Bake brownies according to directions, then cool completely!

To prepare the frosting, put the powdered sugar, peanut butter, butter, vanilla, and salt in the bowl of an electric mixer fitted with a paddle attachment. Mix on medium-low speed until creamy, scraping down the bowl with a rubber spatula as you work. Add the cream and beat on high speed until the mixture is light and smooth; a minute or two. Do not whip or the cream will start to separate.

Frost brownies and cover. Refrigerate for an hour two before serving.

SOURCE: Frosting from Ina Garten


Linked to...
Sweet Indulgences Sunday @ A Well-Seasoned Life
Sweets For A Saturday @ Sweet As Sugar Cookies

Thursday, August 25, 2011

Creamy Lemon-Herb Pasta


Let me just tell you, this is the perfect summer dish! It is easy, quick and uses what most people have in abundance this time of year: zucchini and fresh herbs from the garden. Really, it takes no longer to throw together than the time it takes you to boil your pasta, especially if your chicken is already cooked. I used the leftover chicken from the Lemon and Oregano Chicken I roasted earlier in the week so all I had to do was take it out of the fridge when it was time to throw it all together.

Feel free to use whatever chicken you have on hand, chopped or shredded. If you want a simple marinade, just throw a couple drizzles of olive oil, juice of a lemon and some salt and pepper in a zip-top bag with your uncooked chicken and let it sit for 30 minutes or so then throw it on the grill when you're ready to prepare the rest of the meal.

If I were Rachel Ray, this would be one of my 30-minute meals. And on a good day, I bet you could whip this dish up in 15 minutes; I'd say pretty perfect for a weeknight dinner.


Creamy Lemon-Herb Pasta
1 1/2 cups cooked chicken, grilled and sliced or shredded
1/2 lb pasta
2 medium zucchini (I used one zucchini and one yellow squash)
1/2 small red onion, thinly sliced
olive oil
5-6 cloves garlic
Juice of 2 lemons
2 oz. cream cheese
1 C shredded parmesan cheese
about 8-10 fresh basil leaves, chopped
1 tsp. oregano, dried (or a small handful of fresh, chopped)
salt and pepper

Season and cook/grill/roast your chicken as desired, or use leftovers from a rotisserie chicken. Set aside.

Bring a large pot of water to boil. Preheat grill or or indoor grill pan. Slice zucchini and/or squash, on the diagonal, about 1/8th-inch thick. Grill zucchini/squash and onion, just until lightly browned; about 2-3 minutes per side. Remove from grill and set aside. Drop pasta into boiling water and cook according to package directions.

In a large skillet, add a drizzle of olive oil to heat up, over medium high heat. Add garlic and dried oregano and saute 1 minute. Add lemon juice and cream cheese. Once cream cheese starts melting, start whisking it together so the sauce is smooth. Remove from heat and add the parmesan. Continue whisking until cheese is melted and sauce is once again smooth. Check for seasonings and add salt and pepper to taste. Add reserved chicken and grilled veggies. Toss to coat.

Drain pasta and pour into a large ceramic dish. Pour sauce mixture over pasta, gently folding in the chicken and veggies. Add fresh basil (if using fresh oregano, add it here as well) and toss one more time.

Serve warm.


SOURCE: Adapted from Our Best Bites

Tuesday, August 23, 2011

Lemon and Oregano Roast Chicken


I can't tell you how divinely my house smelled when I was roasting this chicken. It was all I could do to keep my hands out of it when it was cooled and out of the oven, while I was trying to separate it for the week's meals.

I had a few meals in mind when I decided to make this chicken and I had originally wanted to buy a whole chicken to roast, then almost fell back on buying an already cooked rotisserie chicken. But, I was out for a budget buy this time and saw a pack of 5 bone-in chicken breasts marked down to under $4 and decided that would get me the most bang for my buck. The chicken breasts cooked up just as well as a whole chicken would have, tasted out of this world and cooked in a lot less time than a whole chicken would.

This simple, easy to prepare chicken would be a great addition to any number of dishes, or you can simply enjoy it by itself, along side some crusty bread and steamed veggies. Check back soon to see the other dishes I used this chicken in!

Lemon and Oregano Roast Chicken
1 whole chicken, or bone-in chicken breasts; about 3-4 lbs. (rinsed and patted dry)
1 lemon (quartered)
4 sprigs fresh oregano (optional)
4 cloves garlic, whole
1 lemon (zest and juice)
2 tablespoons fresh oregano (or 2 teaspoons dried)
2 cloves garlic, minced
2 tablespoon olive oil
1 tablespoon salt
1 teaspoon pepper

Preheat oven to 350 degrees F.

If you're using a whole chicken, place in a roasting pan and fill the cavity with the lemon quarters, oregano sprigs and garlic. If you're using bone-in chicken breasts, line a cookie sheet with foil and arrange the chicken breasts on top. Arrange the lemon quarters and whole garlic cloves around the chicken.

Mix together the lemon zest, juice, oregano, garlic, oil, salt and pepper in a small bowl. Gently loosen the skin on the chicken and, without tearing the skin, rub the mixture underneath it as much as possible.

Roast chicken in preheated oven until done and juices run clear; about 1 1/2 - 2 hours for a whole chicken and about 35-45 minutes for chicken breasts.

Remove from oven and let rest for 20 minutes


SOURCE:Closet Cooking

Saturday, August 20, 2011

Chicken Tacos with Mango Salsa


One thing I love about dinner time during the summer is all the fresh ingredients that are available. Everything seems to POP with flavor and a lot of times will require little to no cooking. That's the case with this meal. We absolutely loved it. My favorite part was actually the mango salsa, I thought it really made the dish. This was the first time I had added mangoes to a fresh salsa and thought it worked beautifully. You still get that tomato-garlicky-cilantro taste with a bite of sweetness from the mango here and there. It went perfectly with the seasoned chicken and the creamy avocados on top.

I like to use corn tortillas when I make tacos, but they can be a bit finicky sometimes and break apart, which can be frustrating. Usually, I pour a shallow amount of oil in a small fry pan and fry them up for about 30 seconds a side, then drain on a paper towel. If you don't want to use corn tortillas, feel free to substitute flour tortillas.

Chicken Tacos with Mango Salsa
For the marinade:
juice of 2 limes
2-4 Tbsp. olive oil
1/2 tsp. cumin
dash chili powder
2-3 cloves garlic, minced
dash of salt and pepper
1 lb. boneless, skinless chicken breast, cut into strips

For the tacos:
8 corn tortillas
oil, for frying (optional)
avocado, thinly sliced
shredded romaine lettuce

For the Mango Salsa:
1 ripe mango, peeled and diced
1-2 medium tomatoes, diced
3/4 cup jicama, peeled and cut into matchsticks
1/2 jalapeno pepper, seeded and diced (use a whole jalapeno if you like more spice)
1/4 cup chopped fresh cilantro
1/4 small red onion,very thinly sliced or finely diced
2 tablespoons honey
juice of 1 lime
Salt and pepper to taste


Prepare marinade by adding all the ingredients, except the chicken, into a zip-top bag. Shake until well-combined. Add chicken and seal bag, then shake until chicken is well-coated. Place bag on a plate and let marinade on the counter for 30-60 minutes.

In the meantime, prepare salsa by chopping the mangoes, tomatoes, jicama and jalapeno. Whisk together the rest of the ingredients in a small bowl and pour over the salsa. Gently fold until evenly mixed. Let sit at room temperature.

Prepare corn tortillas by frying them, if desired. Fry tortillas, one at a time, in a small frying pan with a little oil, about 30 seconds a side. Remove to a paper towel-lined plate to drain. Alternately you can use them un-fried or use flour tortillas.

To cook chicken, either preheat an outdoor grill or an indoor grill pan. Cook chicken until no longer pink inside; about 5 minutes.

To assemble tacos, layer the shredded lettuce on the bottom of a tortilla, then add the chicken, mango salsa and top with thinly sliced avocado.


SOURCE:Adapted from myrecipes.com

Wednesday, August 17, 2011

S'mores Cake in a Jar


I'm a just a little bit of a s'mores fan. Ok, really, I'm a HUGE fan. I love them just about any way I can get them. In fact, I should have a label over there on the side with all the s'mores goodies I've made; ice cream, pancakes, bars, cookies, brownies...you get the picture.

Anyway, I made this little treat for a friend's birthday and had no idea what a huge hit they would be. They are super easy and taste just like a s'more! Plus, it's such a fun presentation, how can anyone resist eating them?

S'mores Cake in a Jar
8-10 half-pint canning jars

For the crust:
1 1/2 cups graham cracker crumbs
1/2 stick butter
pinch of salt

Preheat oven to 350 degrees F.

Melt butter and mix in graham crumbs and salt. Mix until moistened. Spray canning jars with non-stick spray and press about 1-2 tablespoons graham crust into jars.


For the cake:
1 1/8 cups all purpose flour
1/4 cup cocoa powder
1 1/4 teaspoon baking soda
1/2 teaspoon salt
3/4 cup brown sugar
1 egg
1 teaspoon vanilla extract
1 cup milk (I used 1/2 cup whole and 1/2 cup 1%)
1/4 cup (4 Tbsp.) butter, melted
2 tablespoons sour cream

For the topping:
1/2 bag of marshmallows; large or small (In some of my jars I used the minis and others I used the new marshmallow stackers, which are kind of fun.)

In a bowl, whisk egg and sugar until smooth and no lumps remain. Add milk, butter and vanilla, and mix until combined. Stir in sour cream. Sift dry ingredients together and add to wet mixture. Mix until batter is smooth. Using a 1/4 cup measuring cup, divide batter evenly between jars. Try not to fill them more than half way. Place the jars in a baking dish and add about 1 1/2 cups of water to the bottom. Bake for 25-30 minutes, or until cake is set.

Remove cakes from the oven and press marshmallows down on top, being careful not to burn yourself. Use your own discretion here as to how many marshmallows you want to stuff in the jars. Turn the oven to broil and put jars back in. DO NOT WALK AWAY OR TAKE YOUR EYES OFF THE CAKES! Marshmallows should be puffed and browned in about 2-3 minutes. Serve immediately.

My notes:
-I used half pint jars, which I think is a good individual-sized portion. However, I think I would have liked the graham cracker and cake layers to be just a little bit thinner. So, for me 9 half pints would have been perfect. You can try different sized canning jars, just don't pour the cake batter in more than half way.
-I did use one pint jar and the cake was cooked the same time as the half-pint jars.

SOURCE: Adapted from How Sweet It Is

Linked to...
Sweets For A Saturday @ Sweet As Sugar Cookies
Sweet Indulgences Sunday @ A Well-Seasoned Life

Friday, August 12, 2011

Asian Wonton Salad


This was a fun salad to make and eat! I absolutely loved it. If you look at the ingredients, it doesn't look much different than a lot of other salads. But, what sets it apart is the delicious sesame dressing and the crunchy won tons....oh, the crunchy won tons; talk about fun to eat. I'm all about color in my salads too, because I want it to be eye appealing as well as good tasting, and there was some definite color going on here.

If you like to eat salad a lot, then add this to your repertoire. I love to change up my salads so I don't get tired of eating the same thing all the time. I don't know about you, but I'm also more likely to eat them more often as well if it's not the same old, same old.

I ate this as a main dish without any meat, but if you feel like adding something more substantial, try some grilled or shredded chicken, or even toasted cashews if you want to keep it meatless.


Asian Wonton Salad
1 head romaine lettuce, shredded
1 small head cabbage, shredded
1 pint cherry tomatoes
1/2 red onion, sliced thinly
1 cucumber, sliced
1 cup thinly sliced carrots

1/2 package wonton wrappers (save the other half in the freezer to make for another time)
vegetable oil for frying

Heat about 1 inch of oil in a small or medium frying pan. Use pizza cutter or sharp knife to cut wontons into thirds (3 strips). The oil should be around 375 degrees. Place only 3-4 strips in the pan at once; fry for 10 seconds, flip and fry for another 10 seconds or so. They go quickly so watch closely. Remove fried wontons to a paper towel-lined plate or tray. (These can be made ahead of time and kept in an air tight container.)

Shred lettuce and cabbage and place in a large salad bowl. Top with cherry tomatoes, sliced cucumber, carrots and red onion. If you are serving the salad immediately, pour only enough salad dressing to lightly coat everything and toss to combine; add wontons and gently toss again or just place them on top. Otherwise, dish out salad portions to each plate and top with dressing and wontons.


Sesame Dressing
2/3 cup rice vinegar
2/3 cup canola oil
2 Tbsp sesame oil
4 cloves garlic, minced
2 Tbsp soy sauce
1/2 cup sugar
4 Tbsp sesame seeds

Place all ingredients into a pint jar (or something equivalent) and shake vigorously. If desired, make ahead of time and store in the fridge.

SOURCE: Adapted from Our Best Bites

Monday, August 8, 2011

Cheesey Garlic Bread Swirls


My husband said these rolls were deceptively delicious when he tried them, because they don't look like much; according to him. Actually, they are much like the pizza rolls I make, just without the pizza sauce.

I made these to go with dinner the other night and everyone could barely keep their hands off of them before it was time to eat! That should say enough about them to make you want to try them right?

These rolls are super easy and quick to throw together. I actually didn't even plan on making them until I had already started making dinner and I was still able to get them done in time to eat. (But then again, bread raises relatively fast in my house too.)

I like to use Johnny's Garlic Bread seasoning but feel free to make or use your favorite kind.

Cheesey Garlic Bread Rolls
1 recipe Perfect Pizza Crust
2-3 Tbsp. butter, softened
garlic bread seasoning
mozzarella cheese

Make pizza dough according to directions. After it has risen, roll it out into a rectangle; about 15 inches by 6 inches. Spread softened butter over the surface of the dough. Sprinkle garlic bread seasoning and mozzarella on top. Roll the dough up jelly-roll style.

With a piece of dental floss, slide it under the roll and pinch of pieces about 1-inch thick (for a visual, see photos on my orange roll recipe). Lay the rolls in a 13x9-inch baking pan, sprayed with cooking spray. Cover lightly and let raise until doubled.

Preheat the oven to 350 degrees F when the rolls are just about done raising. Bake for 18-22 minutes. Serve warm.

SOURCE: Adapted from Our Best Bites

Saturday, August 6, 2011

Vegan Breakfast Cookies


The first time I had theses cookies I could not get enough of them! My friend Rachel created the recipe and shared them at a class she was giving and I couldn't wait to get the recipe. I love her recipes because she puts a lot of thought into them and adds things that pack a nutritional punch. For example, coconut, I've talked a little about how good it is for our bodies in previous posts, raw sesame seeds are packed with calcium, flax seed is a great source for essential fatty acids and dietary fiber, and oats are also a good source of fiber as well as protein.

These little breakfast cookies are so delicious and the perfect way to start your day. The dough makes a relatively small batch because they are best eaten fresh, preferably the same day they are made. However, they will keep for several days.

Vegan Breakfast cookies
1 banana, mashed
2 Tbsp. coconut oil
1/4 cup agave
1/4 cup sesame seeds (preferably raw)
1/2 cup shredded coconut
1/2 cup raisins (you could also sub dried cherries or cranberries)
1/2 tsp. vanilla
pinch of salt
1/2 tsp. cinnamon
1 1/2 Tbsp ground flax seed
1 cup oatmeal
1/2 cup whole wheat flour
1/2 tsp. baking powder
1/2 tsp. baking soda

Preheat oven to 350 degrees F. Cream together the banana and the coconut oil. Add agave and mix well. Add the remaining ingredients and bake on parchment lined baking sheet for 10-12 minutes.

Makes about 12 -15 cookies.

Thursday, August 4, 2011

Chicken Milano


With the first bite of this meal, my husband said, "this is way better than Olive Garden."....and that is why we don't go out to eat! Ok, well, not really but I'm pretty choosy about where we go when we do go out.

This dinner is a real treat. It is so packed with flavor, it practically bursts in your mouth with every bite. The sauce is absolutely amazing, and although the original called for heavy cream, I wanted to use coconut milk to avoid dairy issues with my hubby and kids. The depth of flavor it created was wonderful. I couldn't believe how good it tasted, I thought for sure it wouldn't be up to par with heavy cream, but in this instance, I really think it surpassed it. The fresh basil at the end is a wonderful addition, but if you don't have any on hand you can use dried.

Chicken Milano
olive oil
2 Tbsp. butter
2 whole boneless, skinless chicken breasts, butterflied and cut into halves (4 pieces total)
Cajun seasoning, to taste
1 clove garlic, minced
1/3 cup sun-dried tomatoes, chopped
1 cup chicken broth
1/4 cup white cooking wine
1 cup (about half a can) full-fat coconut milk (or you can use heavy cream)
5 oz. cremini mushrooms, sliced
2 Tbsp.chopped fresh basil
1/4 cups Grated Parmesan Cheese
1/2 lb. (8 oz.) Fettucine pasta


Fill a large stock pot with water and bring to a boil.

Season the chicken with salt, pepper and a bit of Cajun seasoning on both sides. In a large, deep skillet or grill pan, heat olive oil over medium and saute chicken until cooked through. (Alternately, you could grill the chicken on an outdoor grill.) Transfer cooked chicken to a cutting board and cover to keep warm. Drain the fat from the juices left in the pan.

Once water in stock pot is boiling, drop pasta and cook to al dente, according to package directions.

In a large skillet, melt 1 tablespoon butter over low heat; add a drizzle of olive oil with it. Add sliced mushrooms and saute until dark in color and tender. Remove to a plate and set aside.

Add remaining tablespoon of butter to the skillet (or more olive oil if you prefer), as well as the garlic; cook for 30 seconds. Add the tomatoes, chicken broth and white wine; increase to medium heat and bring to a boil. Reduce heat and simmer, uncovered, for about 5 minutes or until tomatoes are tender. Add the coconut milk/heavy cream and mushrooms and bring to a boil, stirring often. Simmer over medium heat just another minute or so; sauce will be thin. Stir in basil, Parmesan cheese and more salt, pepper and/or Cajun seasoning, if desired.

Drain pasta and pour into large casserole dish. Pour sauce over pasta and let sit about 5 minutes.

Slice chicken and serve on top of the pasta and sauce. Garnish with fresh grated parmesan cheese and more basil, if desired.


SOURCE:
Tasty Kitchen

Linked to...
Recipe Swap Thursday @ Prairie Story
It's A Keeper Thursday @ It's A Keeper
Seasonal Sunday @ Real Sustenance

Wednesday, August 3, 2011

August 2011 Menu

Oops, I just typed in July menu in the title! I can't believe it's already August. The summer is flying by. Although it's been hot, I was thinking yesterday how enjoyable this summer has actually been, pregnant and all. We've spent lots of time at the park and at the pool, enjoying the outdoors as much as we can.

Last month we tried two new amazing recipes, Chicken Milano and Chicken Parmesan. If you haven't checked out chicken Parmesan, you've got to try it! The chicken Milano will be up tomorrow morning so you'll have to remember to stop by and check it out as well. AMAZING I tell you!

This month I think I have some pretty good meals lined up as well that I can't wait to try and some others that are old favorites. For those of you that are new, recipes that are linked are recipes already on the blog, that we've made before, and the rest I will post as I go.


Dinners
Spaghetti, fresh green beans and Cheesy Garlic Rolls
Black Bean Burgers with Homemade Burger Buns, Jicama and Apple Slaw, steak fries
Roasted Red Pepper, Spinach & Feta Quinoa Salad, with fresh fruit
Chipotle Chicken Taco Salad, corn on the cob

Mini Lasagna Cups, veggie/salad, leftover Cheesy Garlic Rolls
Lemon Linguine with Grilled Chicken
Jambalaya, Spicy Cucumber Salad
Fire Roasted Panzanella, Sweet Potato Fries
Souvlaki Chicken Salad with Roasted Red Peppers and Feta, Greek Salad

Corn and Basil Cakes with fresh salsa, fresh fruit
Chicken Enchiladas, salad/veggie
Bacon and Wild Mushroom Risotto w/ Baby Spinach, fruit
Asian Turkey Meatballs w/ Lime Sesame Dipping Sauce, brown rice & Asian Slaw
Homemade Pizza

Shrimp, Feta & Fresh Herb Mac and Cheese, fresh fruit
Pork tacos w/ Chile Verde, corn on the cob
Lemon Zucchini Fettuccine w/ Corn, Asparagus and Basil, Grilled Caesar Salad
Asian Pork Salad, rice and beans, fresh fruit

Other Stuff
Oatmeal Pancake Mix
English Muffins
Coconut & White Chocolate Pancakes
Peach Pancakes w/ Ginger Syrup

Monday, August 1, 2011

Creamy Caprese Pasta


So, a couple of weeks ago I bought this nice basil plant to keep in my kitchen or window sill. Well, I left it outside a few days and all of a sudden I noticed it was being eaten alive!!! I brought it in to check it out and noticed that small beetles had taken residence in it. I wasn't too happy. Now my plant is dying. I covet my basil plants during the summer because they're so nice and convenient to have and a very inexpensive alternative to buying fresh herbs at the grocery store every time you need them. Luckily I was able to get some more fresh basil from my mom's garden that I kept in a plastic bag in the fridge. I guess I learned my lesson!

Now about this pasta. This is the perfect dish to showcase some of the wonderful fresh flavors of summer: fresh basil and tomatoes. Everything tastes better with fresh ingredients anyway. I love the tomato/basil/fresh mozzarella combo, just LOVE it. And there are so many ways to do it too; pizza, panini, salad...you get the picture. I like this way because my kids are pretty good pasta eaters and this dish in particular came together very quickly; always a plus in my book, especially after a long day. You'll love it too. It's nice and creamy and packed with flavor.

Creamy Caprese Pasta
1/2 pound whole wheat tube pasta, such as penne, rigatoni or ziti
1 cup of your favorite pasta/tomato sauce
1/3 cup heavy cream
1/3 cup freshly grated parmesan cheese, plus more for garnish
4 ounces fresh mozzarella, cut into cubes
1 pint of grape tomatoes
1 bunch of fresh basil leaves; about 5-6 large leaves
Fresh grated parmesan cheese, for garnish

Preheat oven to 350 degrees F. Boil water and cook pasta according to directions.

While pasta is cooking, heat tomato sauce over low heat in a large saucepan. Once warm, stir in heavy cream and grated parmesan. Fold in mozzarella cubes (reserving some of them to top the pasta with), tomatoes and about 3-4 of the chopped fresh basil leaves.

When pasta is done cooking, drain and pour into a large casserole dish. Pour sauce over pasta and toss to coat. Top with remaining fresh mozzarella, add more if you like. Bake for 25 minutes, or until cheese is golden and bubbly.

Top with additional fresh basil and freshly grated parmesan cheese.


SOURCE:
How Sweet It Is

Thursday, July 28, 2011

Berry Chicken Salad with Berry Poppyseed Vinaigrette


I love it when summer rolls around because I get to eat lots of salad! I didn't used to be much of a salad eater. I thought salads were rather boring, although I did eat them when they were offered but mostly because I knew they were good for you and that's what I should do.

Last summer I discovered the beauty and diversity of salads; how flavorful and colorful they can be as well. I ate lots of salad and I didn't get bored with it. I fell in love with this Asian Slaw with this Ginger Lime dressing and ate it a ton.

This year I have found a few more gems and this Berry Chicken Salad is one of them. Apparently it's similar to a more commercially made one but I rarely eat out and when I do, it's not fast food. So, I wouldn't have been the wiser. I love that the berries in this salad are so deep and bright in color that it just makes the salad pop! They lend the sweetness, then the soft feta gives it that salty contrast. This would have been the perfect July 4th salad because it's red, white and blue. Come to think of it, I think I may have actually eaten this salad on July 4th. I ate it for the first time at a family reunion that weekend and when I came home I just had to have more!

Berry Chicken Salad
1/2 head Romaine lettuce, washed and shredded
6-8 oz. baby spinach
2 chicken breasts, well-seasoned to your liking, grilled and either thinly sliced or chopped into bite-sized pieces
8 oz. strawberries, rinsed and sliced
8 oz. blueberries, rinsed
4 oz. crumbled Feta or shredded fresh Parmesan cheese (or both!)
1 c. sliced almonds
Berry Poppy Seed Dressing to taste

For serving a large crowd, toss all the salad ingredients in a large serving bowl and add dressing to taste. For individual servings, arrange ingredients on plates and serve the dressing on the side. Makes about 8 side dish servings and 4 main dish servings.


Berry Poppy Seed Vinaigrette
1/2 c. white wine vinegar
1/2 c. honey (or sugar)
1-2 cloves garlic
1 tablespoon grated onion
1 tsp. kosher or other coarse salt
About 10 cracks of freshly ground black pepper
1 c. raspberries, blackberries, or strawberries
2/3 c. oil
1 1/2 tsp. poppy seeds

Combine the vinegar, honey, garlic, onion, salt, pepper, and berries in the jar of a blender. Blend until smooth and then, with the blender running, add the oil in a steady stream. Turn off the blender and whisk in the poppy seeds. If possible, refrigerate for at least an hour before serving.

This dressing will last in your fridge about as long as the berries they are made with. So, if you want a good indicator, leave a berry or two in the fridge and about the time it starts wilting, you know your dressing is about done.

SOURCE: Our Best Bites

Linked to...
Recipe Swap Thursday @ Prairie Story

Monday, July 25, 2011

Chicken Parmesan


Back when my husband and I were first married, I used to make chicken parmesan often; well, my version of it anyway. It was also my favorite meal to take to my friends who had just had a baby. For some reason, over the years, I stopped making it. Then a while back I saw this version, bookmarked it and it still took me forever to try it! Call me crazy because this stuff is CRAZY good.

I'm not really a fan of fried foods, although chicken parmesan is traditionally fried. However, this version is baked, after sauteing the bread crumbs in olive oil, still giving it a crunchy texture and keeping the chicken moist and tender. For me, the flavors and seasonings are SPOT ON. There's a good balance without being overpowering. You're definitely going to want to make this soon. I will be keeping it in my monthly rotation for a while, if we ever get sick of it.

Chicken Parmesan
1 1/2 cups panko breadcrumbs
1 tbsp. olive oil
1/2 cup grated Parmesan cheese, plus extra for serving
1/2 cup all-purpose flour
1 1/2 tsp. garlic powder
1 Tbsp. salt
1/2 tsp. pepper
2 large eggs
cooking spray
2 large boneless, skinless chicken breasts, butterflied and cut into halves (4 pieces total)
2 cups marinara sauce, warmed
about 1/2 cup shredded mozzarella cheese
1 tbsp. minced fresh basil
Hot cooked spaghetti noodles

Preheat the oven to 475 degrees F. Combine the breadcrumbs and oil in a 12-inch skillet and toast over medium heat until golden, stirring often, about 10 minutes. Spread the breadcrumbs in a shallow dish and allow to cool slightly; when cool, stir in the Parmesan.

In a second shallow dish, combine the flour, garlic powder, salt and pepper together. In a third shallow dish whisk together the eggs.

Line a rimmed baking sheet with foil and spray the foil with vegetable oil spray. Pat the chicken dry with paper towels. Lightly dredge each chicken piece in the flour to coat completely, shaking off the excess. Then dip into the eggs and finally coat with the breadcrumb mixture. Press on the breadcrumbs to make sure they adhere. Place the chicken pieces on the prepared baking sheet.

Bake until the chicken is no longer pink and feels firm when pressed with a finger, about 15 minutes. Remove the chicken from the oven. Spoon 2 tablespoons of marinara sauce over the top of each piece of chicken and top with 2 tablespoons of the shredded mozzarella. Return the chicken to the oven and continue to bake until the cheese is melted, about 5 minutes. Sprinkle with the fresh basil and serve as desired, with extra Parmesan and marinara sauce on a bed of hot cooked spaghetti.


SOURCE: Annie's Eats

Linked to...
It's a Keeper Thursday @ It's A Keeper
Related Posts Plugin for WordPress, Blogger...